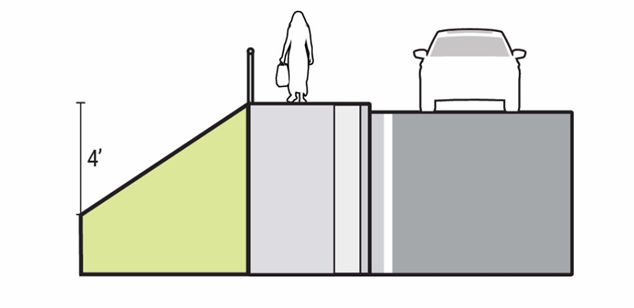
Section 3: Pedestrian Facilities
This section discusses the features and design criteria for pedestrian facilities and includes the following subsections:
- Anchor: #WHRMIHCR
- 7.3.1 General Anchor: #TCOOTVVC
- 7.3.2 Elements of Design Anchor: #ETCMSLTN
- 7.3.3 Linear Pedestrian Facilities Anchor: #YARVXUEW
- 7.3.4 Curb Ramp Design Anchor: #GRPTEBTL
- 7.3.5 Driveway Design Considerations Anchor: #IHGMCSLM
- 7.3.6. Intersections and Crossings Anchor: #LKXJCOGL
- 7.3.7 Overcrossings and Underpasses Anchor: #WJEDFRIF
- 7.3.8 Work Zone and Temporary Traffic Control Pedestrian Accommodations Anchor: #QSMKXFUO
- 7.3.9 Lighting Anchor: #VJVJHFDK
- 7.3.10 On-Street Parking Anchor: #MDIKMSHE
- 7.3.11 Transit Access Anchor: #WBNWQHKE
- 7.3.12 Railings Adjacent to Steep Slopes Anchor: #HDJYULWX
- 7.3.13 Additional Considerations Anchor: #HCYRMENI
- 7.3.14 Micromobility Vehicles
7.3.1 General
7.3.1.1 Purpose
The purpose of this Pedestrian Facilities section is to provide designers of roadways with tools and knowledge for planning and designing pedestrian facilities and other elements of the roadway that impact pedestrian safety and travel. These design decisions must serve people of all ages and abilities, including people too young to drive, who cannot drive, and people who choose not to drive.
For the purpose of this chapter, “pedestrians” are defined as people traveling by foot or using a mobility device, such as a wheelchair or motorized wheelchair, to assist in their travel. The range of design users and their differing characteristics are discussed in Section 7.3.2.1.
7.3.1.2 Design Imperative - Safety
Safety is a key factor in planning and design of roadway facilities for pedestrians as they are particularly vulnerable street users. Texas Administrative Code (TAC) Title 43 §15.122(2)(A) specifies that:
“Safety will be considered throughout the project development process. Each type of project will be evaluated, appropriate engineering studies will be completed, and appropriate design guidelines will be utilized with sound engineering judgment in order to accomplish the purpose of that particular transportation project. Safety is integral to properly engineering each project to address the anticipated needs and conditions.”
The provisions of this chapter direct designers to consider geometric and operational features that will benefit pedestrians by reducing the likelihood of crashes and reducing the severity of crashes when they do occur.
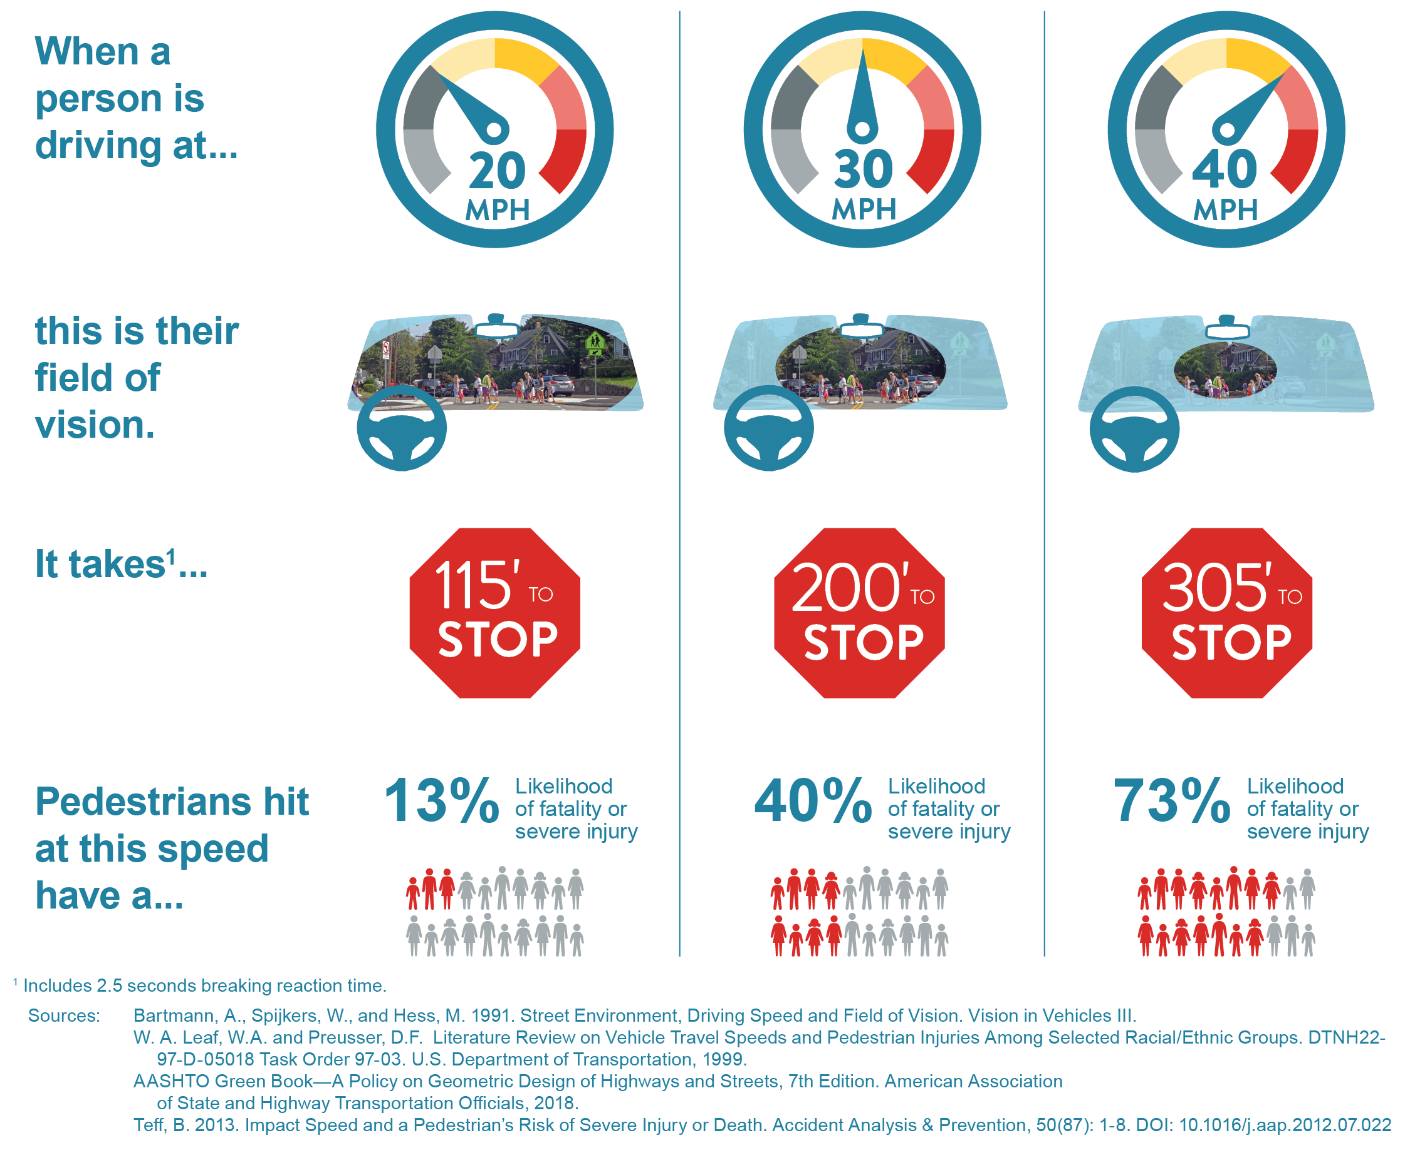
As motor vehicle speeds increase, the risk of serious injury or fatality for pedestrians in the event of a crash also increases. (See Figure 7-1. Note that Figure 7-1 is for information purposes only based on the sources referenced. Actual stopping distances are based on many conditions such as roadway terrain, weather conditions, vehicle braking, tire design, and the human factor.) When pedestrians are expected, especially on high speed roadways, the separation of pedestrians from motor vehicle traffic, and the design of intersections that reduce motor vehicle speeds at conflict points and provide greater visibility of pedestrians must be considered. For the purpose of pedestrian guidance, the designated vehicular speeds will be the higher of the design speed or posted speed.
Designers should be aware of and incorporate findings from Road Safety Assessments being conducted by District staff and local jurisdictions for TxDOT facilities. These reports may contain infrastructure recommendations to improve roadway safety related to pedestrian travel that could drive the selection of specific aspects of project design.
Figure 7-1. Speeds and the Risk of Serious Injury to Pedestrians.
7.3.1.3 Relationship to Other Policies, Laws, and Regulations
This design chapter is intended to support and comply with existing state and federal guidance. Under 23 U.S. Code 217(g)(1) it states, “Bicycle transportation facilities and pedestrian walkways must be considered, where appropriate, in conjunction with all new construction and reconstruction of transportation facilities, except where bicycle and pedestrian use are not permitted.”
Furthermore, this guidance is supported by FHWA’s Bicycle and Pedestrian Planning, Program, and Project Development guidance:
“Bicycle and pedestrian needs must be given “due consideration” under Federal surface transportation law (23 U.S.C. 217(g)(1)). This consideration should include, at a minimum, a presumption that bicyclists and pedestrians, including persons with disabilities, will be accommodated in the design of new and improved transportation facilities. In the planning, design, and operation of transportation facilities, bicyclists and pedestrians should be included as a matter of routine, and the decision to not accommodate them should be the exception rather than the rule.”
On March 11, 2010, a federal policy statement on Bicycle and Pedestrian Accommodations Regulations and Recommendations was signed by U.S. DOT. Recommended actions encourage the incorporation of “safe and convenient walking and bicycling facilities into transportation projects. Every transportation agency, including DOT, has the responsibility to improve conditions and opportunities for walking and bicycling and to integrate walking and bicycling into their transportation systems. Because of the numerous individual and community benefits that walking and bicycling provide — including health, safety, environmental, transportation, and quality of life — transportation agencies are encouraged to go beyond minimum standards to provide safe and convenient facilities for these modes.”
Inclusion of pedestrian facilities in non-maintenance transportation projects is specified in the Texas Administrative Code Title 43, Part 1, §15.120-122. These sections identify design considerations for transportation projects that “involve the construction, reconstruction, rehabilitation, or resurfacing of a highway, other than a maintenance resurfacing project.” These provisions apply to projects where TxDOT has design and construction or funding responsibilities. §15.122(1)(E) states “The department […] must consider the following factors when developing transportation projects: the access for other modes of transportation, including those that promote physically active communities.” Further, §15.122(2)(D) states, “The factors provided in paragraph (1) of this section will be assessed when developing transportation projects. (D) Access for other modes of transportation will be considered during the project development process by developing plans and projects that contain, where appropriate, interconnections with other transportation facilities, including bicycle transportation facilities, pedestrian walkways, and trails.”
7.3.1.3.1 Accessibility
Where pedestrian use is permitted, roadway designs and alterations must comply with accessibility requirements established by the Americans with Disabilities Act (ADA) Standards (2010) adopted by the U.S. Department of Justice (DOJ), the ADA Standards (2006) adopted by the U.S. Department of Transportation (DOT), Proposed Accessibility Guidelines for Pedestrian Facilities in the Public Right-of-way (PROWAG), and the Texas Accessibility Standards (TAS). While the ADA Accessibility Guidelines (ADAAG) are the current enforceable federal regulations implementing the Americans with Disabilities Act (ADA), these pertain mostly to accessible design at public facilities and their grounds. Since the ADAAG does not adequately address features unique to public rights-of-way, the draft 2011 PROWAG was developed. The PROWAG has not been finalized by the U.S. Access Board nor adopted by the DOJ or the DOT so they are not enforceable standards. They do provide a useful framework to meet TxDOT’s obligations to make our programs, services, and activities in the public right-of-way readily accessible and useable by all individuals including those with disabilities. The TAS provides some criteria on curb ramp design that echoes that included in PROWAG.
The TAS is issued by the Texas Department of Licensing and Regulation (TDLR) under the authority of Texas Government Code, Chapter 469. The standards are intended to be consistent to those contained in the DOJ ADA Standards (2010) and are generally the same except as noted. Both TAS and DOJ ADA Standards (2010) provide some criteria on curb ramp design that echoes that included in PROWAG.
As of May 15, 2017, changes to the Texas Administrative Code Title 16, Part 4, §68.102 allow the Texas Department of Licensing and Regulation (TDLR) to accept compliance with PROWAG in lieu of TAS for projects in the public right-of-way. Because the FHWA encourages the use of PROWAG as best practice, TxDOT designers must use PROWAG to achieve accessible design requirements in the public right-of-way. TAS and DOJ ADA Standards (2010) must be used for design and construction of buildings and sites such as TxDOT buildings, Safety Rest Areas, etc. A request for a design variance for any deviations from the applicable PROWAG, or if applicable, TAS requirements must be submitted to the TDLR for approval.
Throughout this section, PROWAG, Supplemental Notice of Proposed Rule Making (SNPRM), and other ADA-related guidance are generally referred to as “pedestrian accessibility guidelines,” except when the reference is to a specific document or regulation.
Further detail on the design implications of compliance are provided in Section 7.3.2.2.
7.3.1.3.2 Key Pedestrian Laws and Definitions
The Texas Transportation Code, Title 6 define laws associated with pedestrian facilities and pedestrian right of way (motorists, Chapter 545 and pedestrians, Chapter 552). The following is a summary of critical elements of these statutes which impact the design, operation, and use of pedestrian facilities on or crossing public roadways.
Marked and Unmarked Crosswalks (Texas Transportation Code §541.302)
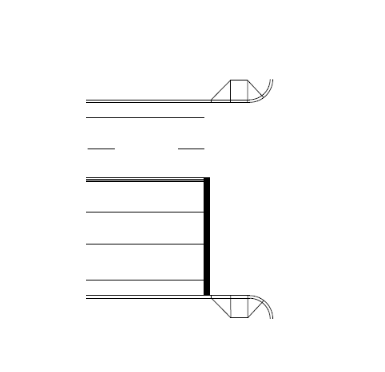
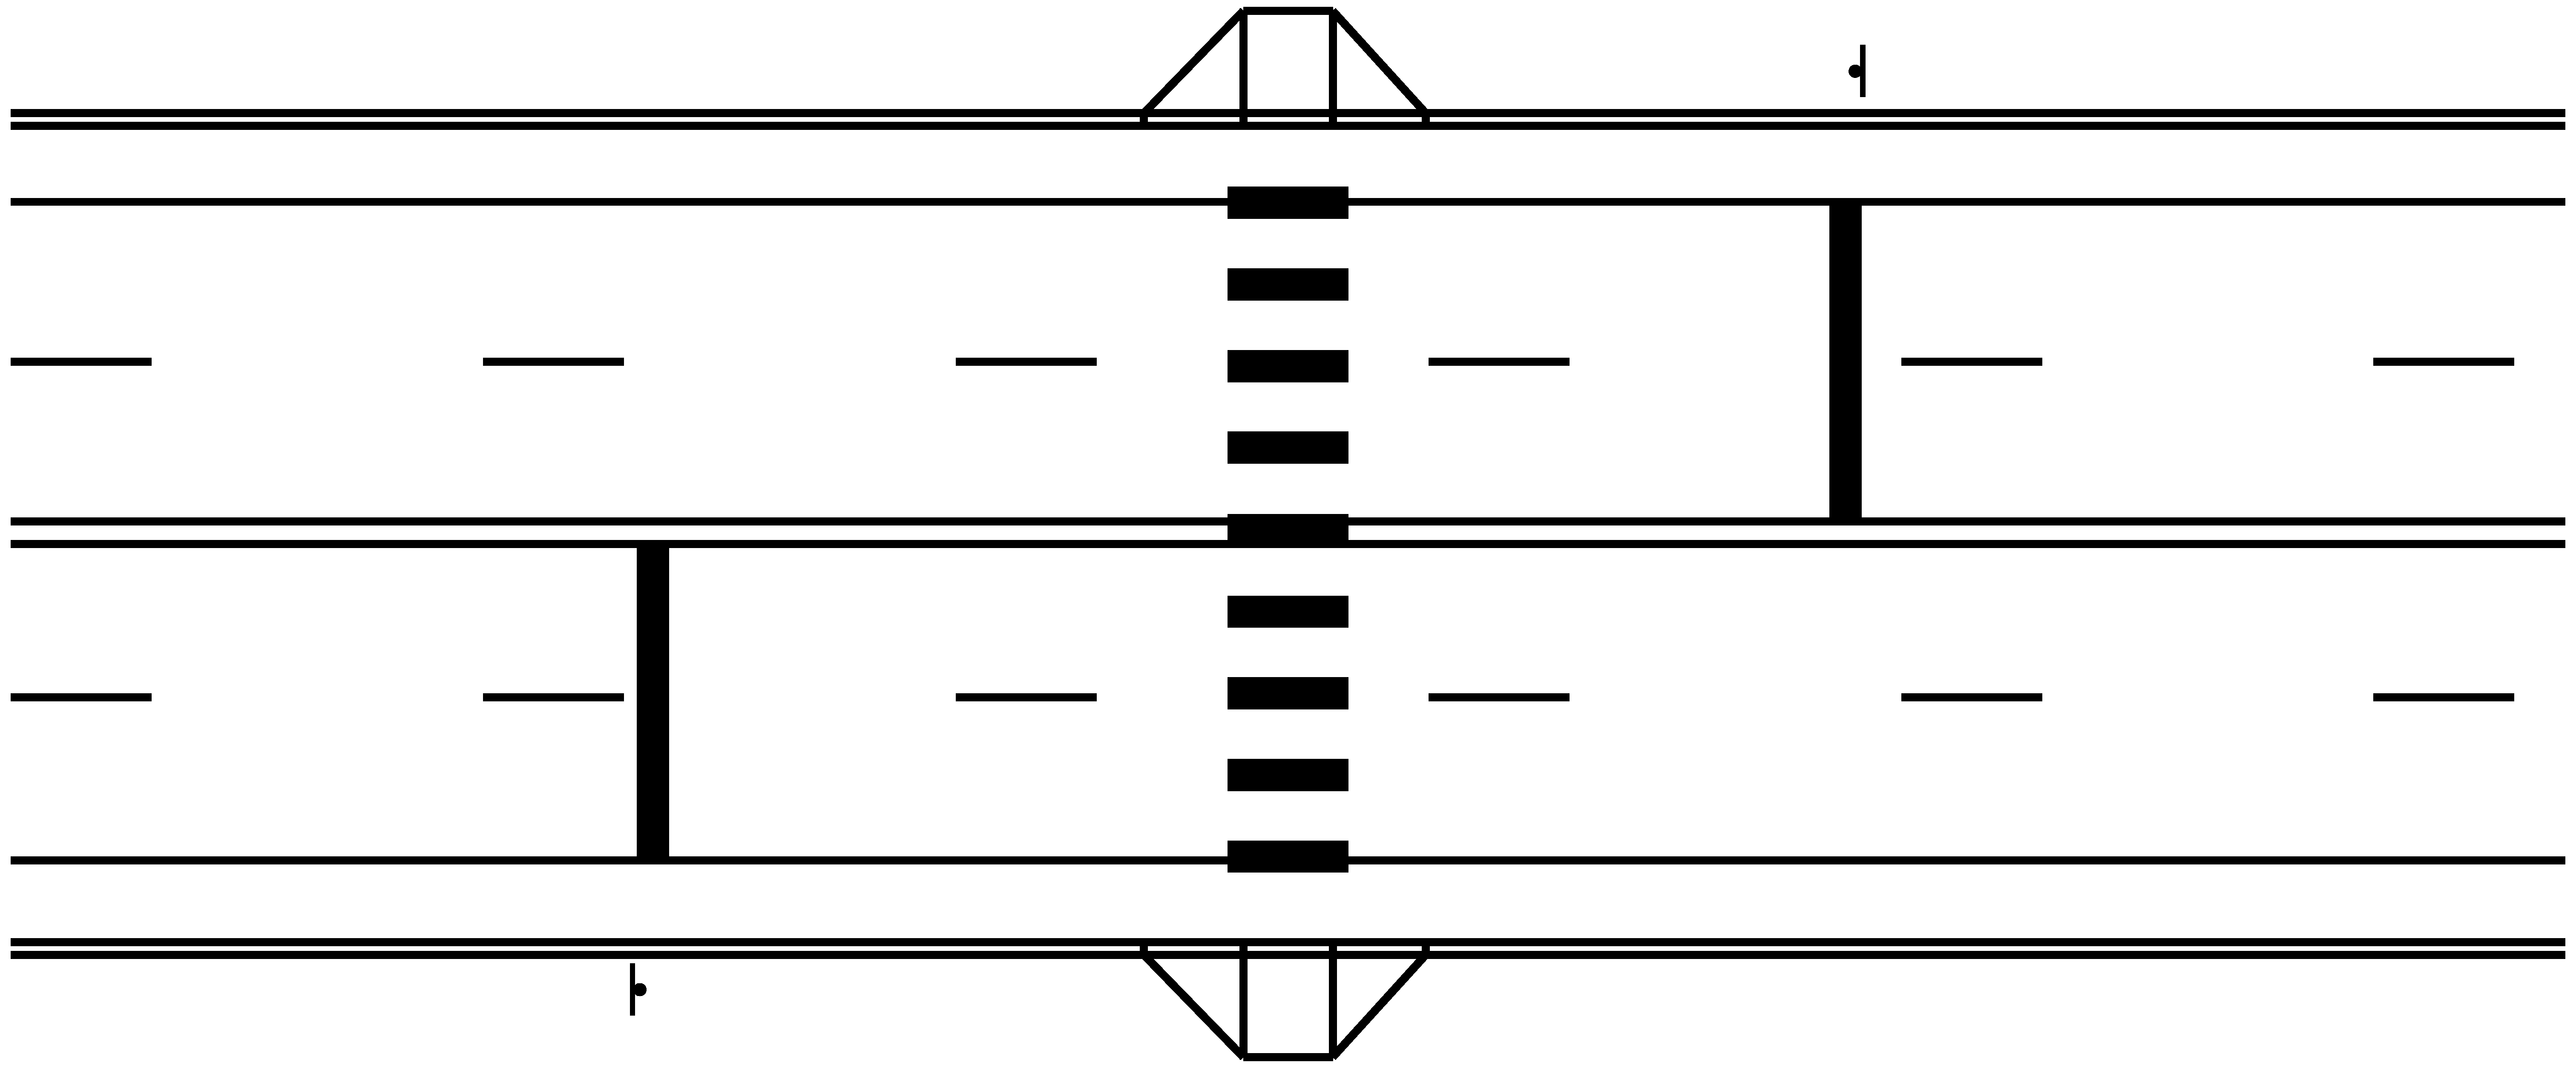
Texas law defines a marked crosswalk as a pedestrian crossing that is designated by pavement markings. It also defines an unmarked crosswalk as the extension of a sidewalk or edge of the roadway where sidewalks are not provided across intersecting roadways. See Figure 7-2 below for location of unmarked crosswalk at an intersection. At midblock locations, unmarked crosswalks do not exist, and a crosswalk must be marked to legally establish the crosswalk. Crosswalks are marked to encourage pedestrian use of a crossing or to legally establish a crosswalk at midblock locations (see Figure 7-2).
Figure 7-2. An Unmarked Crosswalk Exists at an Intersection as the Extension of the Sidewalk or Edge of Roadway Across the Intersecting Street, Regardless of the Presence of a Pedestrian Access Route.
Right of Way at Street Crossings
Motorists must stop and yield the right of way to pedestrians who are lawfully within crosswalks at:
All marked or unmarked unsignalized intersection crossings unless pedestrians are legally prohibited (Texas Transportation Code §552.003)
All marked or unmarked signalized intersection or midblock crossings where pedestrians enter the crossing on the WALK pedestrian phase or, in the absence of pedestrian signals, on the green phase for the parallel vehicular traffic (Texas Transportation Code §552.002)
In all locations, a pedestrian may not suddenly leave a curb or other place of safety and proceed into a crosswalk in the path of a vehicle so close that it is impossible for the vehicle operator to stop and yield.
Pedestrians must yield right of way to motorists at all unsignalized unmarked midblock locations and they are obligated to cross at marked crosswalks at an adjacent intersection if signals are in operation (Texas Transportation Code §552.005).
Use of Pedestrian Facilities
The law requires pedestrians walking along the roadway to walk on the left side of roadway facing traffic where sidewalks or other pedestrian facilities are not provided. Pedestrians are legally required to yield the right-of-way to all vehicles in these locations. Motorists must also exercise “due care” to avoid colliding with any pedestrian.
Where a sidewalk, or shared use path (sidepath) is present and accessible to pedestrians, the pedestrians are required to use those facilities. Due to the need of facilities designed for pedestrians to meet the respective ADA requirements (cross slope requirements, etc.), shoulders generally should not be used as pedestrian accessible routes. Other options should be pursued when designing pedestrian accessible routes.
7.3.1.4 Definitions:
- Anchor: #TTDJGHEQ
- Pedestrian Access Route (PAR). A continuous and unobstructed path of travel provided for pedestrians with disabilities within or coinciding with a pedestrian circulation path. Anchor: #VYHGCNGY
- Pedestrian Circulation Path. A prepared exterior or interior surface provided for pedestrian travel in the public right-of-way. Anchor: #YHTGEGLV
- Public Right-of-Way Accessibility Guidelines (PROWAG). Guidelines from the US Access Board that address access to and on public streets, sidewalks, curb ramps, signals, on-street parking, crosswalks, and other public right-of-way components. See access-board.gov/prowag for more info.
7.3.1.5 Provision of Pedestrian Facilities
Based on TxDOT Administration guidance given for emphasizing pedestrian accommodations, pedestrian facilities must be considered for all types of transportation projects within urbanized settings. Therefore, the inclusion of these facilities must be considered when a project is scoped, with input from the local cities, metropolitan planning organizations, locally adopted bicycle and pedestrian plans, and the public, when applicable.
It is recommended to plan and design a project as if a pedestrian access route will be constructed, even if there is no need at the time of design. Extend culverts, acquire right-of-way, design intersections to allow for accessible crosswalks, and locating utilities and drainage systems to accommodate pedestrian systems. This will reduce the complexity and cost of future pedestrian infrastructure retrofit projects. It is difficult and costlier to retrofit pedestrian facilities when they were not considered in the initial design.
Site conditions sometimes make it difficult or impractical to meet certain accessibility requirements. In these situations, compliance is required to the extent practical in all other elements of design. Any non-compliant conditions must be documented with justification for non-compliance and must be included in the TxDOT ADA Transition Plan. For additional information on the TxDOT ADA Transition Plan contact the Landscape Architecture Section of the Design Division.
7.3.1.5.1 Sidewalks
Sidewalks, or a shared use path in cases where bicycle and pedestrian travel are intended to be accommodated together, must be provided in urbanized settings on:
- Anchor: #RFPTTDVI
- Full reconstruction projects; Anchor: #BNLDHWHU
- New construction projects; Anchor: #BYLTMSXO
- Projects within existing right-of-way that include pavement widening; Anchor: #TWWJSRDO
- Facilities that are part of a locally adopted sidewalk planning document; Anchor: #LGDIJCWD
- Facilities where there is evidence of
pedestrian traffic:
- Anchor: #HYDNAIJM
- Pedestrians are observed; or Anchor: #ILKPOYKM
- There is evidence of a beaten path; or Anchor: #EJTLHMXL
- There is significant potential for pedestrians to walk in the roadway.
Anchor: #OBXKUBVN - Facilities having existing pedestrian features; Anchor: #QNKOCVAP
- Facilities located on a route to school(s); or Anchor: #MTVLDGPW
- Facilities located on a transit route. All transit stops must be made accessible.
If it is determined that sidewalks will not be included in the project, then justification must be provided in the environmental document for not installing sidewalks. For the purposes of this guidance, “urbanized settings” include urban, urban core, suburban, and rural towns.
Although pedestrians are legally authorized to use the shoulder of the road for travel, it is preferable to provide accessible sidewalks in areas of known pedestrian activity or areas with increased development. A shoulder is not considered or designed to be a PAR.
7.3.1.6 Project Development
Planning for pedestrian and multimodal facilities must occur early and continuously throughout project development and must follow the TxDOT Project Development Process Manual. Early consideration of pedestrian facility design during the project development process is necessary to allow the active transportation network to be fully integrated into the overall transportation system.
The following items must be evaluated during project development:
- Anchor: #FFUJSOFO
- Sidewalks; Anchor: #KXWEDULD
- Curb ramps; Anchor: #GYRLTCEE
- Driveway crossings; Anchor: #GADOUIMC
- Vertical surface discontinuities not covered by routine maintenance operations; Anchor: #PKRXYLYR
- Accessibility compliance of existing traffic signal systems; Anchor: #HTHRKYEQ
- Transit stops (through coordination with local transit authority); Anchor: #SBBHQBHK
- Railroad crossings; Anchor: #POOVLMJC
- Installation of new, or upgrades to, accessible pedestrian signals and push buttons; Anchor: #WDQDYAKH
- Restriping existing crosswalk or other pavement markings; Anchor: #ILXJJPDB
- Adequate vertical clearance; and Anchor: #XJNGIYSD
- Other, as applicable
Considerations will differ between construction/reconstruction projects, and rehabilitation and resurfacing projects. Consideration of the following elements involves an assessment of whether the pedestrian facility and other roadway elements:
- Anchor: #FNQMWTAR
- Are compliant with ADA standards; Anchor: #UASDRXXG
- Should be included in the project; and/or Anchor: #VDHXIQCY
- Should be upgraded or maintained as part of the project. Anchor: #BROCVOFY
- Altered by the original scope of the project (per the FHWA/DOJ joint technical memo defining alterations and maintenance activities).
Further detail on specific elements is included below:
- Anchor: #XRYSEBKB
- Sidewalks
Suitability of width to context, while adhering to minimum width standards per accessibility guidelines (volume of expected users, see Section 7.3.3.2).
Suitability of placement to context (characteristics of adjacent roadway, see Section 7.3.3.1).
- Anchor: #JNUGDRHG
- Curb ramps
Provision of curb ramps during resurfacing projects.
Determination of the feasibility of filling gaps between existing ramps and nearby sidewalk segments that are disconnected from the street corner.
- Anchor: #YNEOLXNW
- Transit stops (through coordination with local transit authority)
Evaluate existing transit stop locations for crossing improvements.
Identification of isolated locations for potential relocation or to better serve with pedestrian route.
7.3.1.7 Maintenance and Operation
Project completion and ADA compliance of pedestrian facilities does not end at construction project closeout. Continuous maintenance is required to enable the pedestrian facilities to remain functional for every pedestrian. Maintenance of the pedestrian access route (PAR) includes, but is not limited to:
- Anchor: #KFPELQUY
- Cleaning silt and debris that accumulate in ramps and on sidewalks; Anchor: #TEXOEVPL
- Removing vegetation overgrowth in the pedestrian zone; Anchor: #GSBAWHHP
- Repairing or replacing noncompliant surfaces due to settling, frost heaving, or root heave issues; Anchor: #MUQYWXSA
- Replacing fading crosswalks and pavement markings; Anchor: #WSKLUUGV
- Replacing worn detectable warning surfaces; Anchor: #UYNUJQHP
- Replacing missing or faded pedestrian signage; Anchor: #MUWVSJTM
- Maintaining 80” vertical clearance, 84” for signs, in pedestrian circulation path; and Anchor: #SHYYAPCS
- Adjusting pedestrian crossing signal timing with changes in traffic demands.
Pedestrian facilities should be incorporated into maintenance plans or agreements to maintain ADA compliance and general pedestrian safety and comfort.
Anchor: #i12168797.3.2 Elements of Design
The following sections identify and describe the design user for pedestrian facilities and accessibility requirements. Principles specific to the design of linear pedestrian facilities, and crossings and intersections appear in their respective Sections 7.3.3.1 and 7.3.6.1.
7.3.2.1 Design User
The design user or “design vehicle” for pedestrian facilities must be a pedestrian relying on the use of a wheelchair, cane, crutches, or other equipment for use with navigating pedestrian facilities. If a design works well for people with disabilities, it generally works better for everyone. Designers should also consider the needs of pedestrians walking side by side, or using additional devices, such as a double-wide stroller.
7.3.2.1.1 User Characteristics
Designing a pedestrian facility must consider the basic principles of safety and comfort, as well as human factors like physical abilities, age, height, experience, and ability to perceive and react to potential conflicts. This focus on people’s varied abilities to travel as a pedestrian should be the basis for identifying the design user profiles that will inform key elements of design.
7.3.2.1.2 Mobility and Assistive Devices
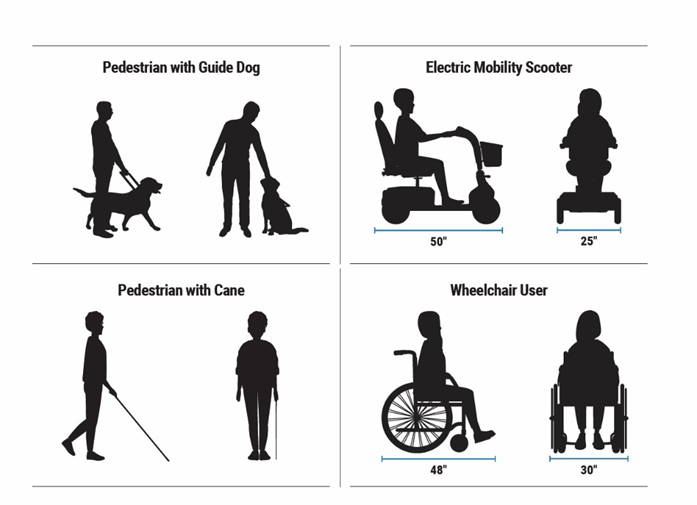
Many pedestrians use varied types of mobility and assistive devices on a regular basis, while others may have temporary mobility disabilities that require them to use an assistive device. Some of the types of devices that are commonly used on pedestrian facilities are shown in Figure 7-3 below. These devices impact the spatial needs of pedestrians. These include, but are not limited to, the turning capabilities of wheeled mobility devices and the arc sweep of a cane used by someone with limited sight. Recommended dimensions and other specifications for pedestrian facilities in this guide generally meet the needs of these devices, and all meet the State and Federal requirements related to accommodating pedestrians with physical disabilities. See Section 7.3.2.2 for information on accessibility requirements.
Figure 7-3. Mobility and Assistive Devices and Users.
7.3.2.1.3 Walking Speeds
Typical pedestrian walking speeds range from approximately 3 to 4-feet/s. Older people will generally walk at speeds in the lower end of this range. To accommodate most pedestrians, a walking speed of 3.5-feet/s must be used to determine signal timings, with a walking speed of 3-feet/s used where older pedestrians are expected or near schools. See the Highway Capacity Manual for criteria for slower walking speed consideration. See also the Texas MUTCD Part 4 Section 4.E06 with regard to pedestrian signal timing.
7.3.2.2 Accessibility Requirements
As described in Section 7.3.1.3.1 above, projects affecting pedestrian facilities must comply with accessibility requirements established in the PROWAG.
7.3.2.2.1 Pedestrian Access Routes
A pedestrian access route (PAR) is a continuous and unobstructed path of travel to accommodate pedestrians with disabilities within or coinciding with a pedestrian circulation path (a path provided for pedestrian travel). In the public right-of-way, a PAR must consist of one or more of the following components, all meeting PROWAG requirements as described in following sections:
- Anchor: #WTWUKYIB
- Sidewalks and other pedestrian circulation paths, or a portion of sidewalks and other pedestrian circulation paths, including across driveways; Anchor: #NVEGNWWM
- Pedestrian street crossings and at-grade rail crossings; Anchor: #NETLPPSH
- Curb ramps and blended transitions; Anchor: #XESGINSC
- Pedestrian overpasses and underpasses, and similar structures, including any elevators used for their access; Anchor: #CXGFNDGL
- Ramps; Anchor: #IJWOUMEA
- Platform lifts (where elevators or ramps are not feasible); and Anchor: #DFJFQTCW
- Gates.
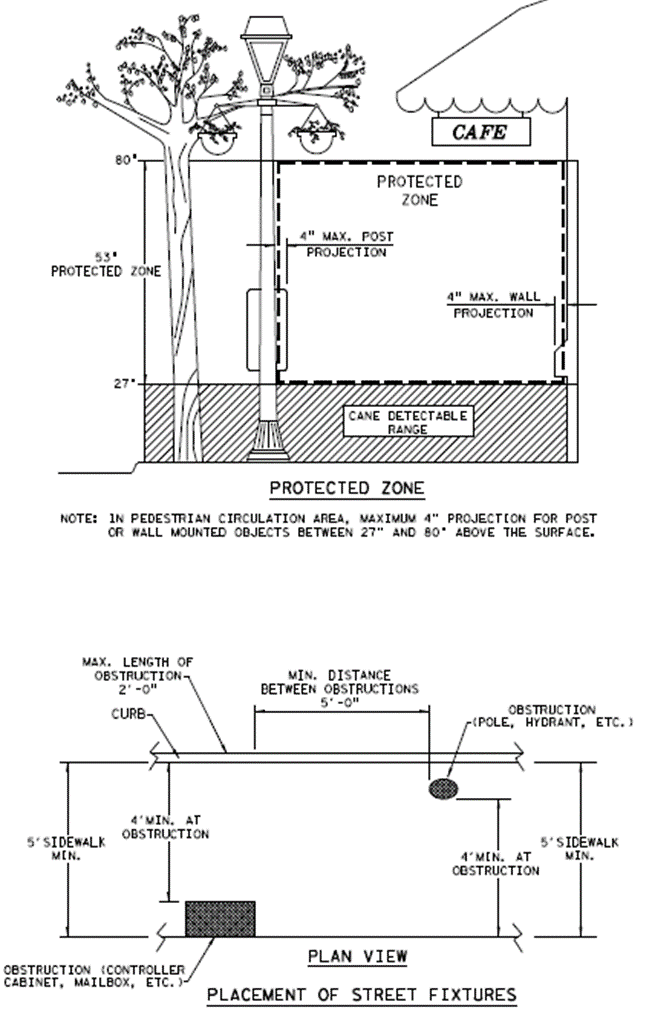
Figure 7-4. The Protected Zone (Top) and The Plan View (Bottom) Regarding Obstacles and Protruding Objects.
In most cases where pedestrian travel is expected (urbanized areas), the PAR along a roadway will be a sidewalk. Where a sidewalk is present, it must provide a PAR and follow PROWAG requirements stated below. In some cases where it is desirable to also accommodate bicycle travel, a shared use path (called a sidepath when along the roadway) will provide the PAR for pedestrians and be shared with bicyclists.
7.3.2.2.2 Clear Width
TxDOT’s standard for the continuous clear width of a PAR is 5-ft minimum, exclusive of the width of the curb, which exceeds the ADA minimum of 4-ft. The clear width of a PAR may be reduced to 4-ft minimum for short distances, including across driveways, but passing spaces must be provided at intervals of 200-ft maximum. Passing spaces must be 5-ft minimum by 5-ft minimum. If a shared use path is provided, the full width of the shared use path must meet grade and cross slope requirements of a PAR. Width requirements for shared use paths are available in Chapter 6 Section 4, Bicycle Facilities.
7.3.2.2.3 Obstacles and Protruding Objects
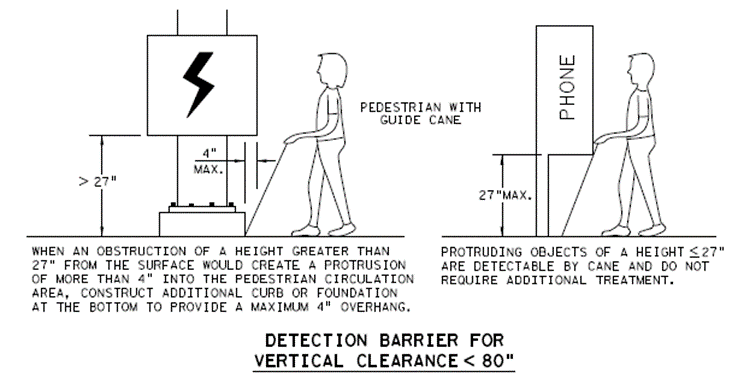
Obstructions are objects along or overhanging any portion of the sidewalk or other pedestrian access route. These include street fixtures (signal and sign hardware, utilities, luminaires) and street furniture (benches, bus stops, drinking fountains, bicycle racks). The sidewalk may be reduced to a minimum of 4-ft around obstructions for a limited distance. Areas with a vertical clearance less than 80-in in height must have a barrier with the leading edge of the barrier at least 27-in in height. Pedestrian circulation paths should be designed with minimal obstructions. If obstructions cannot be removed or relocated, move or widen the pedestrian circulation path to maintain the continuous clear width.
Protruding objects are obstructions that protrude more than 4-in into the sidewalk or other pedestrian circulation path between 27-in and 80-in in height. Protruding objects below 27-in in height are considered detectable by cane. Protruding objects must be removed from the entire pedestrian circulation path or otherwise protected by a minimum 2.5-in-high foundation or curb to reduce the protrusion to the required 4 inch maximum.
For shared use paths, the SNPRM requires a minimum clearance of 8-ft for overhead obstructions, including those on pedestrian bridges.
Figure 7-5. Detection Barriers for Vertical Clearance under 80”.
7.3.2.2.4 Surface, Grade and Cross Slopes
Surface
The surface material of the PAR must be firm and stable and slip resistant. Concrete or asphalt surfaces are traditionally used, but other materials may be used provided they meet accessibility requirements. Avoid rough textures, such as cobblestone and heavily textured pavements as they can cause tripping hazards, confusion for pedestrians using tactile wayfinding cues, and painful vibrations for certain people using wheelchairs. Any gaps or openings must be small enough to prevent passing of a ½ inch diameter sphere. Vertical discontinuities must not be larger than ½ inch. Vertical discontinuities between ¼ inch and ½ inch must be beveled at a 2:1 slope.
Considerations for surfacing of shared use paths are discussed in Chapter 6 Section 4, Bicycle Facilities.
Detectable Warning Surfaces
Detectable warnings indicate to pedestrians, especially pedestrians with vision impairments, the presence of hazards in the line of travel, such as the edge of roadway and railroads, indicating that they should stop and determine the nature of the hazard before proceeding further. The contrasting color and truncated domes are visual and tactile queues for the pedestrians. Section R305 of PROWAG, Section 7.3.5.2.5 of this document, and the current TxDOT Pedestrian Facility Standards detail the application of detectable warnings in the public right-of-way.
Maximum PAR Grade (Within the Street or Highway ROW)
PAR running parallel (or adjacent) with roadway: For a PAR facility running parallel with a roadway with a steep general grade, the PAR grade must not exceed the general grade of the roadway.
PAR (independent alignment): For a PAR facility with an independent alignment, the grade of a PAR must not exceed 8.3 percent. A grade between 5 and 8.3 percent is considered a ramp and must meet ramp requirements.
Pedestrian Crossing: The running slope (measured parallel to direction of pedestrian travel) of a PAR has a maximum grade of 5 percent. Advisory R302.5 Grade (PROWAG) states that grade requirements must be applied to “sidewalks and other pedestrian circulation paths, pedestrian street crossings, and pedestrian overpasses and underpasses and similar structures.”
https://www.access-board.gov/prowag/chapter-r3-technical-requirements/
Where compliance with the above is not practicable due to existing terrain or infrastructure, right-of-way availability, a notable natural feature, or similar existing physical constraints, a variance application must be submitted, and compliance is required to the extent practicable.
Cross Slope
The cross slope of a PAR must not exceed 2 percent. Due to construction tolerances, it is recommended that sidewalk cross slopes be specified in the plans as 1.5 percent to avoid exceeding the 2 percent limit when constructed. The cross slope requirements apply to PARs across bridge structures as well. The design of sidewalks at driveway crossings must also meet these cross-slope requirements.
Crossings at intersections with stop control (stop sign, signal, yield) must have a maximum 2 percent cross slope. Intersections without stop control or yield control must not exceed 5 percent cross slope. Where the PAR is contained within midblock pedestrian street crossings, the cross slope is permitted to equal the street or highway grade.
Accessible Pedestrian Signals
Section R209 of PROWAG specifies that where pedestrian signals are provided at pedestrian street crossings, they must include accessible pedestrian signals and pedestrian pushbuttons complying with sections 4E.09 through 4E.13 of the TMUTCD. This applies to new projects or those where the signal controller and software are altered, or the signal head is replaced (PROWAG Section R209.2). See Section 7.3.5.5.4 of this document for guidance and TRF Division Guidance.
Anchor: #i12172327.3.3 Linear Pedestrian Facilities
Linear pedestrian facilities provide an area for pedestrian travel separated from automobile traffic. For pedestrian comfort and safety, particularly along roadways with high speed traffic, the goal is to maximize the width of the buffer between the sidewalk or shared use path and the adjacent roadway. As such, the desirable placement of the linear pedestrian facility is as close to the State ROW line as practical.
7.3.3.1 Characteristics Contributing to Pedestrian Comfort and Safety Along the Roadway
A variety of roadway characteristics impact pedestrian safety and the user experience for the pedestrians walking along the roadway. Note that the impact of these characteristics on crossings are addressed in subsequent sections.
- Anchor: #ILEMOPUW
- Presence of a sidewalk. Pedestrians are approximately 2.5x more likely to be involved in a crash when there is no sidewalk provided. Anchor: #EHIXDPNA
- Speed of motor vehicle traffic. Pedestrian fatalities rise exponentially as vehicular crash speeds increase. Pedestrians also experience a decrease in comfort when walking adjacent to high speed motor vehicle traffic. Pedestrian comfort and safety can be increased by increasing the width of the buffer zone and/or providing some type of vertical separation such as plantings. A row of parked vehicles between the sidewalk and the roadway also serves to improve pedestrian comfort. Anchor: #FNCQLAPV
- Volume of motor vehicle traffic. Higher motor vehicle volumes also decrease pedestrian comfort along the roadway, especially when operating at speeds above 20 mph. Similar options for separation as described above should be considered when designing sidewalks on higher volume roadways. Anchor: #ESXRGRTY
- Vehicle type. Similarly, a higher percentage of heavy vehicles on the adjacent roadway can decrease pedestrian comfort. Providing greater distance from the roadway or vertical elements may increase comfort.
7.3.3.2 Sidewalk Design on Curbed and Non-Curbed Roadways
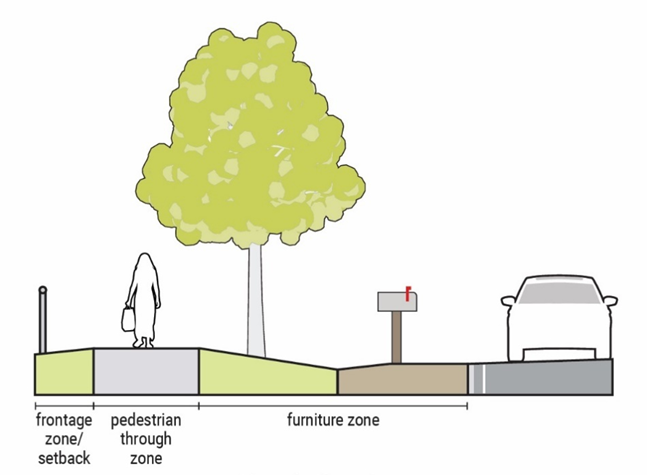
Sidewalk design on curbed roadways includes designing three sidewalk zones: the pedestrian zone, the buffer furniture zone, and the frontage zone.
7.3.3.2.1 Pedestrian Zone
The pedestrian zone, also known as the “walking zone” or pedestrian circulation path. The Pedestrian Access Route (PAR), is the portion of the sidewalk dedicated to ADA accessible pedestrian movement.
The pedestrian zone should be wide enough to accommodate the volume and type of pedestrian traffic expected in the area. The minimum pedestrian zone width is 5-ft. In areas of higher expected pedestrian volumes, such as near schools, parks, in suburbanizing areas, and along transit routes, a pedestrian zone of 6-ft or more is desired in order to provide for side-by-side walking and passing. Pedestrian zone widths of 8-ft or more may be appropriate in downtown commercial areas and in other areas with concentrated pedestrian traffic.
Where necessary to avoid an obstruction or to cross a driveway while maintaining the maximum 2 percent cross slope, the pedestrian zone may be reduced to 4-ft for short distances. Sidewalks less than 5-ft in width must include passing sections of 5-ft x 5-ft no more than every 200-ft.
While sidewalks do not need to be perfectly straight, the pedestrian zone should not weave back and forth in the right-of-way for no other reason than to introduce curves. Meandering sidewalks create navigational difficulties for pedestrian with vision impairments
Curbed Roadways
Where a sidewalk is placed immediately adjacent to the back of curb with no buffer, a minimum pedestrian zone width of 6-ft is desirable and 7-ft preferred to allow additional space for street and highway hardware and allow for the proximity of moving traffic. Where the curb-adjacent sidewalk is in a commercial district, a minimum of 8-ft is preferred to accommodate pedestrian volumes and passenger access from parked vehicles on street.
Uncurbed Roadways
The same width requirements for the pedestrian zone apply to sidewalks on uncurbed roadways. In these cases, sidewalk should be placed between the ditch and the right-of-way line, not between the ditch and edge of the vehicular travelway.
Figure 7-6. An Uncurbed Roadway.
7.3.3.2.2 Buffer (Furniture) Zone
For pedestrian comfort, especially adjacent to high-speed traffic, it is desirable to provide a buffer (commonly called a furniture zone in urbanized areas), between the vehicular travelway and the pedestrian zone.
Curbed Roadways
On curbed roadways, the buffer is the space between face of curb and the edge of the pedestrian zone. Pedestrian zone placement immediately adjacent to the curb should be avoided where at all possible. Buffers provide space for other operational needs in the right-of-way, including signposts, bus stops, parking meters, utility connections, and light poles. They also provide space for plantings and other landscape development which enhance pedestrian comfort through providing shade and a greater sense of buffering and protection from adjacent traffic. See the Landscape & Aesthetic Design Manual for appropriate plant selection and application. Buffers can also allow the pedestrian zone to continue at a constant grade across driveways as described in Section 7.3.4.1.2 and provide for much better curb ramp designs at intersections.
While wider clear zones are appropriate for freeways and high-speed roadways, the AASHTO Roadside Design Guide recognizes that there are practical limitations to clear zones on low-speed curbed streets. See Table 2-12 and Appendix A, Section 2 for clear zone guidance. In urban, urban core, suburban, and small-town rural settings where pedestrian activity is expected, traffic speed is generally lower, and, depending on the context, roadway design may incorporate street furniture and/or plantings to create a sense of enclosure. This provides a traffic calming effect, which may increase comfort and safety for vulnerable road users
For curb and gutter sections, the buffer zone should be at least 4-ft wide measured from face of curb, although more buffer space is preferable. For roadways with higher speed traffic, particularly those with speeds over 35mph, designs should consider providing additional buffer width to protect pedestrians from vehicle traffic and provide a more comfortable walking environment. The respective desirable clear zones from Table 2-12 would be the desirable buffer width.
Uncurbed Roadways
On uncurbed roadways, the buffer zone is defined as the space between the edge of the vehicular travelway pavement and the edge of pedestrian zone sidewalk pavement. The minimum buffer zone is 10-ft for both low- and high-speed conditions. The desirable buffer would be the respective desirable clear zone values from Table 2-12 in Chapter 2.
This space is often the location of drainage ditches. If the ditch has a backslope of 3:1 or steeper, a separation of at least 2-ft should be provided between the top of slope and the edge of pedestrian zone pavement.
At driveways, bus stops, mid-block crossings, and anywhere else where a pedestrian or bicyclist would need to access the sidewalk/sidepath, an at-grade crossing of the ditch is required and may be provided through use of a sidewalk bridge, culvert, trench drain, or other means.
7.3.3.2.3 Frontage Zone
The frontage zone is the area between the pedestrian zone and the property line, typically applicable in areas with buildings directly adjacent to the ROW line.
Curbed Roadways
Frontage zone width may vary between 1- and 2.5-ft depending on building setback requirements and adjacent land uses. A 1-ft frontage zone (resulting in the pedestrian zone being 1-ft off the property/ROW line) provides room for maintenance space; with the 1-ft space, a construction easement will not be necessary if sidewalk maintenance needs to occur. In downtown areas, wider frontage zones may be considered for accommodation of commercial uses such as product displays and outdoor dining seating.
Non-Curbed Roadways
Typical land use context for non-curbed roadways would not necessitate a frontage zone other than for providing maintenance space. Setbacks may effectively function as frontage zones in these areas, separating the paved pedestrian zone from adjacent structures on private property.
7.3.3.3 Shared Use Paths
A shared use path is defined as a multi-use path designed for use by bicyclists and pedestrians, including pedestrians with disabilities. Shared use paths are physically separated from motor vehicle traffic by an open space or barrier and are either within the highway right-of-way or within an independent right-of-way.
Shared use paths are used by pedestrians and must meet the accessibility requirements of the Americans with Disabilities Act (ADA). Paths in the public right-of-way that follow the roadway and function as sidewalks, commonly referred to as sidepaths, should be designed in accordance with the proposed PROWAG, or subsequent guidance that may supersede PROWAG in the future. Shared use paths built in independent right-of-way should meet the draft accessibility guidelines in the Supplemental Notice of Proposed Rulemaking (SNPRM) on Shared Use Paths or any subsequent rulemaking that supersedes the SNPRM. Where pedestrian and bicycle travel are accommodated on separate pathways, only the pedestrian pathway must meet the requirements of the above guidelines.
7.3.3.3.1 Cross Slope
See Section 7.3.2.2.2 for information regarding the accessibility requirements related to cross slope.
7.3.3.3.2 Grade
See Section 7.3.2.2.2 for information regarding the accessibility requirements related to grade.
If the path is at or approaching 5 percent for a significant length (1000-ft or more), this sustained grade would be quite noticeable for a bicyclists or wheelchair user and maximum grade of 3 to 4 percent should be considered. Alternately or in addition to a lower sustained grade, level-graded pull-outs could be provided at strategic locations for users to get out of the travel path to pause or rest, or resting intervals of flatter grades may be provided. Designers may also consider the provision of accessible pedestrian handrails located at the edge of the path to assist pedestrians in traversing steeper grades. See Section 7.3.13 for guidance regarding protective rails adjacent to steep slopes.
Provision of a handrail may impact shared use path width; see Chapter 6 Section 4, Bicycle Facilities for information regarding the impact of handrails on path width.
7.3.3.3.3 Additional Requirements
See the above guidance documents of PROWAG and SNPRM for additional specific requirements for shared use paths that are intended to serve as pedestrian facilities.
More information on shared use paths can also be found in Chapter 6 Section 4, Bicycle Facilities.
Anchor: #i12175697.3.4 Curb Ramp Design
Curb ramps are a fundamental element of the PAR because they form the vital connections between sidewalks and street crossings. Curb ramps are required at all pedestrian crossings, including midblock crossings, unless the crossing is brought to the level of the sidewalk. The TxDOT preferred standard is two curb ramps per corner, each aligning with desired paths of travel (see Section 7.3.5.2.6). All curb ramps must be compliant with PROWAG. Refer to the current TxDOT Pedestrian Facility Standards for further detail on curb ramp design.
7.3.4.1 Curb Ramp Locations
Curb ramps must be installed to connect the pedestrian access routes at each pedestrian street crossing. A pedestrian street crossing is considered to be present if:
- Anchor: #UECLFPJM
- There is a sidewalk or shared use path crossing a curb, Anchor: #RBMJMHLI
- There are pedestrian signal heads or detection buttons indicating pedestrian presence,* Anchor: #QMDMDJXB
- There is a marked crosswalk, or Anchor: #SOJLFRDJ
- There is a school crossing.
*The ADA does not require installation of curb ramps in the absence of a pedestrian walkway with a prepared surface (even when items 3 and 4 on the list above exist).
Curb ramp placement may be affected by the location and placement of streetscape elements and utilities, including inlets. The location of fixed objects (e.g., poles, signal cabinets, etc.) should not limit access for pedestrians and bicyclists using sidewalks and curb ramps. Curb ramps and crosswalks should be designed to drain water away from curb ramps, reducing risk of pooling (and icing) across ramps. The approach to curb ramp landings should minimize the number of movements needed to reach the curb ramp. An excessive number of movements may be hard for impaired pedestrians to detect and maneuver. See Section 7.3.5.1.2 for the design of curb ramps at driveways.
7.3.4.2 Design Considerations
Manhole covers, grates, and obstructions should not be located within the curb ramp, maneuvering area, landings or turning spaces. Curb ramps should not be located where pedestrians must cross drainage structures such as inlets and manholes. In new construction, curb ramp design must consider both the location of the curb ramp and the drainage structures. Additional drainage inlets should be located on the upstream side of all curb ramps where practical in order to avoid running water across the foot of the ramp. Curb ramps must be located away from low points of the curb return. For more information on drainage design, see Chapter 2 Section 7.
7.3.4.3 Curb Ramp Components
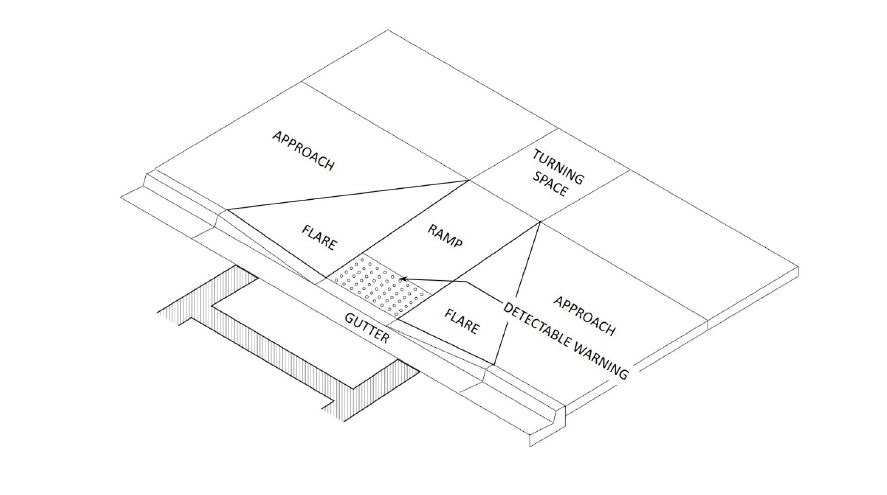
The basic components to the standard curb ramp design are the following (see Section 7.3.4.4, Design Elements, for specifications on each element):
- Anchor: #KMGCEVVS
- Ramp – The ramp is the portion of the curb ramp that pedestrians traverse, delivering them from the crosswalk to the sidewalk. Anchor: #MDGMEFGH
- Turning Space (Landing) – Turning spaces provide an area for mobility device users to maneuver into or out of the curb ramp, or to simply bypass it. Turning spaces are required at the top or bottom of each ramp and have a maximum slope of 2 percent in any direction. Anchor: #VYBAYTEF
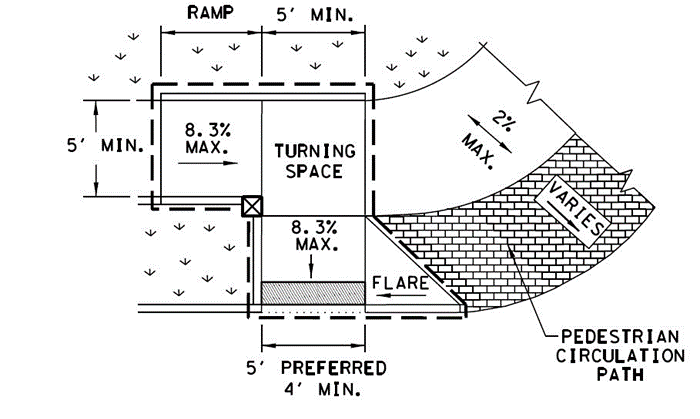
- Flares – Flares are graded transitions from a curb ramp to the surrounding sidewalk. The flares of a curb ramp are not intended to be used by pedestrians using mobility devices. Flares may be seen as a signal to identify the presence of a curb ramp. Flares are required when the pedestrian circulation path crosses the curb ramp, or when the curb ramp is adjacent to a walkable surface. Anchor: #NPTIJEIY
- Gutter – The gutter is the curb and gutter section within the ramp width limits that connects the roadway travelway to the ramp.
Figure 7-7. Curb Ramp Components.
7.3.4.4 Design Elements
7.3.4.4.1 Grade
The grade of a curb ramp (also referred to as the running slope) is the grade measured along the direction of pedestrian travel. The grade of the curb ramp should be a maximum of 8.3 percent (1V:12H). Where the transitioning slope between the sidewalk and roadway is less than 5 percent, it is considered a blended transition.
The grade, in any direction, of flares measured along the back of curb must not exceed 10 percent measured parallel to the curb.
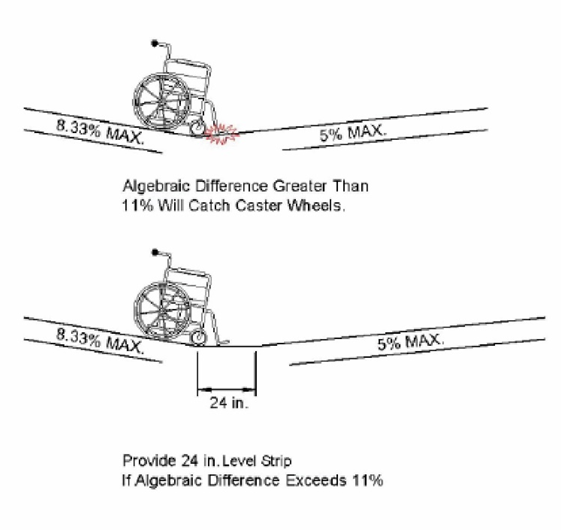
Transitions from the curb ramp to gutter and/or road surfaces must be flush (level) and free of abrupt surface changes. Gutters and/or road surfaces immediately adjacent to curb ramps must have a maximum counterslope of 5 percent toward the curb ramp. However, a rapid change in grade at the base of the curb ramp and gutter may be difficult for wheelchair users if the footrests or anti-tip wheel cannot clear the ground surface. Therefore, the maximum recommended change in grade between a curb ramp and gutter (or road surface) is limited to 11 percent. If the algebraic difference in grade exceeds 11 percent, a 24 in level strip should be provided to transition from the curb ramp to the gutter (or road surface) to avoid tripping concerns (see Figure 7-8).
Figure 7-8. Grade Considerations for Curb Ramps.
7.3.4.4.2 Cross Slope
The curb ramp cross slope is the slope perpendicular to (i.e., across) the direction of pedestrian travel on the curb ramp. The cross slope of the curb ramp should not exceed 2 percent. However at midblock pedestrian street crossings and intersection crossings without stop or yield control, PROWAG will permit curb ramp cross slopes equal to the street or highway grade. It is desirable to keep the cross slope value low because people with mobility disabilities often have difficulty negotiating a grade and cross slope simultaneously. Since the grade of the curb ramp will usually be significant, the cross slope should be minimized; also, the transition from the cross slope on the ramp to the steeper street grade should not be sharp so as to cause unstable conditions for wheelchairs. Transitioning the cross slope of the curb ramp to match the roadway profile behind the curb allows the pedestrian to adjust to the road profile in the safety of the space behind the curb. Transitioning behind the curb also keeps stormwater flow lines intact.
7.3.4.4.3 Width
It is recommended that the curb ramp be the full width of the sidewalk or approaching shared use path. The minimum width of a curb ramp is 4-ft, exclusive of flared sides. Some ramp types may require a minimum width of 5-ft. Refer to the latest TxDOT Pedestrian Facility Standards for ramp types.
7.3.4.4.4 Turning Spaces (Landings)
A turning space is a landing area that allows users to maneuver on and off the curb ramp. Turning spaces may overlap the path of travel for pedestrians who are continuing along the sidewalk and do not want to cross the street. The maximum slope for a turning space is 2 percent in all directions. The minimum dimensions of a turning space are 5-ft x 5-ft. They should be provided at either the top or bottom of the curb ramp depending on curb ramp type or design, and/or whenever a turning maneuver is needed for pedestrians to maintain their orientation to the direction of the ramp.
7.3.4.4.5 Detectable Warnings
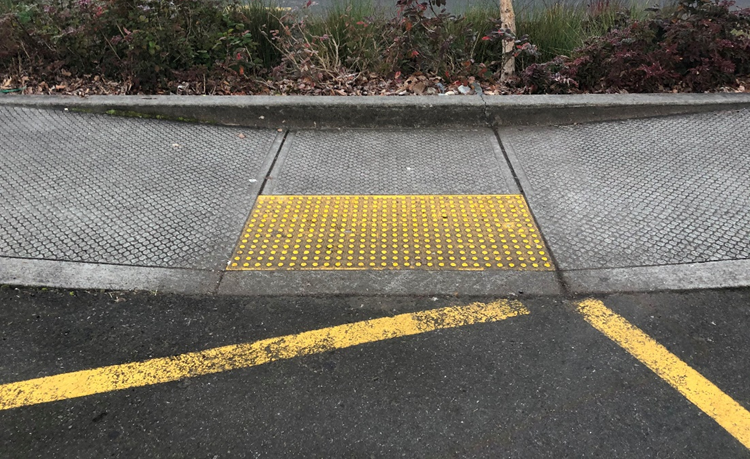
Curb ramps must contain a detectable warning surface that consists of raised truncated domes that comply with PROWAG. Detectable warning surfaces must be used at the following locations on the pedestrian access route:
- Anchor: #BXAWNPLN
- Curb ramps and blended transitions at pedestrian street crossings Anchor: #SBCNPXBH
- Pedestrian refuge islands Anchor: #TTRLDMYJ
- Pedestrian at-grade rail crossings not located within a street or highway Anchor: #QXCGWQVH
- Boarding platforms at transit stops for buses and rail vehicles where the edges of the boarding platform are not protected by screens or guards, and Anchor: #TCXFBGEW
- Where the side of the boarding and alighting areas facing the rail vehicles is not protected by screens or guards
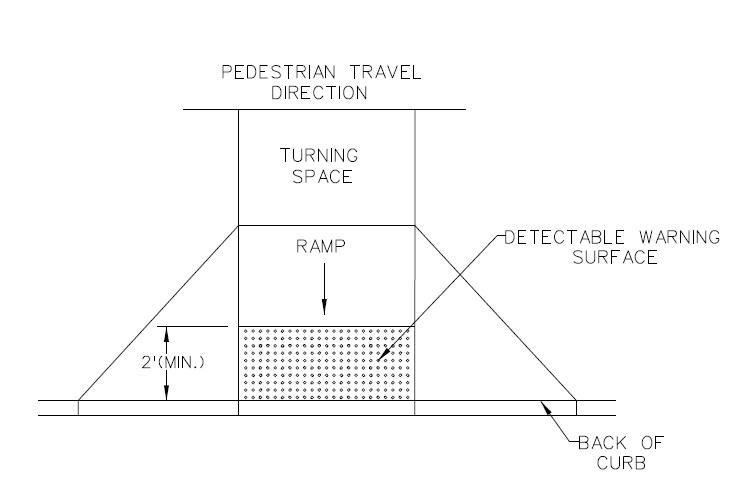
Figure 7-9. Detectable Warning Strips with a Minimum of 2-ft.
Detectable warnings must contrast visually with the adjacent surfaces, either dark on light or light on dark. Detectable warning surfaces must extend a minimum of 2 ft in the direction of pedestrian travel and must extend the full width of the curb ramp or blended transition. Detectable warning surfaces must be placed at the back of the curb or edge of street; detectable warning surfaces may be curved along the corner radius.
Detectable warning materials must meet current TxDOT Pedestrian Facility Standards materials specifications.
7.3.4.4.6 Side Treatments
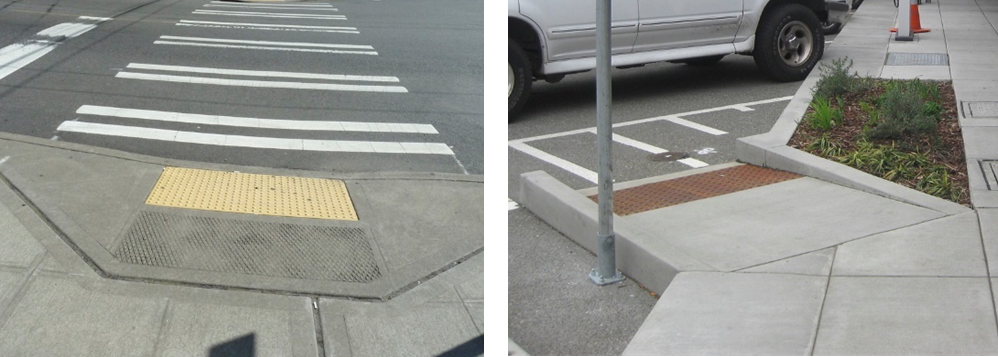
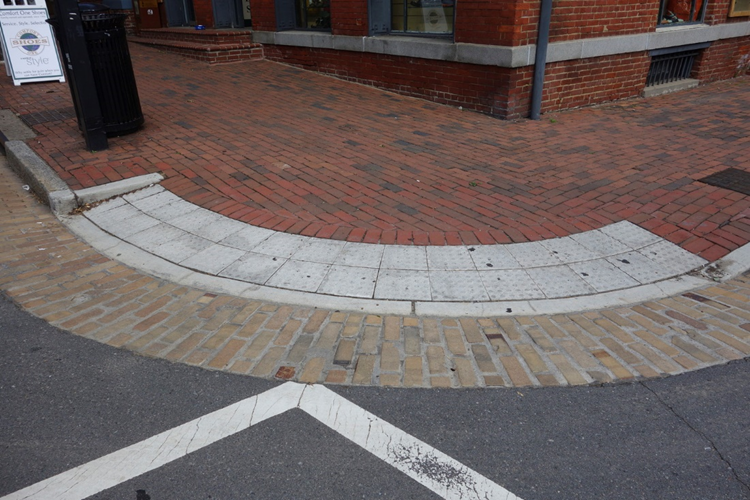
Side treatments of curb ramps include flares and returned curbs. See images below for an example of flares and returned curbs.
Flares
Flares must be provided for curb ramp designs where the pedestrian circulation path crosses the curb ramp. Flared sides should be sloped at 10 percent maximum, measured parallel to the curb.
Returned Curbs
Returned curbs do not use flares, but instead curbs on the sides of the curb ramp. Returned curbs may be used only where pedestrians would not normally walk across the ramp, either because the adjacent surface is planted, substantially obstructed, or otherwise not meant for pedestrian travel.
Figure 7-10. Curb Ramp with Flares (left) and Returned Curb (right).
7.3.4.5 Curb Ramp Types
Curb ramps are classified as perpendicular, directional, parallel, combination or blended transition per TxDOT PED Standards.
Diagonal curb ramps, defined as one ramp serving two crossing directions, are no longer permissible and may only be used where existing physical constraints prevent two curb ramps from being constructed.
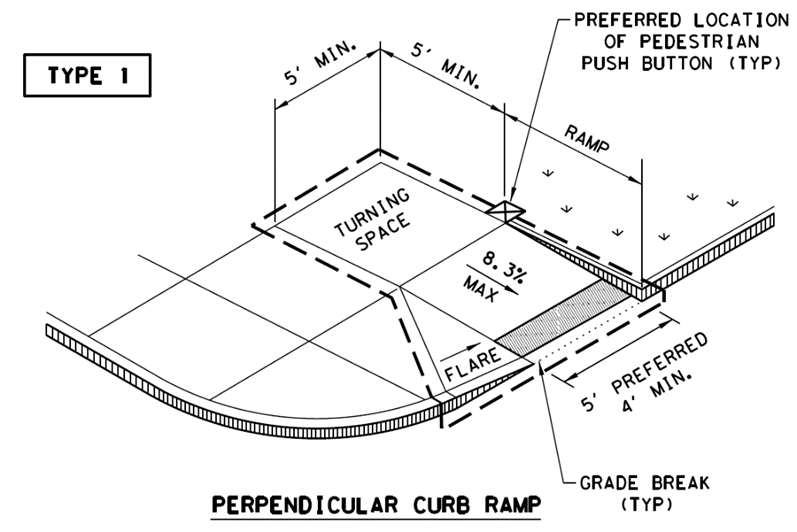
7.3.4.5.1 Perpendicular
Perpendicular curb ramps are the preferred ramps for application over parallel and directional curb ramps, with an adequate landing provided for pedestrians for each approach and the alignment of travel to traffic is generally perpendicular. Where practical, the curb ramp path should be aligned with the crosswalk. At large curb return radii, it may not be possible to provide a curb ramp that is both aligned with the crosswalk and exactly perpendicular to the curb face.
Figure 7-11. Specifications for a Perpendicular Curb Ramp.
7.3.4.5.2 Parallel
Parallel curb ramps have two ramps leading down towards a center level landing at the bottom between both ramps. Since pedestrians must make a turning movement at the bottom of the ramp to align themselves with the street, it is crucial to provide an adequate turning space at the base of the ramp. Parallel ramps are one solution on narrow sidewalks where perpendicular ramps are not feasible. Parallel curb ramps typically include a curb wall at the back of the ramp.
Figure 7-12. Parallel Curb Ramp.
7.3.4.5.3 Additional Sub-Types
Other types of curb ramps include combination curb ramps blended transitions, and ramps at median islands. They are facilities that combine design elements of both perpendicular and parallel curb ramps. Slopes, widths, and other conditions must be consistent with common curb ramp requirements. Combination curb ramps are useful in areas of limited right of way and areas with high sidewalks. Note, the secondary ramp is considered part of the combination curb ramp and may not meet sidewalk ramp requirements.
Figure 7-13. Combination Curb Ramp. Key Ramp Slopes and Turning Space are Maintained.
Blended Transitions
With a blended transition, the sidewalk elevation is lowered to the street level with a gradual change in slope. The maximum grade in the direction of pedestrian travel is 5 percent, provided there is a pedestrian access route at the top of the slope. Otherwise, the maximum slope is 2 percent. Blended transitions without accessible pedestrian signals (APSs) should be used sparingly since they provide limited directionality for pedestrians with vision disabilities.
Figure 7-14. A Blended Transition Curb Ramp.
Curb Ramps at Median and Channelization Islands
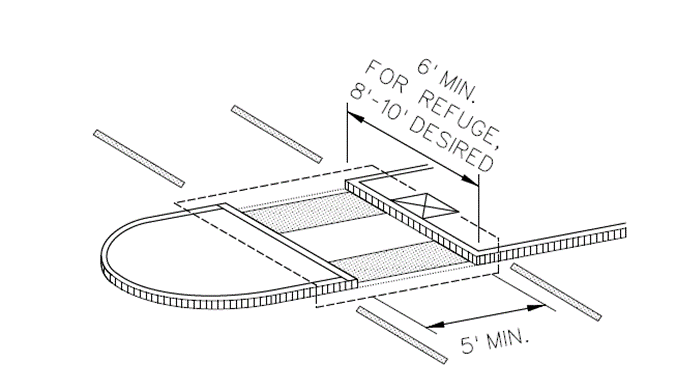
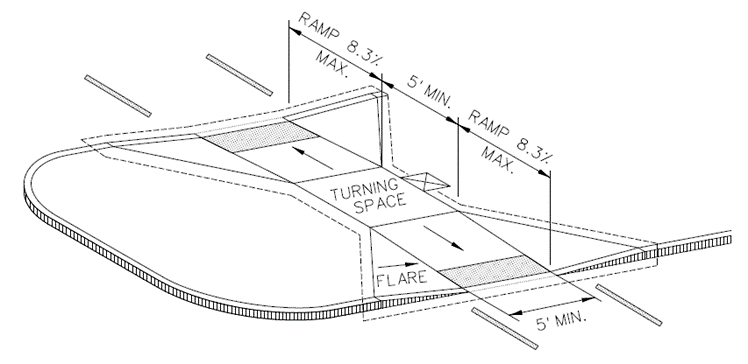
Ramps at raised median islands must have a minimum 5-ft x 5-ft landing between curb ramps. Where it is difficult to provide a 5-ft x 5-ft landing because of space restrictions, consideration can be given to only partially raising the landing above street grade, which allows for shorter curb ramp lengths and a longer landing. Another alternative is to provide a level cut-through. If the width of the median is 6-ft or greater, tactile detectable warnings are still required though no curb ramp is present. For medians less than 6-ft, pedestrian refuge is not available and detectable warnings should not be utilized. These designs are also applicable for channelization islands.
Figure 7-15. Curb Ramp with Level Cut-through at Median.
Figure 7-16. Curb Ramps at a Median.
7.3.4.6 Curb Ramp Evaluation
Curb ramps that meet ADA standards do not need replacement. However, curb ramps that do not meet ADA standards, must undergo evaluation to determine whether and how they will need to be replaced or retrofitted.
Criteria for installing or updating curb ramps include:
- Anchor: #KULRYJYN
- New construction; Anchor: #TQNCAKCF
- New projects that are considered an alteration; Anchor: #SMNFQKVH
- New projects that alter existing sidewalks or prepared surfaces with barriers; Anchor: #EAVXUQNP
- Existing curb ramps that do not meet ADA standards in place at the time that the curb ramps were constructed; Anchor: #XOSKQQKN
- Resurfacing is an alteration that triggers
the requirement to add curb ramps or bring existing curb ramps into
compliance with current standards if it involves work on a street
or roadway spanning from one intersection to another and includes
overlays of additional material to the road surface, with or without
milling. Examples include, but are not limited to the following treatments
or their equivalents:
- Anchor: #KCJDEFPX
- Addition of a new layer of asphalt; Anchor: #WGDHSVWB
- Reconstruction; Anchor: #VIRDICSD
- Concrete pavement rehabilitation and reconstruction; Anchor: #QQESUPKL
- Mill and fill or mill and overlays; Anchor: #NUPNWCWH
- Micro-surfacing and thin lift overlays; or Anchor: #MNDNFSTY
- Cape seals and in-place asphalt recycling.
Maintenance projects do not trigger an evaluation of existing curb ramps and the addition of new curb ramps. Examples of maintenance activities include, but are not limited to the following treatments or their equivalents:
- Anchor: #RSQVWSMS
- Seal coats (chip seals); Anchor: #JLHIXEST
- Fog seals and slurry seals; Anchor: #YWSICWEH
- Joint repairs; Anchor: #JHQPFDVE
- Diamond grinding; Anchor: #MCJYAGIK
- Pavement patching; or Anchor: #UNTQQHLC
- Spot repairs.
7.3.4.7 Design Variance to Curb Ramp Replacement
Where existing physical constraints make it impracticable for altered elements, spaces, or facilities to fully comply with the requirements for new construction, compliance with the ADA is required to the extent practicable within the scope of the project. Variance application must be submitted for any project that does not achieve full compliance.
Anchor: #i12182647.3.5 Driveway Design Considerations
Like intersections, driveways are locations of potential conflict between pedestrians and vehicles. As such, they should be designed to maximize visibility between motorists and pedestrians, slow motor vehicle turning speeds, and provide adequate space for vehicles to queue while stopping and yielding to pedestrians in the driveway crossing. Driveways should be consolidated and/or minimized on streets with anticipated high pedestrian volumes, those with a high density of pedestrian destinations, and commercial streets.
Designers refer to Appendix C for more detailed driveway design guidance.
7.3.5.1 General Guidelines
Accommodating pedestrians and vehicular traffic at the junctions of sidewalks and driveways presents a variety of challenges. Some general principles are:
- Anchor: #NEMTDCSI
- Consider using right-turn deceleration/storage lanes so that right-turning drivers can safely wait in the auxiliary lane, clear of through traffic, while pedestrians are present in, or near, the driveway (see Appendix D). Queuing length should meet the needs of the design vehicle. In locations where a driveway functions as an intersection, pedestrian safety features should be included. These features may include crosswalks, small corner radii to limit turning speeds to 10 mph, and pedestrian signal heads (if signalized) as warranted. Anchor: #FTFYWTCL
- Detectable warnings are not required where minor driveways cross a sidewalk. If the driveway functions as a public street crossing, such as commercial driveways with traffic signals, detectable warnings are required. Anchor: #IEXHQXCH
- Where separator islands are provided between inbound and outbound travel lanes in a driveway, the island must provide pedestrian refuge with a minimum width of 6-ft. See Section 7.3.6.2.1 for the design of pedestrian refuge islands. Anchor: #HLKOLLDA
- Driveways must maintain the PAR as a continuous, ADA grade-compliant, and clearly delineated path to encourage drivers to stop and yield to pedestrians. For example, if the sidewalk is composed of concrete and it is crossing an asphalt driveway, the concrete should be continuous across the driveway. The PAR within the driveway crossing must meet accessibility standards (see Section 7.3.2.2). Anchor: #JXHSRGTK
- Locate sidewalks far enough from the curb, or edge of pavement (4-ft or greater is preferred), to provide a suitable vertical curve transition between the pavement cross-slope and the driveway apron and to allow the driveway to cross the sidewalk at the same elevation as the approaching sidewalk. Anchor: #NYMXOPQO
- Where driveways are closely spaced, consider the use of right-in/right-out driveways to eliminate conflicts between left-turning vehicles and pedestrians. In this case it is recommended that provisions be made for the left-turns only at locations where the vehicular-pedestrian conflict can be safely addressed by appropriate design and traffic control. Anchor: #MPNNXHKA
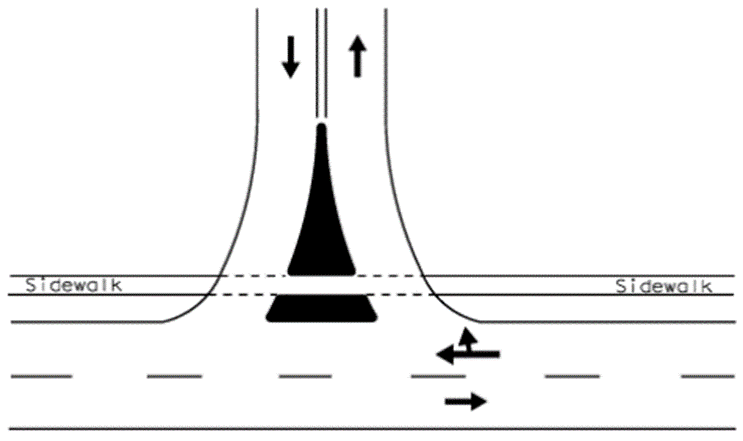
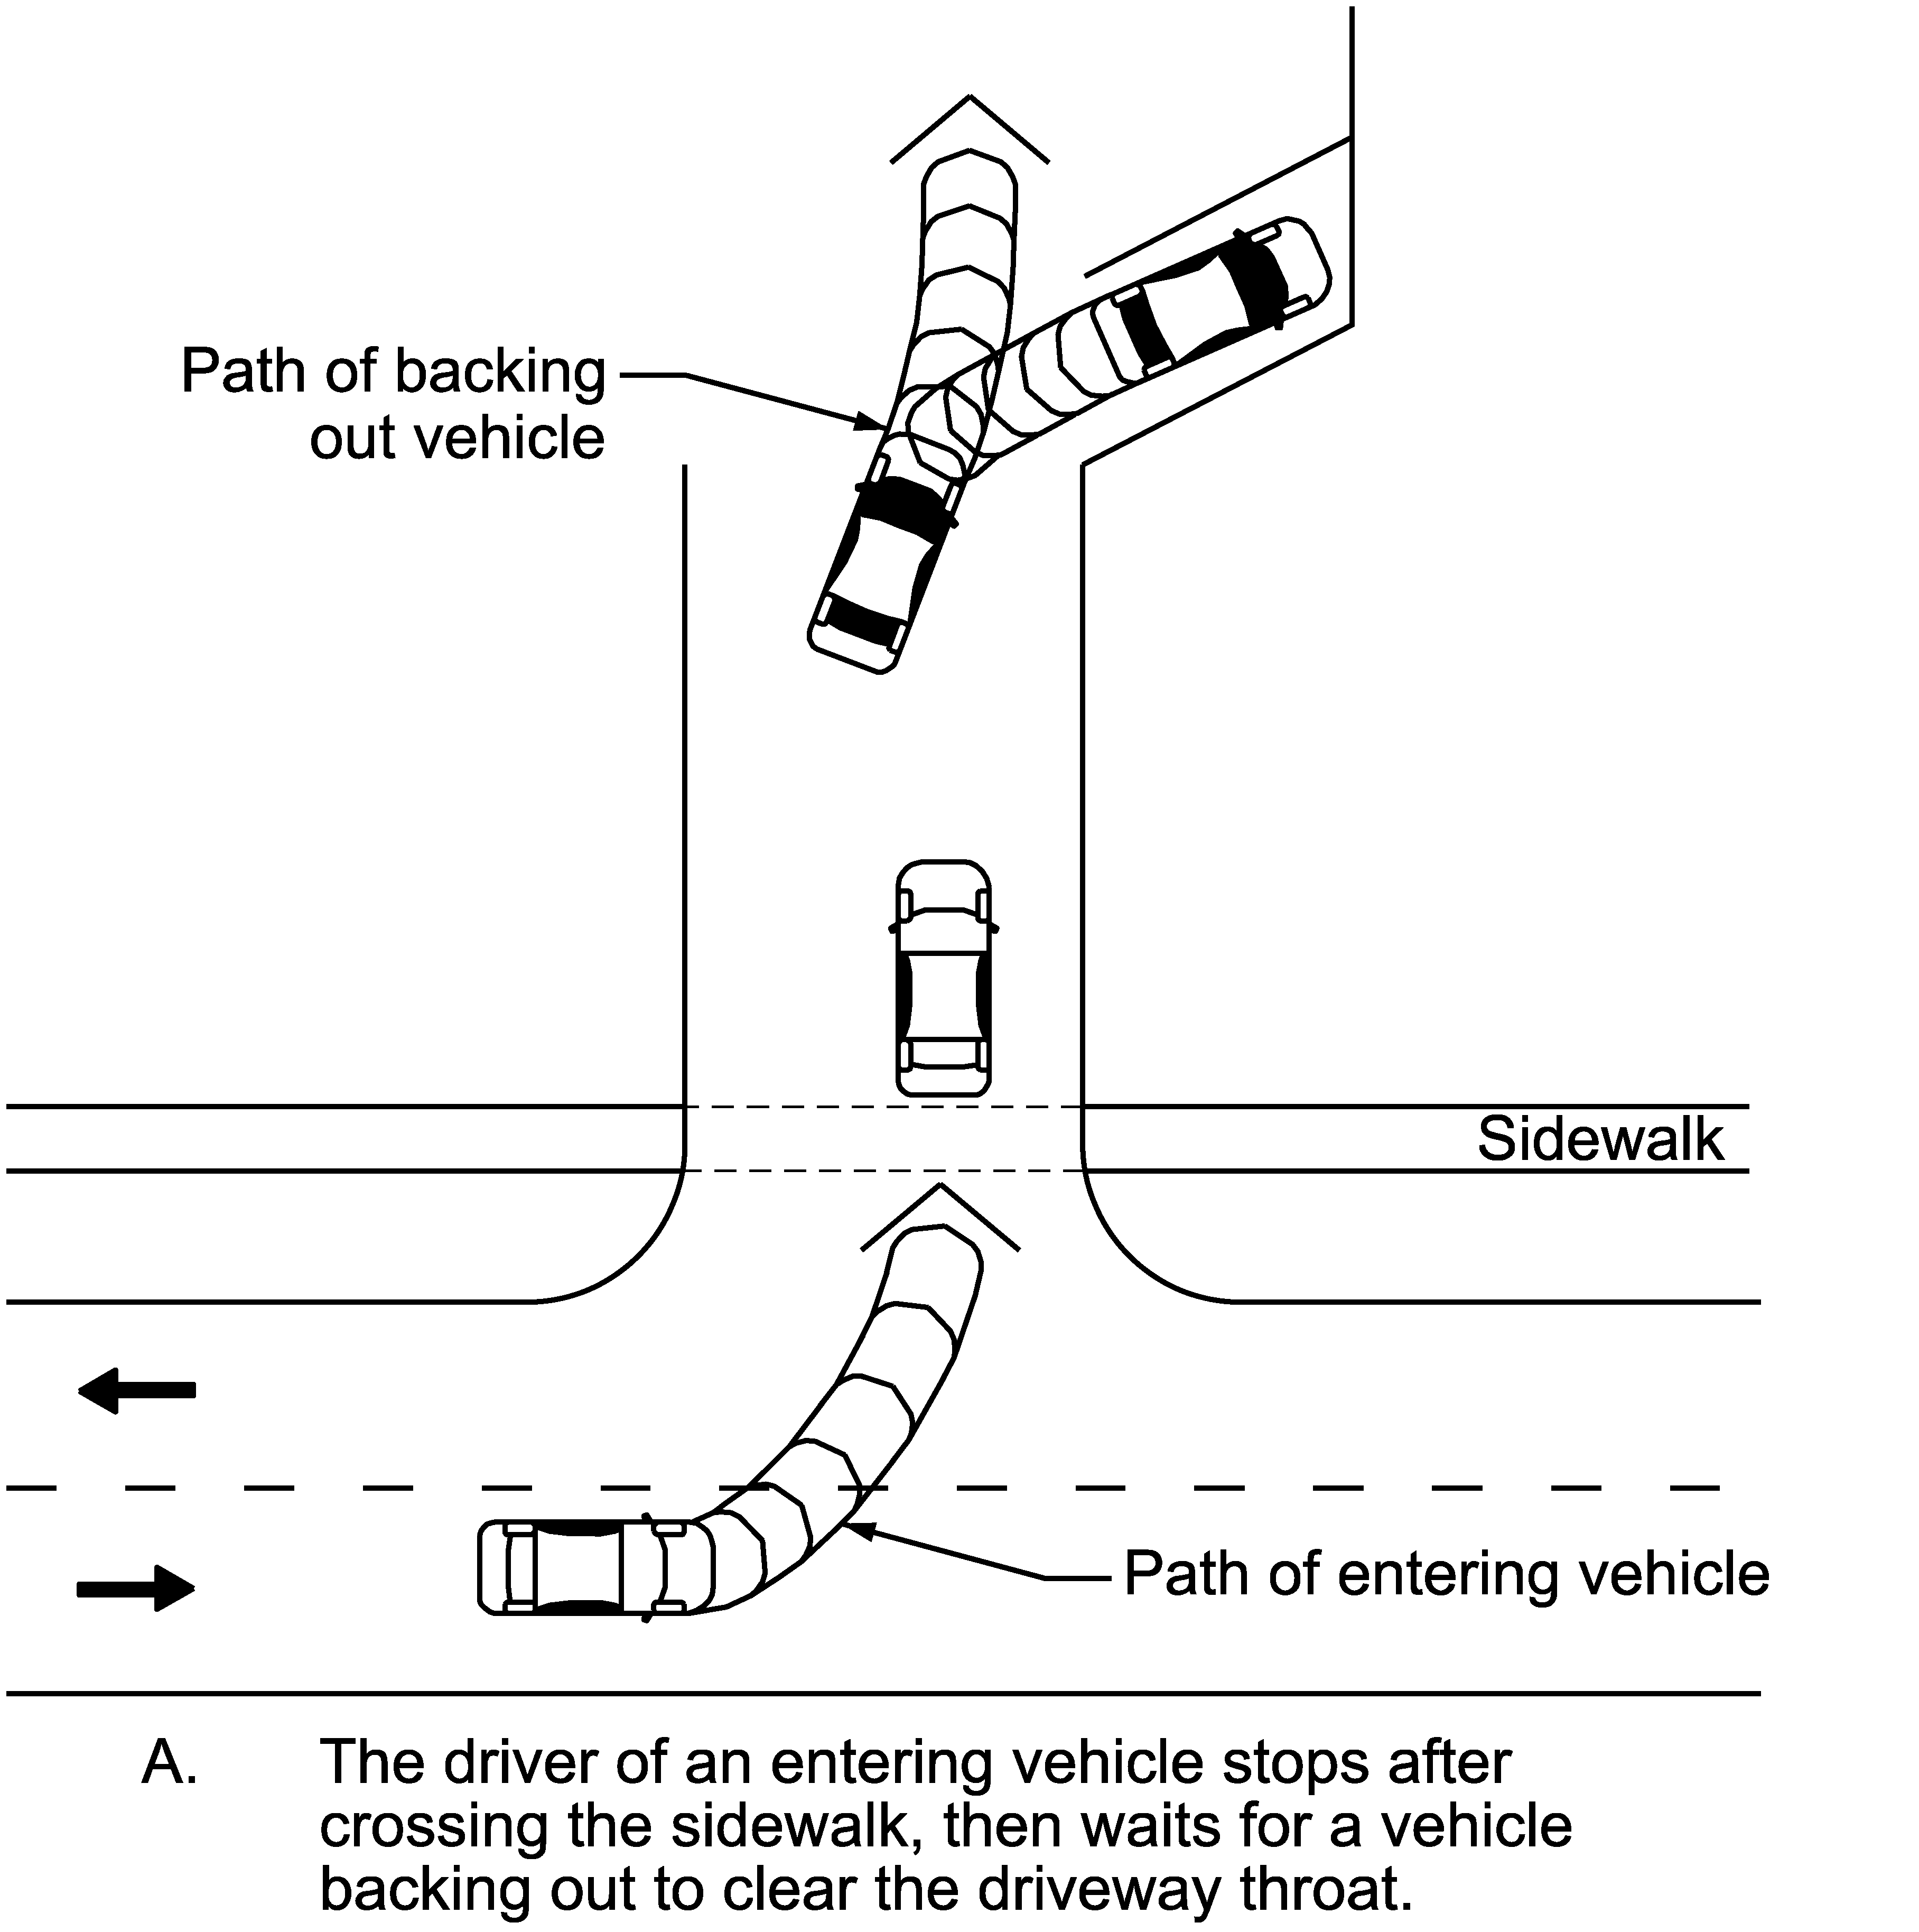
- TxDOT may work with local jurisdictions to ensure throat length allows for enough space for vehicles to queue out of the path of pedestrian travel (see Figure 7-18). Vehicles should not block the sidewalk when parked in driveway.
Figure 7-17. Channelizing Island Provide Pedestrian Refuge.
Figure 7-18. Sufficient Throat Length Should Allow Entering Vehicle to Clear the Through Traffic Lane.
7.3.5.2 Designing for Cross Slope Compliance
Sidewalks crossing driveways must comply with the same cross slope requirements (no more than 2 percent) as the rest of the sidewalk corridor. Several layout options exist for compliance with this requirement and are outlined in the following text and accompanying graphic, Figures 7-19 to 7-23. Refer to TxDOT’s Pedestrian Facilities Curb Ramps standard drawings for additional guidance on driveways crossing a sidewalk.
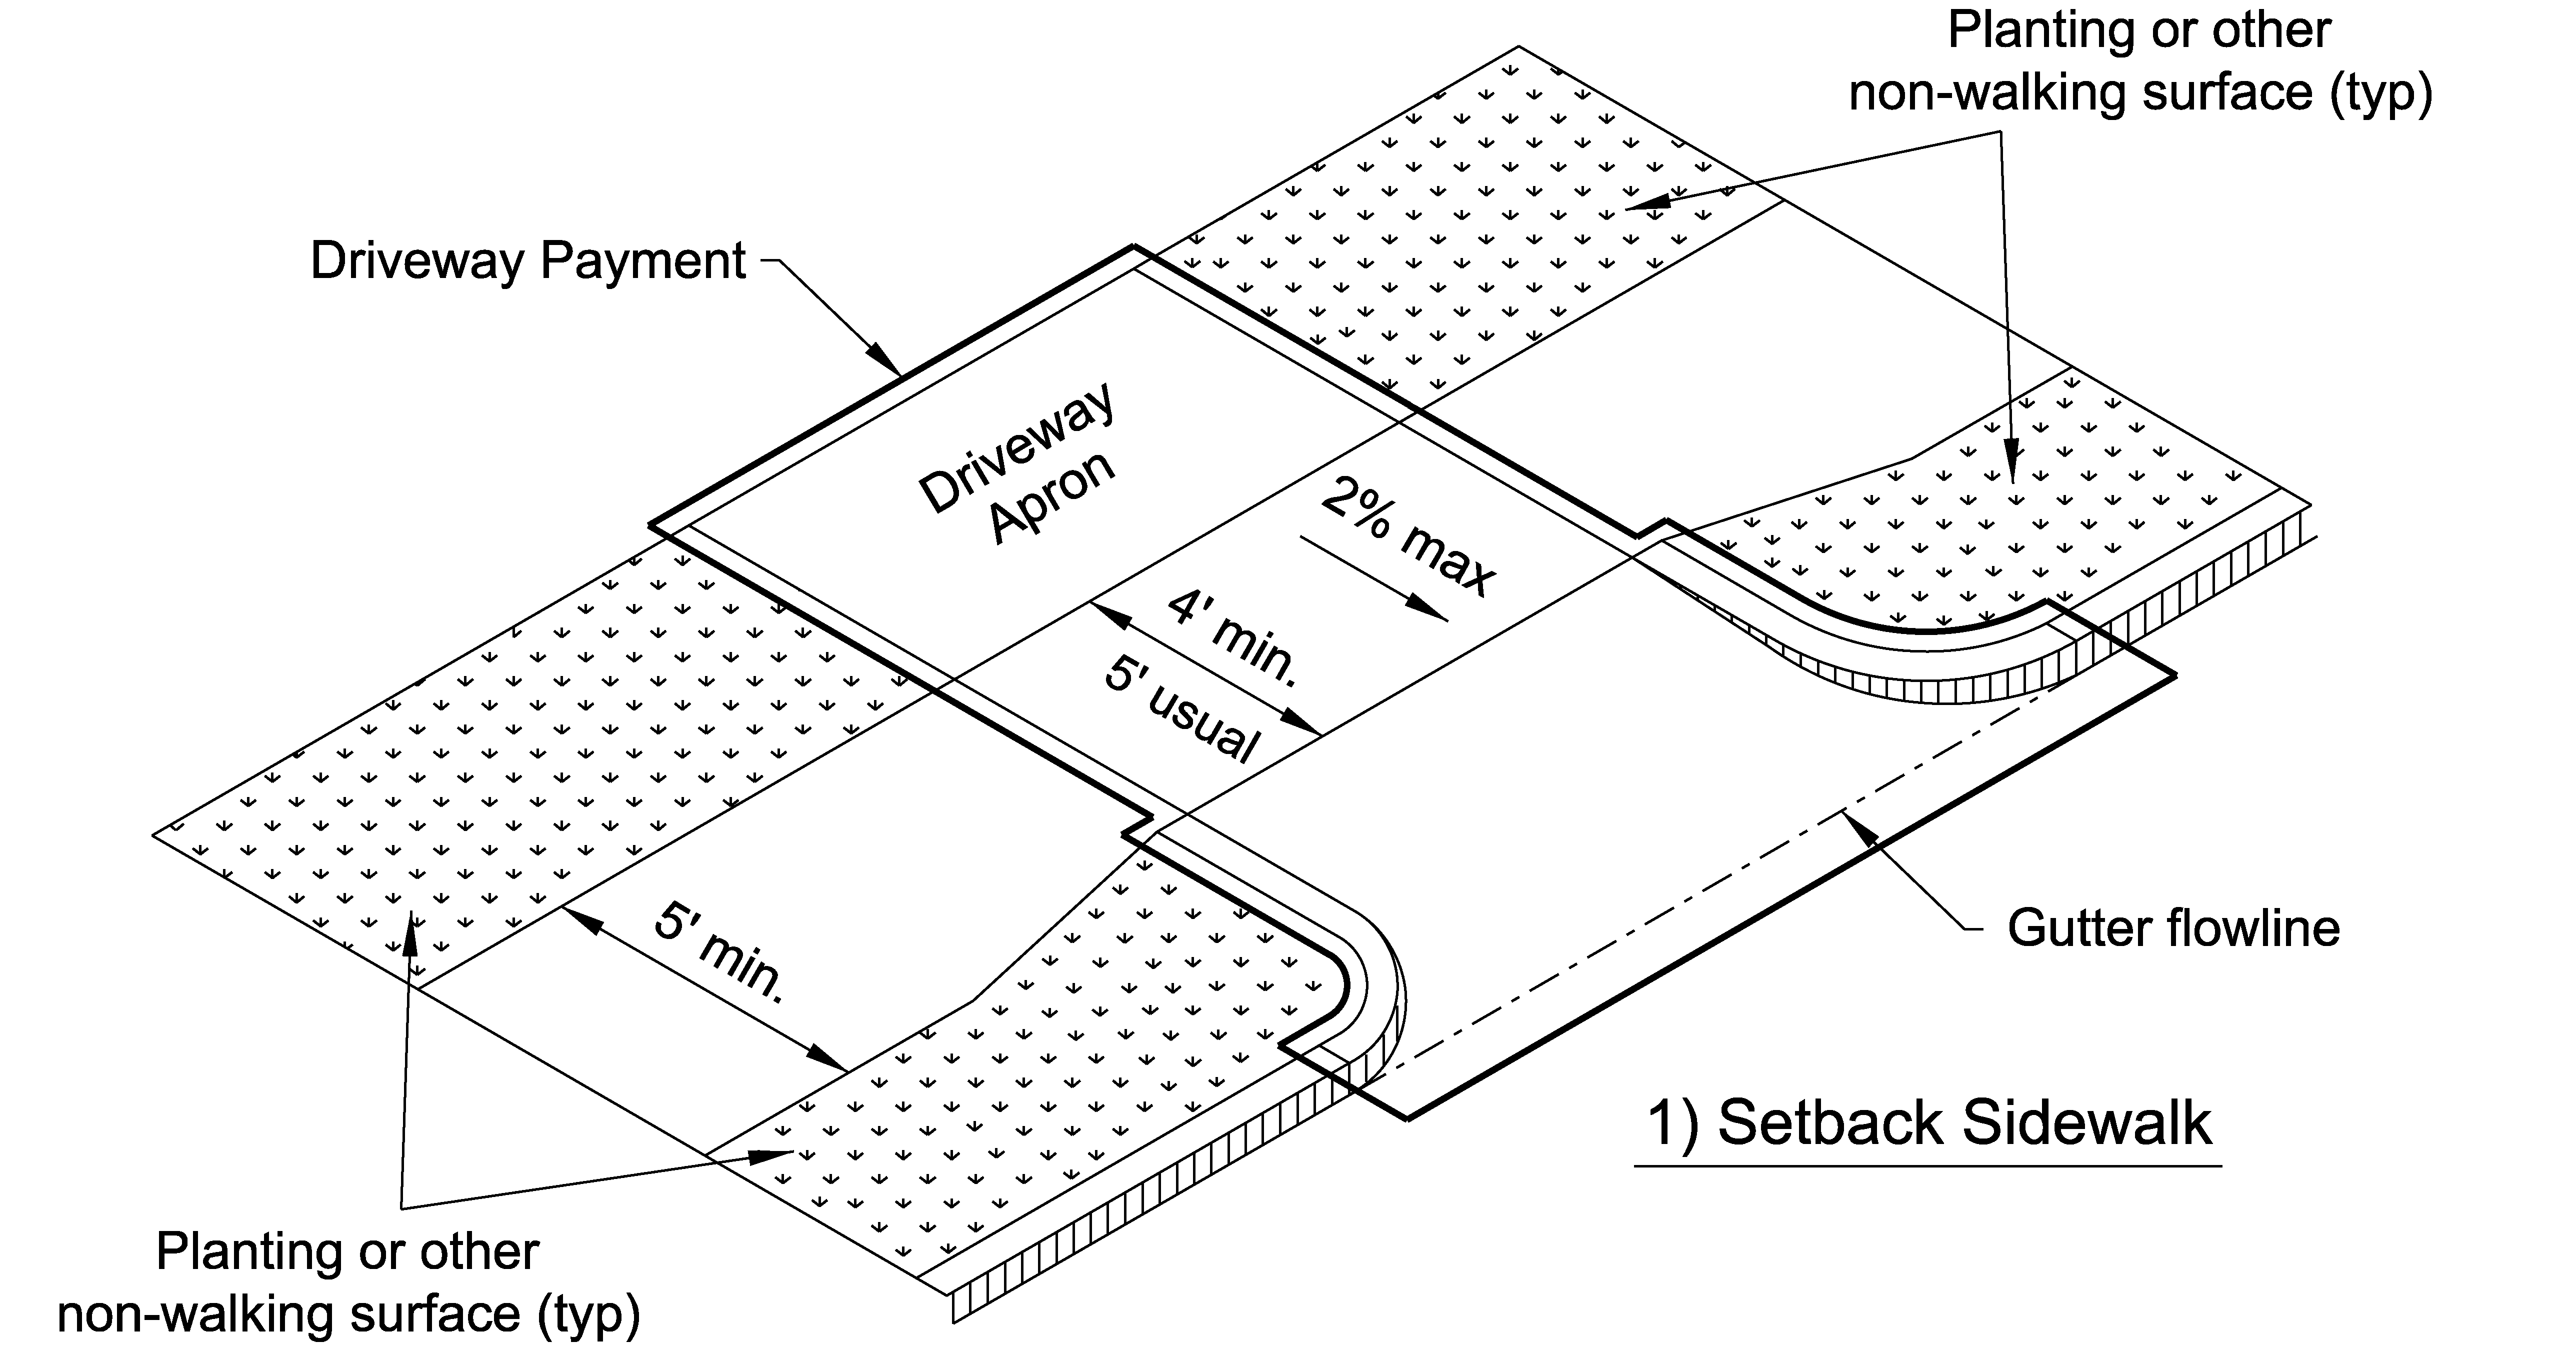
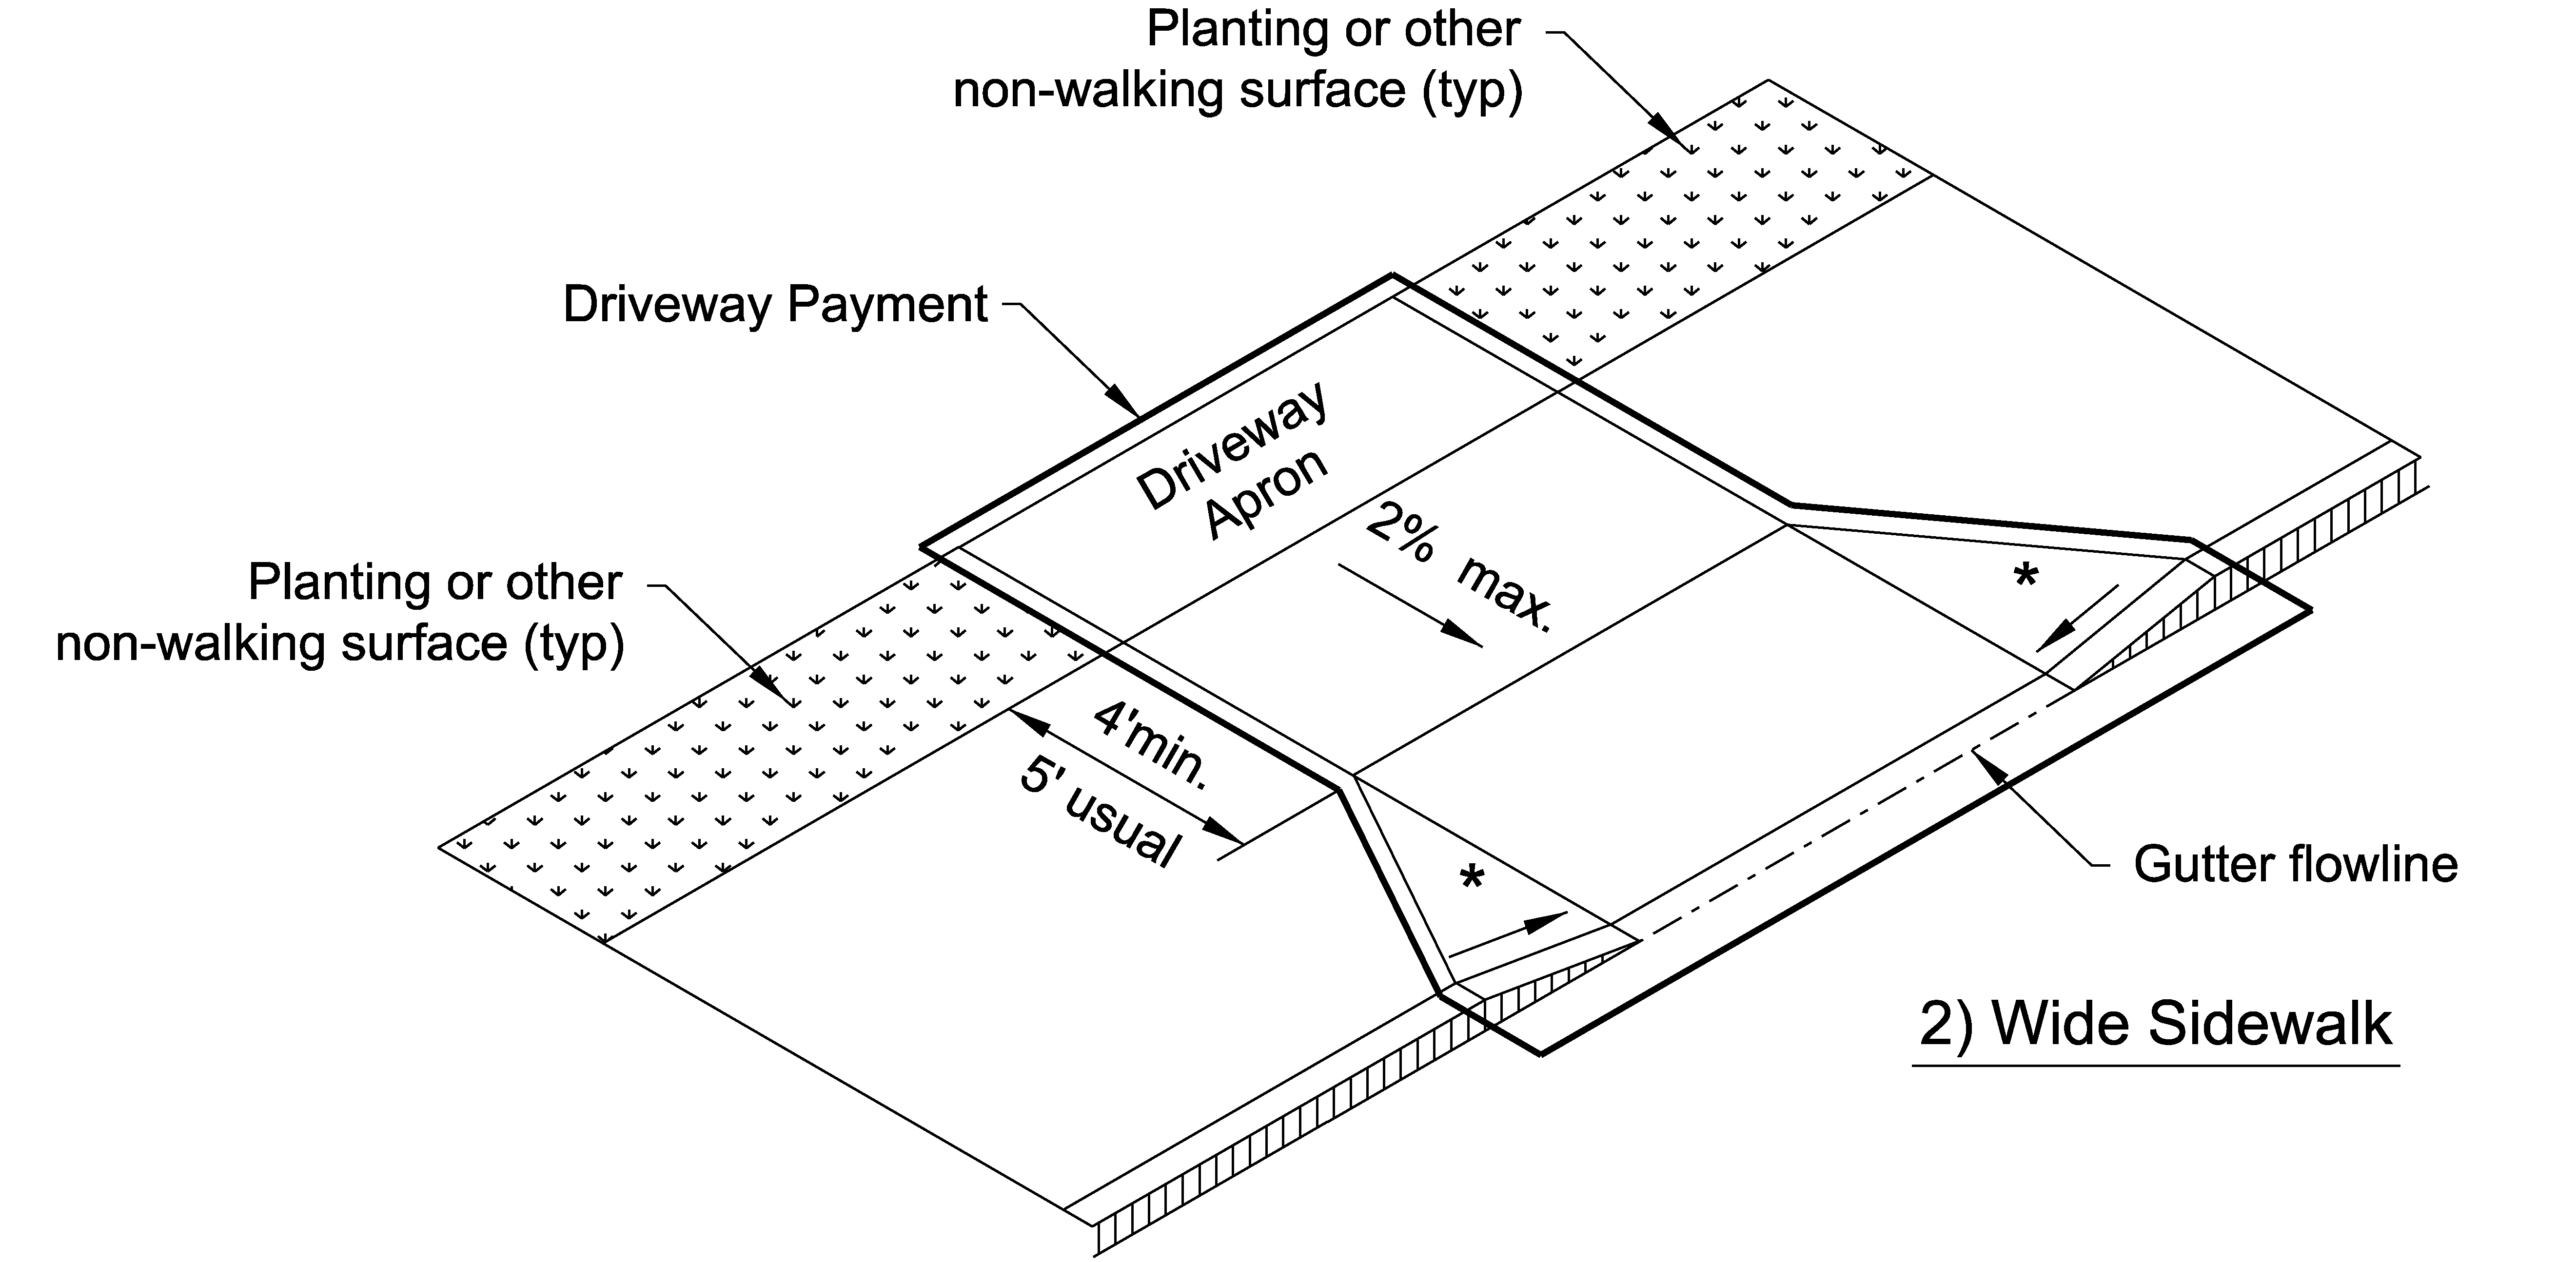
1) and 2) These options are preferred, as they maintain the same sidewalk elevation as the approaching sidewalk and reinforces motorist stopping and yielding behavior. In the case of a setback sidewalk, a width of 4 ft or greater is preferred for the parkway planting to provide suitable apron slopes. See Figures 7-19 and 7-20.
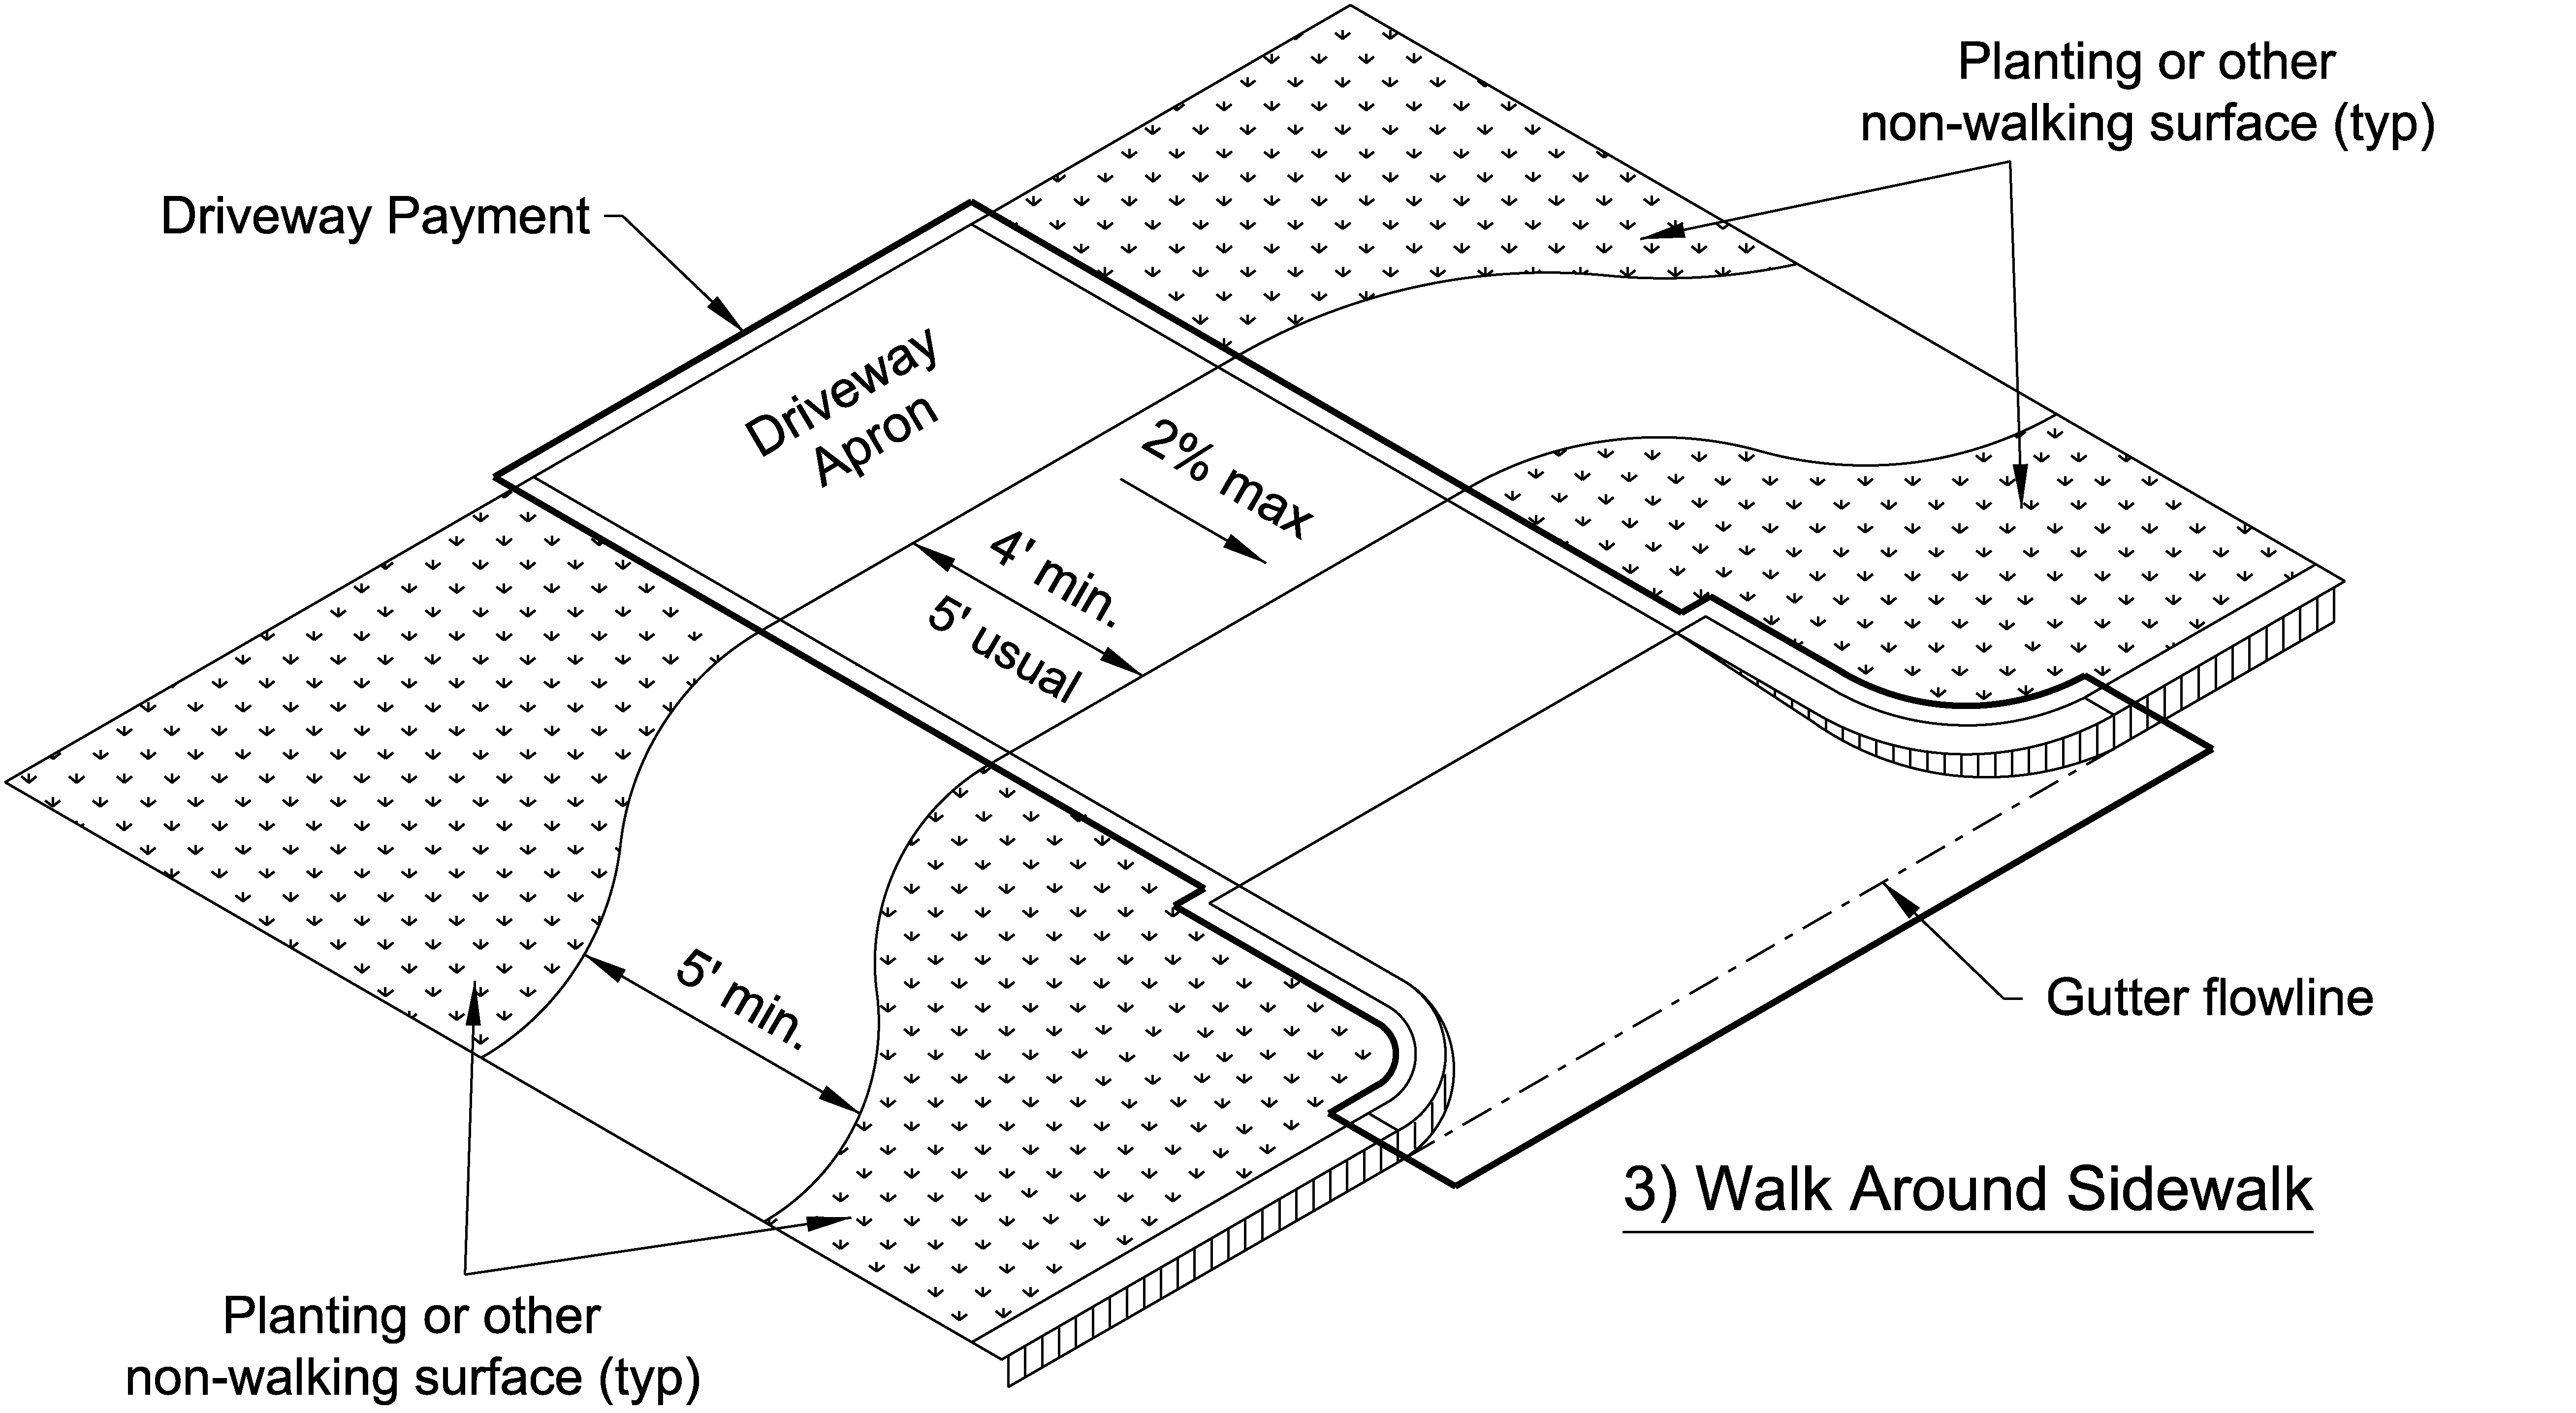
3) This option is preferred if Options 1 and 2 are not feasible. This driveway design provides an increased setback design for the pedestrian accessible route around the driveway space. This driveway design is long enough to accommodate a car length so as to not prohibit through movement on the roadway. See Figure 7-21.
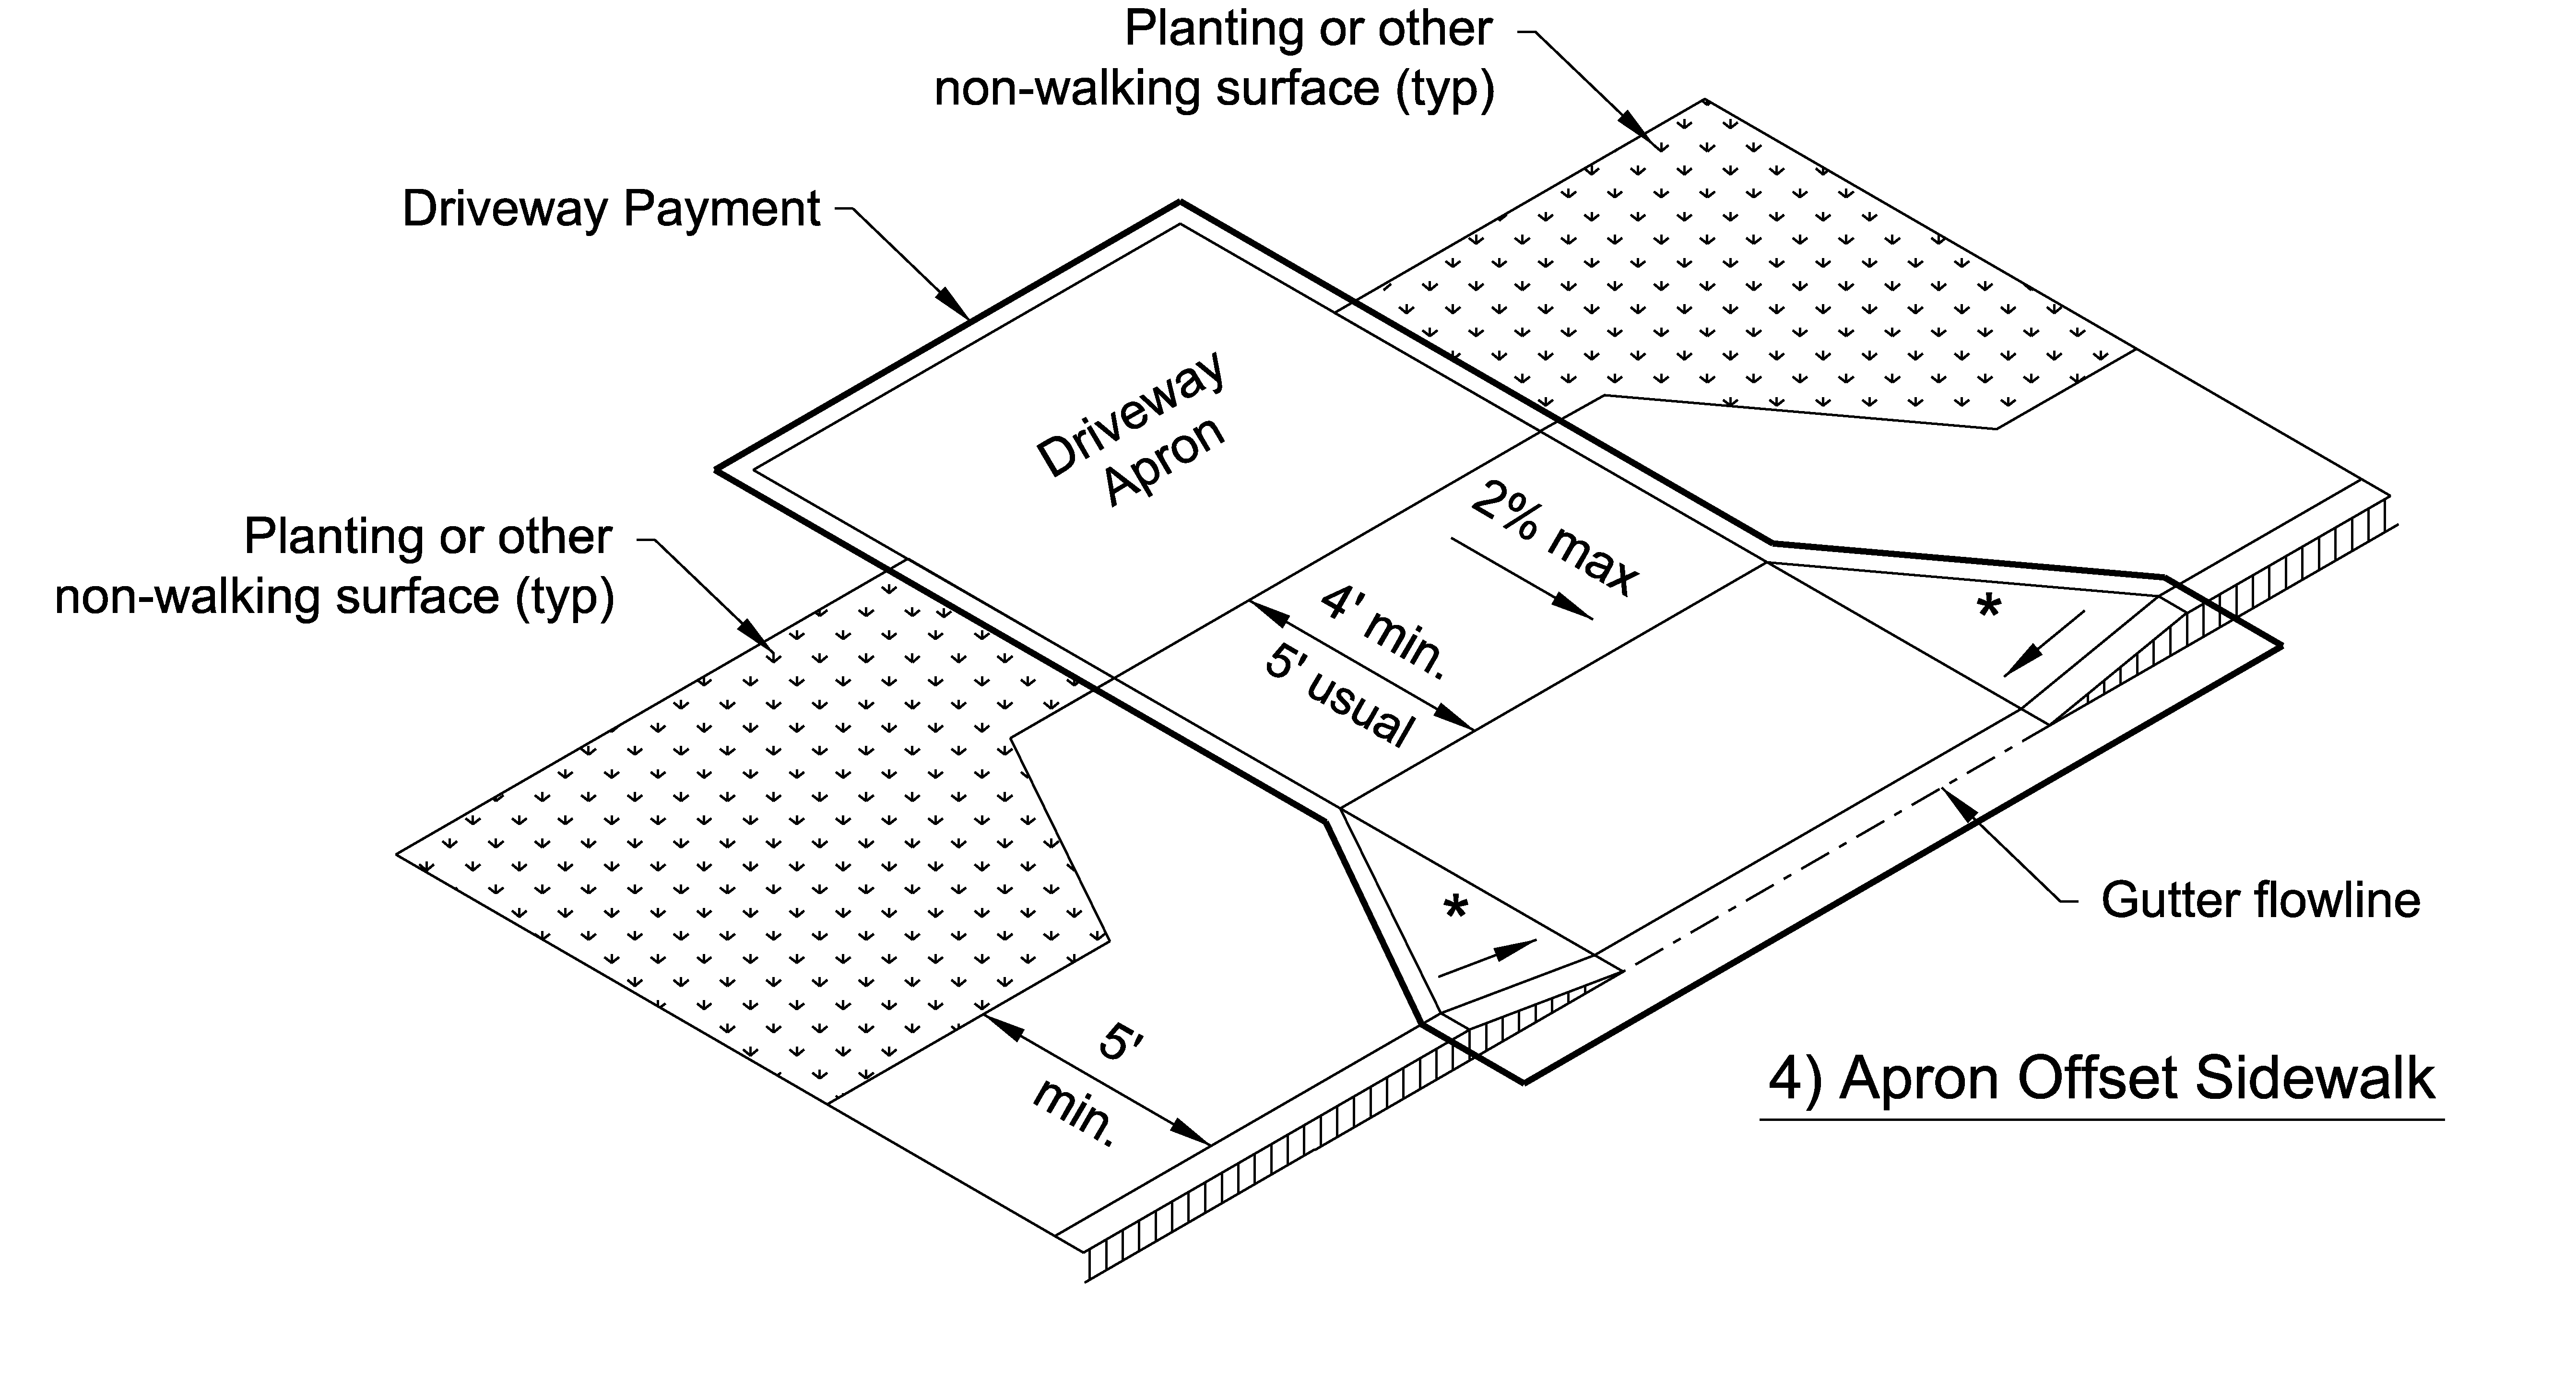
4) Sidewalks immediately adjacent to the curb or roadway may be offset to avoid a non-conforming cross slope at driveway aprons by diverting the sidewalk around the apron to provide greater distance between the flowline of the gutter and the sidewalk. See Figure 7-22. This option is preferable to Option 5.
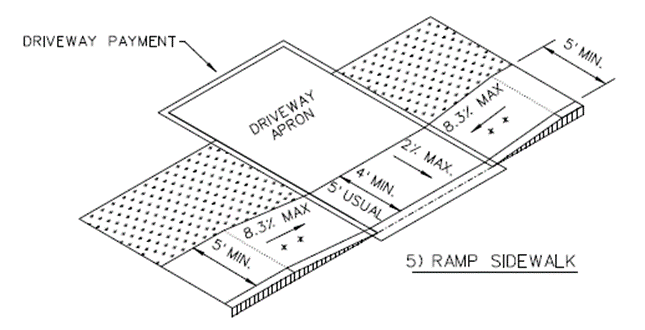
5) Where Option 3 is not possible, the sidewalk may slope down across the driveway apron. The sidewalk grade should not be lowered all the way to street level. A 1-in rise at the gutter flowline should be provided so that drainage in the gutter is maintained. Note that sidewalk slopes must meet the provisions of section 405 rather than section 406 of the ADA Standards (2010). See Figure 7-23.
Figure 7-19. Option 1: A Preferred Curb Ramp Design at Driveways.
Figure 7-20. Option 2: A Preferred Curb Ramp Design at Driveways.
Figure 7-21. Option 3: Walk-Around Design at Driveways.
Figure 7-22. Option 4: An Additional Curb Ramp Design at Driveways. (This design is preferable over Option 5 in Figure 7-23).
Figure 7-23. Option 5: An Additional Curb Ramp Design at Driveways.
Anchor: #i12184967.3.6 Intersections and Crossings
Designing multimodal intersections requires intersection geometry that increases safety for all users in combination with effective and efficient traffic control measures. Changes in geometry can help to reduce vehicle turning speeds, facilitate safe crossings, increase pedestrian and bicyclist comfort and safety, and create space for dedicated bicycle facilities. One of the key considerations of intersection geometry is the location of pedestrian crossing ramps and crossings relative to vehicle paths. It should be noted that these principles apply to all roadways including frontage roads.
7.3.6.1 Pedestrian Crossings Principles
7.3.6.1.1 Speed of Vehicles
Many pedestrian-vehicle collisions occur at intersections. A key strategy to avoiding these crashes is reducing vehicle speeds, which should be complemented by other strategies, including providing adequate sight distance through sight triangles, providing a variety of signalization strategies at locations with signals, eliminating free-flowing movements (or using truck aprons in slip lanes to slow turning cars while accommodating the larger vehicles), and using infrastructure strategies that increase visibility such as curb extensions and parking restrictions near pedestrian crossings.
Wider curb radii can enable drivers to maintain higher speeds when turning, decreasing reaction time for potential conflicts with crossing pedestrians. Designing to minimum radii accommodates vehicle operating characteristics while providing some control over vehicle speeds.
Traffic volume and vehicle type influence the width and curvature of intersection corner radii. See Chapter 7 Minimum Designs for Truck and Bus Turns.
7.3.6.1.2 Visibility
It is critical that pedestrians and drivers have clear sight lines to one another at crossings, both at intersections and mid-block crossings. This adequate sight distance allows vehicles to stop for crossing pedestrians; higher speeds require longer sight distances. Design elements such as fences, plantings, buildings, and walls may obscure sight lines. Parked vehicles close to crossing locations can also obscure sight lines for both parties. When possible, these elements should be restricted or moved to another location to provide proper visibility. Several treatments discussed below can also improve visibility.
7.3.6.1.3 Frequency of Crossing Opportunities
In areas with high pedestrian volumes and denser land uses, pedestrian crossing opportunities should be closely spaced. “Crossing opportunities” are defined here as intersections or crossings that are equipped with appropriate control, signage, lighting, geometry, and markings that allow pedestrians to safely and comfortably cross the street. In the absence of frequent crossing opportunities, pedestrians will choose the most direct path of travel, thus creating opportunities for collisions with vehicles where pedestrians are unexpected, less visible, and more exposed. In general, the frequency of crossing opportunities should be at least as dense as the surrounding street grid. Where large gaps between crossings are identified, midblock crossing may be appropriate.
7.3.6.1.4 Crossing Distance and Alignment
Reducing street width improves pedestrian safety and comfort by shortening crossing times, reducing exposure to vehicle-pedestrian conflicts, and reducing vehicle delay. Pedestrian crossing distances should be minimized to the greatest extent reasonable. Shorter crossing distances may be achieved through any or a combination of the following treatments:
- Anchor: #KYVJOMNP
- Providing median refuge islands Anchor: #GJEXHECI
- Providing curb extensions Anchor: #UGWHURDH
- Realigning of crosswalks at offset or diagonal intersections Anchor: #NHDRIIDO
- Reducing vehicle and parking lane widths Anchor: #PTRYSMQH
- Reducing the number of vehicle lanes
Alignment of crossings is an important aspect to the safe crossing of streets for pedestrians. It is natural for pedestrians to cross the road at convenient locations; therefore, providing crosswalks in those locations that align to minimize distance and time crossing the road is important to consider.
7.3.6.1.5 Crossings at Intersections
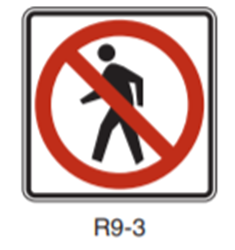
Intersections should be designed to enable pedestrians to cross all legs. There may be limited circumstances where pedestrian access across a leg of an intersection may be prohibited, however this should rarely be done unless there is a compelling reason to limit this movement. Pedestrians should not be directed to cross multiple legs of an intersection to access a corner that could otherwise be accessed by crossing a single leg. Crossing additional legs creates more exposure to vehicular traffic for pedestrians and forces pedestrians to travel longer distances.
7.3.6.1.6 Pedestrian Delay
Minimizing pedestrian delay when crossing the street increases a pedestrian’s convenience and reduces the likelihood that pedestrians will cross the street in an unsafe manner. At signalized intersections, pedestrian delay can be minimized by maintaining short signal cycles. At uncontrolled crossings, designers should provide pedestrians as much frequency and length of gaps in traffic as possible.
7.3.6.2 Intersection Crossing Treatment Decision-Making Framework
There are many factors that can affect roadway crossing opportunities for pedestrians, including motorist approach speeds and volumes, motorist stopping and yielding behavior, roadway configuration, types of vehicles, the volume and assertiveness of crossing pedestrians, the amount of sight distance that can be achieved at the crossing location, and other factors. These factors will also vary based on time of day or day of the week, seasonally, or due to special events.
Pedestrian crash risk increases as traffic volumes and operating speeds increase and motorist stopping and yielding decreases. To mitigate locations with increased crash risk, countermeasures which increase motorists stopping and yielding, increase gaps, or reduce pedestrian exposure should be considered to facilitate the pedestrian crossing.
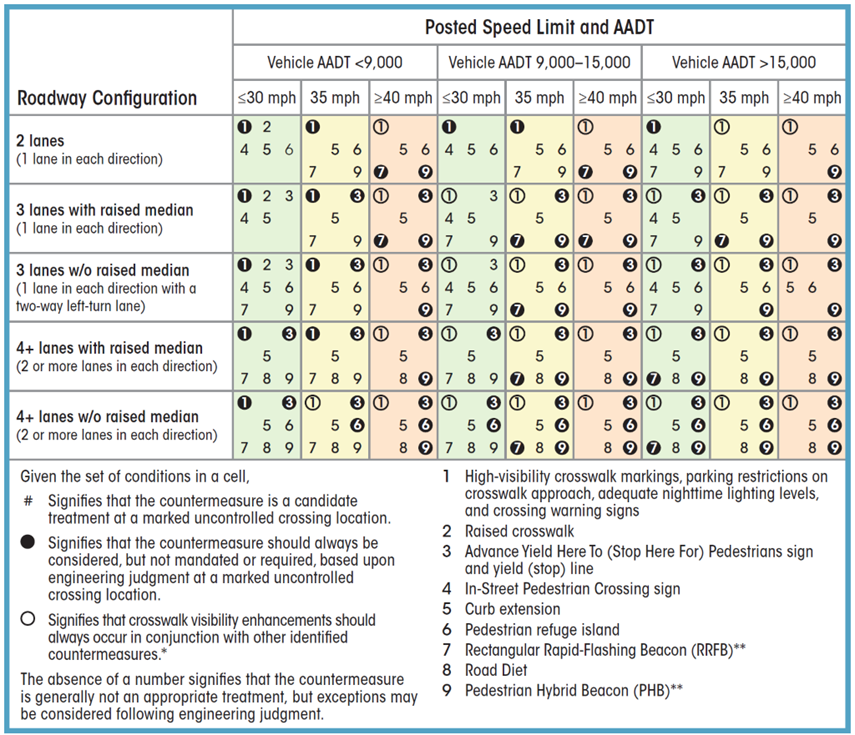
The FHWA Guide for Improving Pedestrian Safety at Uncontrolled Crossing Locations identifies a range of potential countermeasures which have been shown to achieve improved pedestrian safety at uncontrolled crossings. Figure 7-24 includes an extensive matrix and list of countermeasures which have been found to be effective for improving pedestrian safety at uncontrolled crossing relative to specific combinations of roadway geometry and traffic operating conditions. Other resources which should be consulted to review potential countermeasure not included in this table or within this guide which may be effective include:
- Anchor: #SSDMMAPK
- NCHRP Report 562, Improving Pedestrian Safety at Unsignalized Crossings Anchor: #XJOKWFSJ
- NCHRP Report 926, Guidance to Improve Pedestrian and Bicyclist Safety at Intersections Anchor: #GSRFGBWY
- FHWA Proven Safety Countermeasures website: https://safety.fhwa.dot.gov/provencountermeasures/ Anchor: #FTEBGPWH
- FHWA PedBikeSafe website - http://www.pedbikesafe.org/
Figure 7-24. Pedestrian Safety Countermeasures Based on Roadway Configuration and Posted Speed Limits and Annual Average Daily Traffic.
7.3.6.3 Geometric Treatments for Pedestrians at Intersections
7.3.6.3.1 Medians and Refuge Islands
Raised medians have been proven to provide safety benefits to pedestrians when compared to flush (at street grade) medians and are therefore preferred as a safety measure at pedestrian crossings. Medians are generally used to divide traffic streams, such as in Figure 7-25 where the midblock median separates two-way traffic and enables the pedestrian to cross one direction of traffic at a time. Channelization islands between turning lanes and through lanes can also act as refuge islands. A two-way center turn lane is not a raised median as it cannot provide safe refuge for crossing pedestrians.
Application
To improve pedestrian safety, refuge islands should be considered where street crossing distances are four travel lanes or greater. See Figure 7-24 in Section 7.3.6.2 for further detail on application with respect to traffic volumes and speeds. Medians and refuge islands also reduce the speed of left turning movements at intersections which can also improve pedestrian safety where they are exposed to left-turning traffic.
Though they provide refuge, median islands should not be used to allow for traffic signal phasing that breaks the pedestrian trip into two phases. Pedestrians should be staged in the median at signalized intersections only on boulevard sections with wide medians that would add excessive pedestrian clearance interval. Where pedestrians are staged in the median, additional pedestrian signal heads and pushbuttons must be installed in the median. For locations with rectangular rapid flashing beacon or pedestrian hybrid beacon (RRFB or PHB), refuge islands may be used to create two-stage crossings.
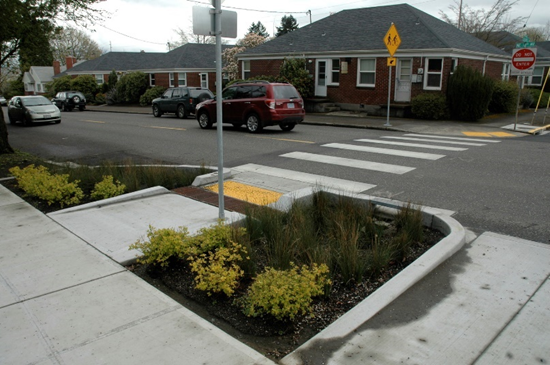
Figure 7-25. A Median Refuge Island.
Design Parameters
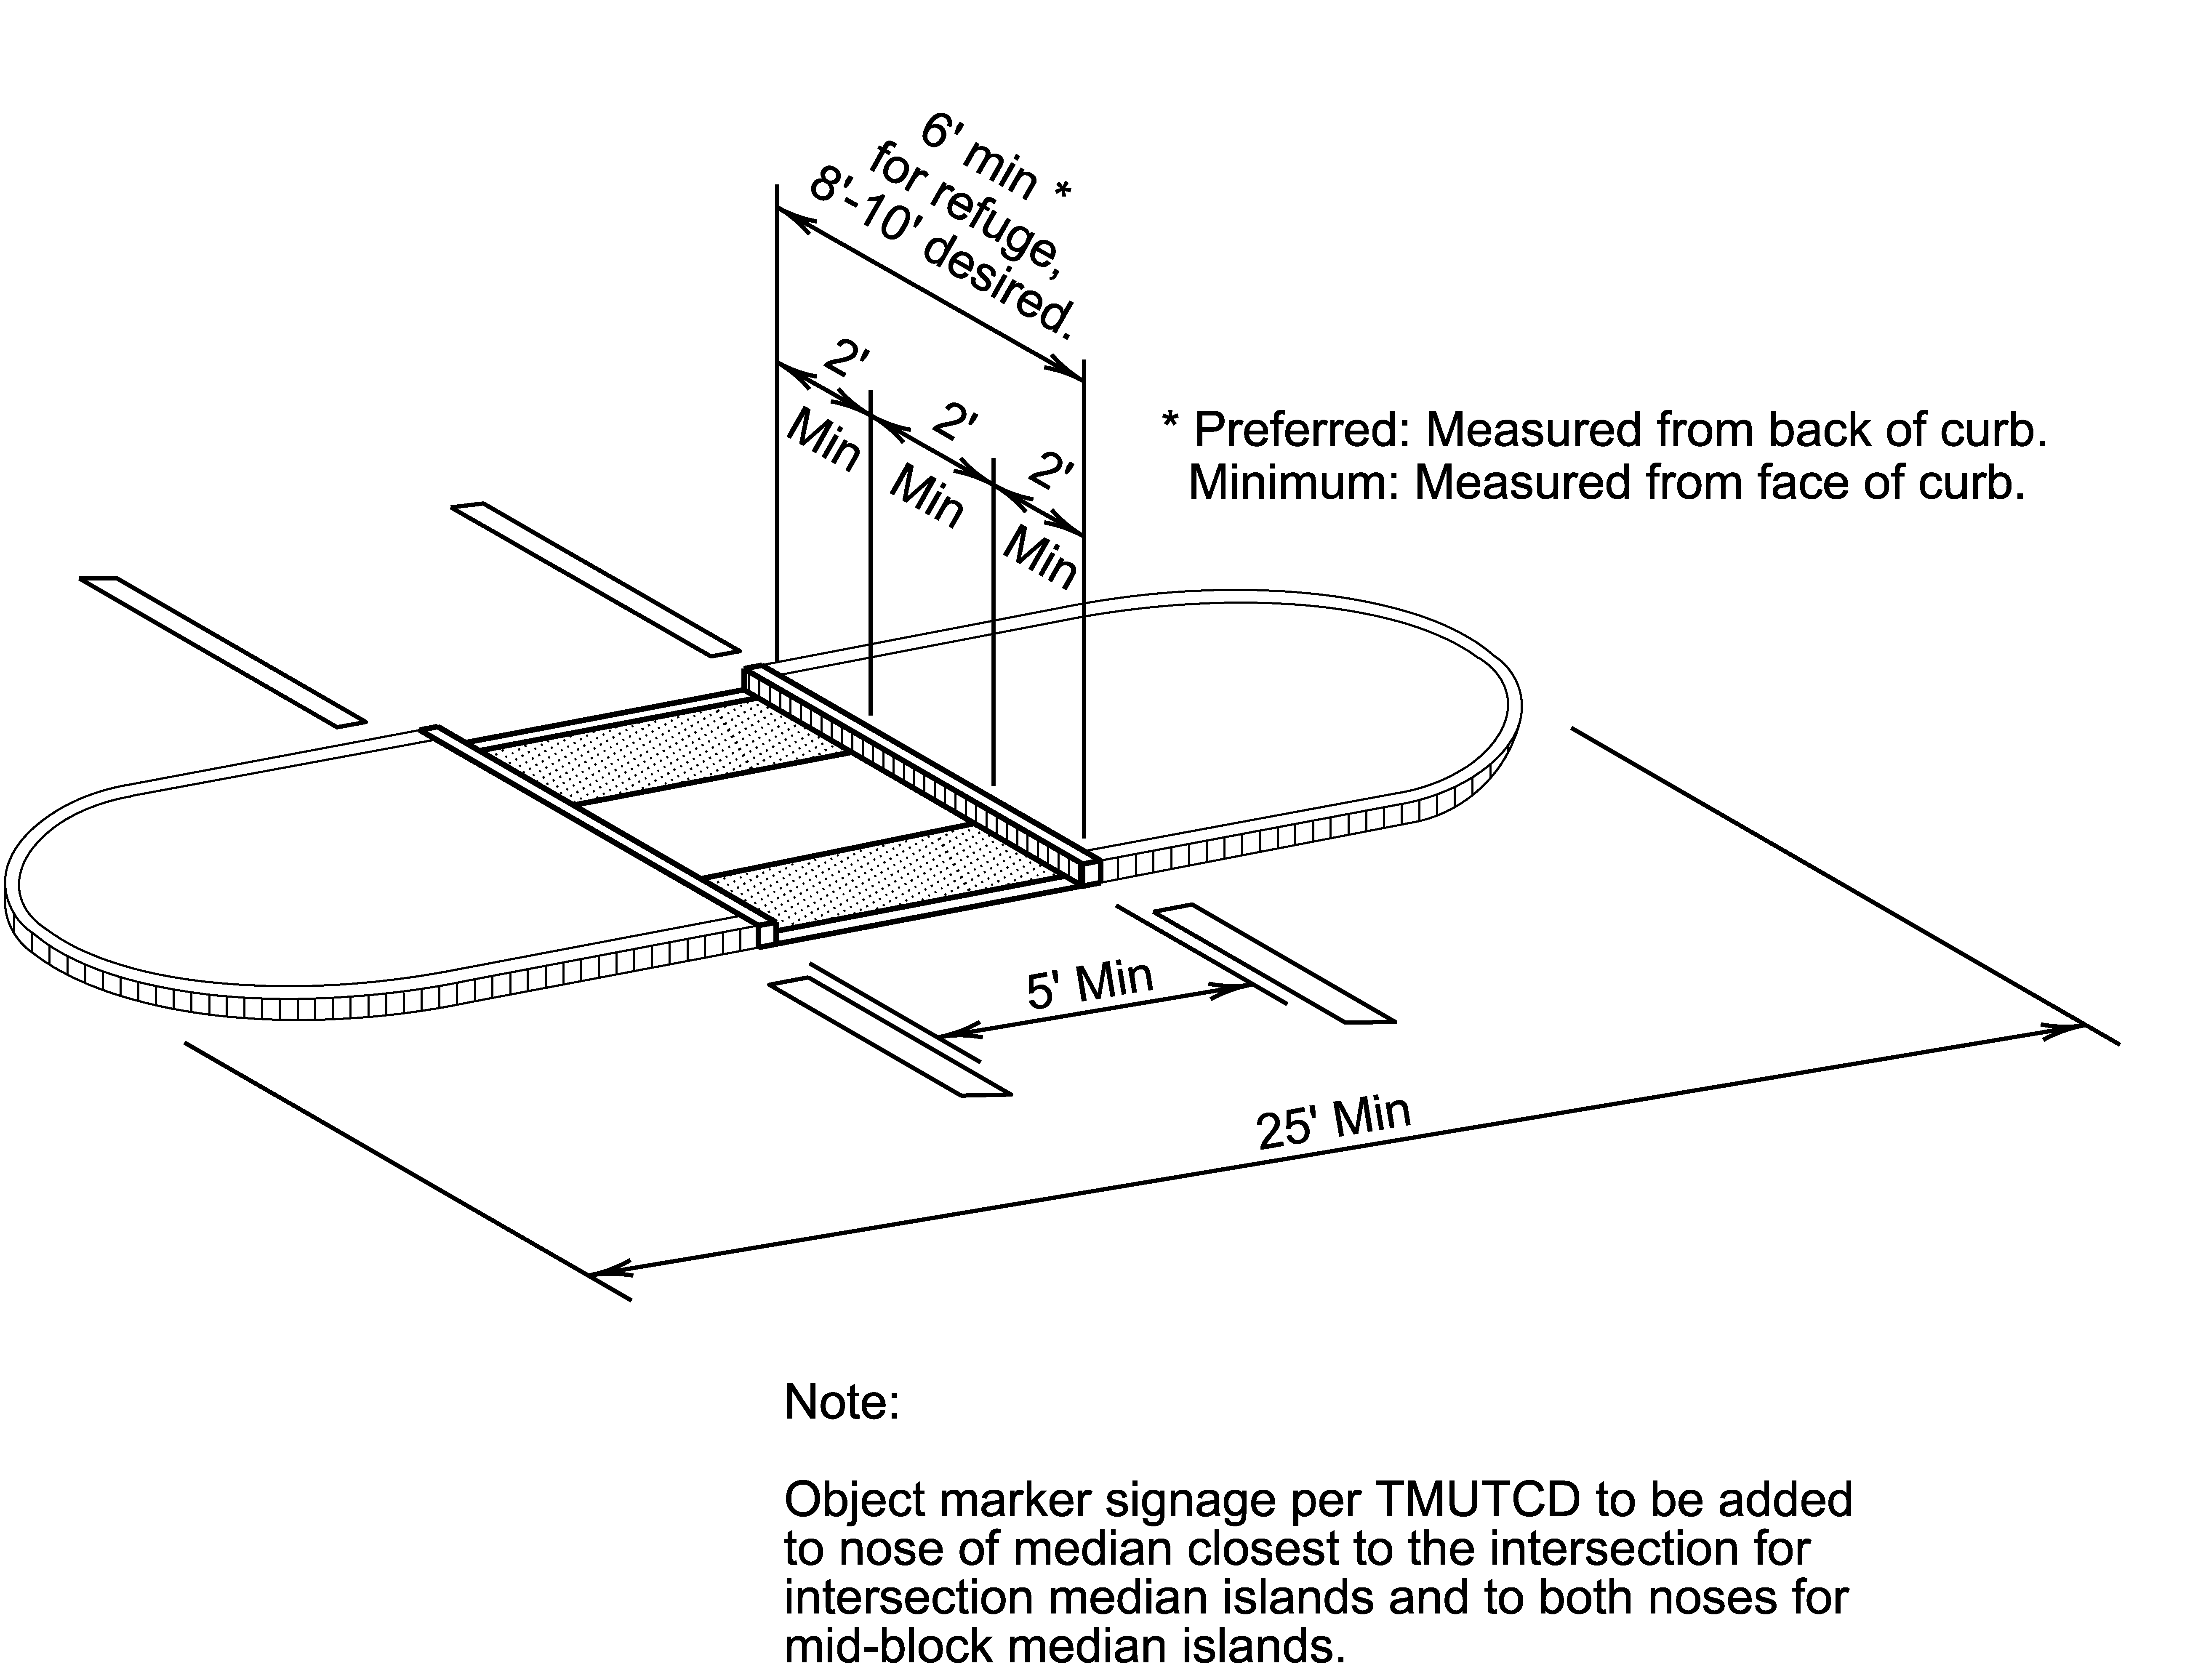
Median Width: To function as a refuge (i.e., a place where pedestrians may stop to await a gap in traffic or a signal indication before completing their crossing), a raised median with a pedestrian access route cut through the island at a level flush with the roadway surface must be at least 6-ft wide, exclusive of the width of the curbs. An 8- or 10-ft median island width is desirable to provide additional clearance for wheelchairs and bicycles and to better accommodate groups of pedestrians.
Length: At midblock locations, the minimum length of the median refuge is 25-ft. Advance lane tapers may be required to warn approaching motorists of the physical median following the guidance of the TxDOT MUTCD and PM standard drawings.
Accessibility: If the median is at least 6-ft wide so that it functions as a refuge, then detectable warning surfaces must be installed at the threshold of each roadway surface. The detectable warning surfaces will occupy the same 2-ft needed for clearance from the adjacent travelway, leaving 2-ft open for storage at the center of the island.
PROWAG indicates that if a median island is less than 6-ft wide (measured in the direction of pedestrian travel), detectable warnings should not be installed. An island less than 6-ft wide is not considered adequate for pedestrian refuge and detectable warnings should not be used.
Crosswalk: It is recommended that the cut-through for a median refuge be the full width of the crosswalk in the direction of pedestrian travel. The minimum width of a cut-through for a median refuge is 5-ft. Crossings through a median can be angled so pedestrians can see and be more aware of traffic on the roadway they are about to cross. See Section 7.3.4.5 for curb ramp design at median islands.
At an intersection crossing, a “nose,” or curbed edge, that extends past the crosswalk toward the intersection is recommended to separate people waiting on the crossing island from motorists, and to slow turning motorists. The recommended minimum nose length is 2-ft.
Considerations
Medians and refuge islands can provide additional space for warning signs or beacons at multi-lane pedestrian crossings, increasing their visibility to approaching drivers.
Offset Crossing (“Z-style”) Median Islands
At uncontrolled locations (intersection or midblock), designers may consider a Z-style PAR configuration within the median island. This configuration reorients the pedestrian to face oncoming traffic, creating staggered crosswalks on either side of the island. Islands should be at least 12-ft wide to accommodate an accessible route in both directions and maintain maneuverability and passing distance for pedestrians using mobility devices. When used along a shared use path alignment, the design should also consider maneuverability for bicyclists, including bicycles with trailers or long wheel cargo bikes. This treatment is most appropriate in rural and suburban areas.
7.3.6.3.2 Curb Extensions/Bulb-Outs
Curb extensions are created by extending the sidewalk or curb line into the street at an intersection or mid-block crossing location in order to shorten the crossing distance for pedestrians and improve visibility at crossing locations.
Application
Curb extensions are recommended on streets that have on-street parking and can be used selectively in locations with shoulders where shortened pedestrian crossings are desired. Curb extension installation on both sides of a crossing is preferred, but where curb extension installation on one side is infeasible or inappropriate (i.e., no parking lane or shoulder), this should not preclude installation on the opposite side.
Design Parameters
Width: The width of parking lane minus 1-ft of offset to the travel lane.
Length: The minimum length of a curb extension must be the width of the crosswalk although it can extend farther to match a no parking limit approaching the intersection. The length of a curb extension can also vary depending on the intended use (e.g., stormwater management, transit loading, restrict parking, bike parking) and potential for sight line improvement.
Considerations
In proximity to transit stops, curb extensions can present challenges with bus maneuverability where they must pull to the edge of the roadway in advance of, or after, the curb extension. In these locations, the curb extension should be designed to enable buses to easily navigate to the edge of the roadway or consideration should be given to allowing the bus to stop in the travel lane by incorporating the curb extension into the bus stop, creating a bus bulb.
The radii of the curb extension should be designed so that street-sweeping equipment can reach the entire curb face without leaving gaps where debris can collect. Designers should consult with local jurisdictions regarding the operating characteristics of their sweeping equipment. Landscaping within a curb extension should be limited to low-level plants that will not impact sight distance.
Curb extensions retrofitted onto a street can significantly alter drainage patterns. Drainage must be evaluated as part of the design of both full reconstruction and retrofit curb extensions.
Figure 7-26. A Curb Extension with Landscaping.
7.3.6.3.3 Truck Aprons
A truck apron (Figure 7-27) is a design strategy used to accommodate the turning needs of large vehicles while slowing the turning speeds of smaller vehicles by reducing the perceived actual radius. A truck apron is designed to be mountable by larger vehicles to accommodate their larger effective turning radius needs. The mountable surface encourages the most common vehicles – a passenger (P) or delivery vehicle (SU) to turn outside the apron at a slower speed by design, thereby decreasing their effective turning radius.
Application
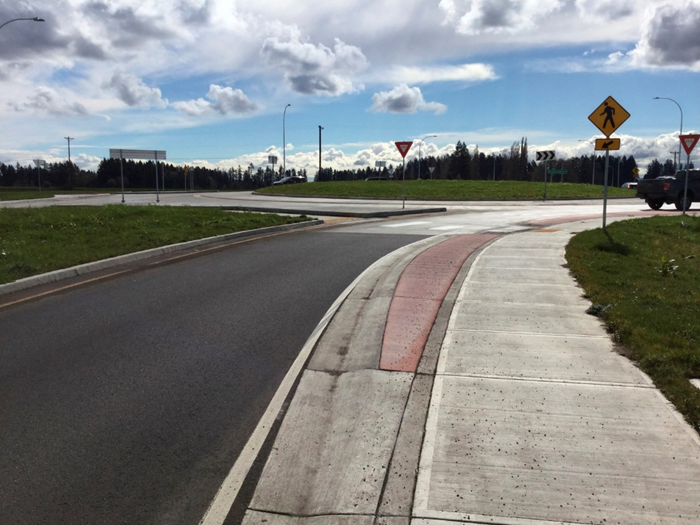
Truck aprons are applicable where slower vehicle turning speeds are a priority. They may be used at corners of standard intersections, as part of a channelization island, or as part of the central island of a roundabout. Truck aprons may be used at corners and islands that have either controlled or stop and yield condition vehicle movements. Truck aprons can be installed with corner reconstruction, or in a retrofit condition. When they are installed as a retrofit, or when a gap is left between the mountable curb and the curb face to facilitate surface drainage, they are called truck pillows.
Design Parameters
Color: The apron’s color should be easily distinguishable in contrast with the surrounding roadway and sidewalk.
Height: A truck apron/pillow should incorporate a mountable section with a height between 2-in and 3-in to provide the desired traffic calming.
Accessibility: The accessible route across the truck apron should be clear and obvious to pedestrians. The pavement texture and surface slopes at this location should be smooth and meet accessibility standards. While texture is appropriate in other mountable portions of the apron, where the accessible route cuts through, the texture should be discontinued for the portion of the accessible route. Crosswalks should be marked up to the detectable warning surface through the truck apron to clearly distinguish the intended path of travel and have it to be recognized as part of the street. The detectable warning must be located behind the truck apron at the sidewalk.
Considerations
The presence of a higher volume pedestrian or shared use path crossing should be considered as a condition for truck apron installation, especially in an area where drivers may be starting to accelerate, such as a freeway on-ramp.
Figure 7-27. A Truck Apron.
7.3.6.3.4 Raised Crosswalks and Intersections
Sight lines between crossing pedestrians and drivers are essential for safety as are slower motorist approach speeds where they must stop and yield to crossing pedestrians. Placing pedestrians at a higher elevation through the intersection can make them more visible and slow the speeds of approaching motorists. This is especially important at locations where greater numbers of children or people using mobility devices may be present as they are lower to the roadway and can be more difficult to see and may have reduced ability to judge or react to approaching motorists.
Raised Crosswalks
Raised crosswalks continue the elevation of the sidewalk across a crosswalk in order to provide better visibility of and for pedestrians and to slow vehicle speeds in a manner similar to other vertical speed control elements.
Application
Raised crosswalks are possibly applicable in urbanized areas on streets with speeds of 35mph or less. They are also applicable at roundabouts and channelized right-turn lanes between the curb and a triangular island where drivers have a stop and yield condition.
Design Parameters
- Anchor: #PDDSPCHY
- Height: The crosswalk should be raised approximately 3-in from the elevation of the roadway. Anchor: #CHILEFGT
- Width: The table of the crosswalk should be at least 10-ft wide, allowing both front and rear wheels of a typical passenger vehicle to be on top of the table at the same time. Anchor: #PAEEENOO
- Approach ramp length: The recommended length of the ramp up to the raised crosswalk is 8-ft. Anchor: #DPDPDNJK
- Markings: Crosswalk markings are recommended for the top of the raised crosswalk. Anchor: #VLXGSVUQ
- Accessibility: The junction between the sidewalk and raised crosswalk should meet all applicable accessibility standards.
Considerations
- Anchor: #RNIJMUYF
- Drainage design will differ based upon whether the elevation of the crosswalk extends to the curb or not. Anchor: #BBGCCSRI
- Chevron-style markings may be used on the half of the ramp facing traffic for increased driver awareness of change in slope. Anchor: #XXGRHCOH
- Consult with local emergency services providers regarding placement and design.
Raised Intersections
Raised intersections are those where the elevation of the entire center of the intersection is raised. Similar to speed humps and other vertical speed control elements, they reinforce slow speeds and encourage motorists to stop and yield to pedestrians at the crosswalk, while improving visibility for pedestrians and drivers. Crosswalks are typically placed on top of the raised area.
Application
Raised intersections are applicable in urban areas and towns with higher volumes of pedestrians, at minor intersections, on streets with speeds of 35mph or less. They may be used at controlled or uncontrolled locations.
Design Parameters
Accessibility: The junction between the sidewalk and raised crosswalk should meet all applicable accessibility standards.
Drainage: The presence of raised pavement can significantly alter the drainage characteristics of a street. Drainage must be evaluated as part of the design of raised crosswalks and intersections.
Considerations
Raised intersections may have different pavement material to bring attention to the intersection. Ensure that colored pavements or materials still meet ADA requirements for contrast and surface.
7.3.6.3.5 Lower Speed Limits
Motor vehicle speed is known to contribute to crash severity and likelihood of survival for bicyclists and pedestrians. Speed is also a known factor that influences motorist stopping and yielding rates. Lowering the posted speed of roadways can result in the lowering of the operating speeds and improve pedestrian safety and improve motorist compliance with pedestrian safety countermeasures. See the TxDOT Procedures for Establishing Speed Zones manual for additional information on posted speed determination.
7.3.6.3.6 Hardened Centerlines
Hardened centerlines are painted centerlines supplemented with vertical barriers at signalized or unsignalized intersections. Hardened centerlines change the path of travel through the intersection, creating tighter left turn radii which improves the visibility of pedestrians in the crosswalk and also reduces turning speed.
Application
Hardened centerlines are applicable in retrofit situations where the intersection has not been otherwise designed to slow turning vehicles and appropriately align them to provide drivers clear sightlines of crossing pedestrians.
Design Parameters
Materials: Materials for hardened centerlines should be sturdy, stable materials, such as plastic bollards and turning wedges. See TxDOT Departmental Materials Specification DMS 4350 for more information. Materials must be listed on the Material Producer List. Install products in accordance with manufacturer's specifications.
Considerations
The use of hardened centerlines should decrease over time as intersections are built to principles with pedestrian safety in mind or are wholly retrofit with more permanent materials.
7.3.6.4 Uncontrolled Crossing Safety Countermeasures
Uncontrolled crossing locations are those where sidewalks or designated walkways intersect a roadway at a location where no traffic control (i.e., traffic signal or STOP sign) is present. These may be at intersection or midblock locations.
7.3.6.4.1 Marked Crosswalks with Uncontrolled Traffic Movements
As discussed in Section 7.3.1.3.2, motorists must stop and yield the right of way to crossing pedestrians who are lawfully within a marked or unmarked crosswalk at intersections or at marked crosswalks at midblock locations. Marked crosswalks visually communicate to both pedestrians and drivers that pedestrian crossings are expected at that location and remind motorists of their responsibility to stop and yield to pedestrians.
Application
Marked crosswalks indicate optimal or preferred locations for pedestrians to cross, and remind motorists to stop and yield the right of way to crossing pedestrians. They may be installed at any intersection location where it is desired to support pedestrian crossings.
In general, marked crosswalks and other safety treatments should be prioritized at locations where pedestrians desire to cross the street and are vulnerable to conflicts with vehicles such as locations with:
- Anchor: #RLXCOHUO
- High pedestrian and vehicular volumes Anchor: #KCBTURWC
- Locations where pedestrians are routinely expected typical of urban areas, rural town centers, school zones, parks, university or other similar pedestrian intense institutional land uses, or at bus stops Anchor: #ARGTEEMR
- Locations with vulnerable populations such as children, senior citizens, people with disabilities, or hospital areas Anchor: #CFFMVRUS
- Locations where traffic or geometric conditions make it difficult for pedestrians to cross creating safety challenges for pedestrians Anchor: #RPNBHLFA
- Locations with shared use path or trail crossings
Marked crosswalk research shows that they are an effective treatment to increase motorist awareness of pedestrians and to improve understanding of right-of-way compared to unmarked crosswalks. However, this research also shows that marked crosswalks used alone may increase pedestrian crash risk if not used with other supplemental engineering treatments at uncontrolled crossings where the speed limit exceeds 40 mph and either:
- Anchor: #VYYWDGTI
- A. The roadway has four or more lanes of travel without a raised median or pedestrian refuge island and an ADT of 12,000 vehicles per day or greater; or Anchor: #QCGEWQDS
- B. The roadway has four or more lanes of travel with a raised median or pedestrian refuge island and an ADT of 15,000 vehicles per day or greater.
At these locations, it will be necessary to install other measures to reduce traffic speeds, shorten crossing distances, enhance driver awareness of the crossing, and/or provide active warning of pedestrian presence to supplement the marked crosswalk following the guidance in Section 7.3.6.2.
A marked crosswalk is required to legally establish the midblock crossing per Texas code§541.302.
Design Parameters
Marked crosswalks must follow TxDOT PM standards and further guidance found in TMUTCD Section 3B.18.
Figure 7-28. A Marked Crosswalk
Stop Line Location: Stop lines should be used to indicate where vehicles are required to stop in advance of a marked crosswalk at signalized and stop controlled intersections. Locating stop bars at least 6-ft from the crosswalk can increase pedestrian comfort and may decrease the likelihood of encroachment on the sidewalk by vehicles. The minimum separation is 4-ft.
Considerations
Supportive Traffic Control Signs: Regulatory and warning traffic signs (see Section 7.3.6.4.3) may be used at and in advance of a crosswalk where pedestrians may be unexpected, and it is desired to improve visibility of the crossing.
Standard markings will incur wheel wear and need to be maintained over time. Longitudinal crosswalk markings should not be in the wheel path of vehicles. Center the crosswalk lines on travel lanes, lane lines, and shoulder lines (if present) to reduce, wear, and thus maintenance. To provide better visibility on concrete roadways, the white crosswalk markings may be outlined with black contrast markings.
7.3.6.4.2 Stop Bars and Yield Lines
Stop bars, yield lines, or advance yield markings, improve safety at uncontrolled crossings on multilane roadways by improving visibility and decreasing the possibility of a multiple threat collision. These lines reinforce a driver’s responsibility to stop and yield to pedestrians in a crosswalk at an uncontrolled location, or stop and yield condition movement within a signalized intersection, e.g., a channelized right turn lane. Stop bars, or yield lines are those placed in advance of a marked crosswalk. See TMUTCD Section 3B.16 and Figure 3B-17.
Application
Refer to Figure 7-24 in Section 7.3.6.2 for application. Because they are effective at mitigating multiple threat crashes, they should be considered at all marked, unsignalized crossings of multi-lane roadways. They may be used on single lane approaches to marked crosswalks where engineering judgment determines a need.
Design Parameters
See Section 3B.16 of the TMUTCD and the current PM standard for further design guidance.
Considerations
Parking should be restricted on both sides of the street between the stop bars, and yield line markings and the marked crosswalk to improve visibility. See Section 3B.16 of the TMUTCD for further guidance.
Stop bars may be staggered across lanes if appropriate.
“PED XING,” “SCHOOL XING,” or “TRAIL XING” pavement markings may be placed in advance of the stop bar pavement markings to identify the purpose of the stop bars is a crossing along with a corresponding warning sign.
Figure 7-29. Stop Bars at a Marked Crosswalk
7.3.6.4.3 Supportive Signs
The functions of signs are to provide regulations, warnings, and guidance information for road users. They can be supplemented with markings. Any information intended for pedestrians must be accessible to all pedestrians. The following discussion focuses on the most common signs needed to support engineering treatments in this chapter. The TMUTCD describes the use and application of other signs not discussed which may be beneficial to accommodating pedestrians.
Wayfinding is discussed in section 7.3.9 below.
7.3.6.4.4 Pedestrian Crossing Warning Sign Assemblies
Application
Pedestrian traffic warning signs should be used at and in advance of a marked or unmarked crosswalk to notify motorists of the crossing and improve visibility of the crossing as a baseline treatment to marked crosswalks. Refer to Figure 7-24 in Section 7.3.6.2 for application. The message should reflect the type of crossing (pedestrian (W11-2), school (S1-1), trail (W11-15 or W11-15a)). They should be used at all marked, uncontrolled crosswalks. See TMUTCD Section 2C.50 for guidance and standards for use. School zone traffic control is further covered in Chapter 7 of the TMUTCD.
Figure 7-30. Pedestrian Crossing Warning Signs (left to right): Pedestrian Crossing, School Crossing, Pedestrian and Bike Trail Crossing, and Trail Crossing.
Considerations
Signs may be mounted back to back on the same sign post to allow double posting of signs on the left and right side of the road to improve visibility to approaching motorists. Signs should be such that visibility is not obscured by other signs, utility poles, buildings, or vegetation.
An advanced placement of these signs should be considered in locations where sight distance is obstructed, or the crossing may be unexpected following the guidance of TMUTCD Section 2C.05.
Beacons or flashers can be used to supplement warning signs and can be mounted on the sign post with the warning sign or over the crossing. They can flash continuously or be actuated by a pedestrian waiting to cross; however, these signs have been shown to be more effective if actuated. Actuation can occur when a pedestrian uses a pushbutton or through passive detection such as infrared. Wherever pedestrian actuated systems are installed, they should be accessible.
7.3.6.4.5 Pedestrian Crossing Regulatory Sign Assemblies
Application
The “Stop Here for Pedestrians” series signs (R1-5b, R1-5c, R1-6a, and R1-9a) may be used to notify approaching motorists of their responsibility to stop and yield to crossing pedestrians at uncontrolled crossings. Refer to Figure 7-24 in Section 7.3.6.2 for application. See Section 2B.11, 2B.12, and Section 3B.16 of the TMUTCD for further standards and guidance.
Figure 7-31. Unsignalized Pedestrian Crossing Signs.
Figure 7-32. Pedestrian Stop Sign at an Uncontrolled Intersection.
Considerations
In-street Stop for pedestrian sign (R1-6a) have been found to be effective at increasing motorist stopping rates on roadways operating at 30 mph or less with ADT of 25,000 or less (see Figure 7-32).
7.3.6.4.6 Rectangular Rapid Flashing Beacon
A rectangular rapid flashing beacon (RRFB) is a device that supplements a warning sign that consists of amber LEDs that use an irregular flash pattern to draw roadway users’ attention to a crossing when a pedestrian is present. They may supplement any of the warning signs discussed in Section 7.3.6.4.3. RRFBs are generally actuated with a pedestrian push button but may also be activated through passive detection.
As of September 11, 2018, RRFBs have interim approval for use across Texas though they do not appear in the current (2011) edition of the TMUTCD. Contact Traffic Safety Division for specific guidance on the use of RRFBs. (As of the publishing of this manual, the link for interim approval of rectangular rapid flashing beacons can be found here: https://ftp.dot.state.tx.us/pub/txdot-info/trf/pdf/revised-guidelines.pdf.)
Application
RRFBs can be used at and in advance of an uncontrolled marked or unmarked crosswalk to notify motorists of the crossing and improve visibility of the crossing as a baseline treatment at locations where static signs or flashing beacons are not sufficient to induce motorist stopping and yielding. Refer to Figure 7-24 in Section 7.3.6.2 for application.
Considerations
On multi-lane roadways, consider the visibility of roadway edge signs to drivers in the middle lanes. Where a median island is present, placement of additional RRFB assemblies there may increase visibility and thus stopping and yielding compliance. RRFBs may also be placed in advance of the crossing on higher speed roadways or at locations with sight distance restrictions providing motorists sufficient time to react to the device to slow and stop and yield to crossing pedestrians. The advance sign(s) can be designed to wirelessly communicate when the crossing is actuated.
The R1-5b signs and advanced stop bar markings may also be used with the RRFB. Care should be taken such that R1-5b signs do not restrict motorists’ view of the flashing beacon at the crosswalk.
Solar-powered assemblies can eliminate the need for connecting to a power source.
Figure 7-33. Rectangular Rapid Flashing Beacon.
7.3.6.5 Signalized Crossing Safety Countermeasures
7.3.6.5.1 Warrants
Warrants specified in Chapter 4C of the TMUTCD govern the installation of traffic signals at intersections, including provisions to accommodate pedestrians. Engineering studies to support the evaluation of traffic signal warrants must include a review of pedestrian characteristics and volume and whether the location is a school crossing.
7.3.6.5.2 Standard Signals
Application
Traffic signals provide benefits to pedestrians by stopping automobile traffic and allowing a designated phase for pedestrians to cross a roadway. See Section 7.3.6.2, and the Traffic Signals Manual for further guidance on the use of traffic signals.
Consideration
The needs of all pedestrians should be taken into account when designing traffic signals at intersections where they can be expected to cross. Pedestrian safety, comfort, and convenience at intersections is fundamentally impacted by several major design decisions including cycle length, crossing time, and phase selection. Signalized intersections should be designed for pedestrians to cross in one phase. Wait times for pedestrians at traffic signals should be minimized. Substantial delays encourage pedestrians to violate the traffic signals and cross against Don’t Walk signals. Phasing based on other factors (volume, anticipated turning volumes, etc.) should be reviewed for its adequacy in accommodating pedestrian travel across each intersection leg. Long cycle lengths which dramatically increase pedestrian delay during periods of lower traffic volumes can reduce pedestrian compliance rates inducing attempts to cross during gaps in traffic. This is a particular concern during evening hours when pedestrian fatalities are highest.
7.3.6.5.3 Pedestrian Hybrid Beacon
A pedestrian hybrid beacon (PHB) is a pedestrian-activated warning device located on the roadside, or on mast arms over midblock or intersection pedestrian crossings. The beacon head consists of two red lenses above a single yellow lens. The beacon head is dark until the pedestrian wanting to cross the roadway presses the button and activates the beacons.
This device provides an additional tool for improving the safety of crosswalks when traffic signals do not meet warrants. PHBs should be used in conjunction with signs and pavement markings to warn and control traffic at locations where pedestrians enter or cross a street or highway.
Districts must receive Traffic Safety Division (TRF) approval for installation of a PHB for each location.
(As of the publishing of this manual, the link for interim approval of rectangular rapid flashing beacons can be found here: https://ftp.dot.state.tx.us/pub/txdot-info/trf/pdf/revised-guidelines.pdf.)
Application
Refer to Figure 7-24 and Chapter 5 Section 7 of the Traffic Signals Manual for application. PHBs are generally more applicable on wider, higher volume roadways where a stop and yield condition does not provide reliable, safe, frequent opportunities for pedestrians to cross.
All of the following conditions must be met for a PHB to be considered:
- Anchor: #KQNSWAFI
- An engineering study must be performed and meet the guidelines detailed in Chapter 4F of the TMUTCD; Anchor: #ACJEAXBD
- An established crosswalk with adequate visibility, markings and signs; Anchor: #SSMXCILS
- A posted speed limit of 40 mph or less (does not include school speed zones); Anchor: #PYAVMRYF
- 20 pedestrians or more crossing in one hour; Anchor: #NQRPXWNV
- Location deemed as a high-risk area (e.g. schools, shopping centers, etc.); and Anchor: #MMRCFCFI
- Crosswalk is more than 300 ft. from an existing, traffic controlled pedestrian crossing.
See Chapter 4F of the TMUTCD for specific design standards and guidelines.
Considerations
Designers may make the case for a PHB in a location that today does not have 20 pedestrians or more crossing in one hour. (See considerations below) If a location may draw that level of pedestrian traffic once the PHB is implemented, or if there are anticipated nearby land use changes that will attract more significant volumes of pedestrian traffic.
Figure 7-34. A Pedestrian Hybrid Beacon.
7.3.6.5.4 Use of Pedestrian Signal Faces
Application
Pedestrian signal faces aid in crossing by communicating timing and permission specific to pedestrian travel who may be crossing at a traffic signal or a Pedestrian Hybrid Beacon.
Pedestrian signal heads should be provided at all signalized crossings with sidewalks and curb ramps on the approaches, as well as at all signalized crossings where pedestrian activity is expected, regardless of the presence of sidewalks. See Chapter 4E of the TMUTCD for guidance and standards, including for accessible pedestrian signals (APS).
Considerations
Marked crosswalks should be installed at all crossings with pedestrian signals. See Section 7.3.6.4.1for details.
Pedestrian signal faces may be timed and phased differently from the general traffic signal face, thus better accommodating the differing travel characteristics and speeds of pedestrians. See Section 4E.03 of the TMUTCD for further specifications regarding the application of pedestrian signal faces.
7.3.6.5.5 Actuation
Pedestrian actuation may impact signal or beacon operation in two ways: 1) actuating pedestrian beacons or signal heads that direct pedestrians’ crossing behavior, and/or 2) it may also change overall operations of a signal to extend a pedestrian phase only when pedestrians are present, thus allowing them to cross the full width of an intersection leg in one phase.
Pedestrian Pushbuttons
Push buttons allow pedestrians to actuate a signal or beacon by pressing a button. Some emerging technologies allow pedestrians to activate the signal by waving a hand in the vicinity of the button as well. See TMUTCD Sections 4E.08 through 4E.13 for guidance and standards regarding use of pushbuttons.
Application
Actuation is optional at signals but required for pedestrian hybrid beacons and RRFBs. All buttons should be accessible.
Figure 7-35. Preferred Pushbutton Locations. (Source: Draft MUTCD, Federal Highway Administration). Pedestrian Actuation Pushbuttons. Source: Draft MUTCD 2021 Update, FHWA.
Considerations
If the button is mounted on its own pole, the pole should not obstruct the pedestrian access route. Where there are physical constraints that make it impractical to place the pedestrian pushbutton adjacent to a level all-weather surface; the surface should be as level as feasible.
Though it is not desirable to design for an intersection where pedestrians are most likely to cross in two stages (curb to median, median to curb), where signal design necessitates this operation, a pushbutton must be provided in the median refuge for pedestrians to activate the pedestrian signal heads for the second crossing.
The use of audible or visual confirmation of detection communicates to pedestrians that the WALKING PERSON indication is forthcoming can improve signal compliance. This can be provided with an accessible signal.
Signal supports may be excluded from clear zone requirements. Refer to Chapter 2 Section 7, Clear Zone and Table 2-12 for further considerations when placing signal supports within the clear zone.
Passive Detection
Passive detection systems consist of one of several types of technologies (e.g., infrared, microwave, etc.) to detect pedestrians’ presence near the point of departure at a crosswalk.
Application
Passive detection may be used to activate pedestrian phases and signal heads and/or to supplement other sources of actuation by adjusting pedestrian clearance time when a pedestrian is detected.
7.3.6.5.6 Timing Considerations
Signal timing may be designed or amended to create a safer, more comfortable pedestrian environment through several strategies. Signalized intersections are common locations for pedestrian-vehicle collisions, most often with turning vehicles; collisions can occur between parties traveling the same direction (right-turn conflict) or in opposing directions (left-turn conflict). Collisions may also occur between pedestrians and vehicles traveling in perpendicular directions when pedestrians do not have adequate crossing time and remain in the roadway once the signal changes, or when either party fails to obey traffic controls. The strategies below can aid in avoiding these conflicts.
Protected Turn Phasing
Signal phasing that includes protected left-, right- or both turn phases can benefit pedestrian safety by removing potential conflict through separating pedestrian and vehicle travel in time. Pedestrians crossing an intersection leg proceed with the through movement in the same direction while turning traffic is held.
Application
Protected phasing should be considered where pedestrian volumes are anticipated to be high, where there are high percentages of child or older pedestrians, and at locations with multiple conflict point turn lanes across a crosswalk. Protected phasing should also be considered where intersection geometry allows vehicles to turn in excess of 20 mph while executing turning movements. The pedestrian crossing interval must meet the requirements of Section 4E.06 of the TMUTCD.
Considerations
Application of protected turn phasing to an existing signal should be accompanied by the installation of an accessible pedestrian signal so pedestrians with disabilities will follow the same behavior as other pedestrians. Intersections with right and left turn lanes and pedestrian crossing islands create the opportunity to create exclusive pedestrian phases by restricting motorists turning movements to shared right and left turn overlaps. The exclusive pedestrian crossing can be provided concurrent with through moving motorists.
During periods of lower traffic volume protected phases could be adjusted to permissive with flashing yellow arrows for right and/or left turns across pedestrian crossings. This can provide flexibility to reduce conflicts during the pedestrian walk phase at key times during the day or during special events limiting times of protected phases to periods with the greatest need.
Leading Pedestrian Intervals
A leading pedestrian interval (LPI) activates the white WALK indication for the crosswalk while a red indication continues to be displayed for vehicle traffic (through and/or turning) in the same direction. This allows pedestrians to proceed into the crosswalk in advance of vehicle movements, thus making them more visible to turning drivers who may cross their path of travel. They are a proven FHWA Safety Countermeasure. See Section 4E.06 of the TMUTCD for further guidance.
Application
An LPI should be considered for locations with high pedestrian volumes and high volumes of turning vehicles or locations with a history of crashes between pedestrians and turning motorists.
Design Parameter
If a leading pedestrian interval is used, they should be timed to allow pedestrians to cross at least one lane of traffic or, in the case of a large corner radius, to travel far enough for pedestrians to establish their position ahead of the turning traffic before the turning traffic is released. A typical LPI interval range is between 3 and 7 seconds with a minimum of 3 seconds. There is no maximum interval, however long intervals may be better served by completely protected crossing phases.
Considerations
Application of an LPI to an existing signal should be accompanied by the installation of an accessible pedestrian signal so pedestrians with disabilities will follow the same behavior as other pedestrians.
If a leading pedestrian interval is used, consideration should be given to prohibiting turns across the crosswalk during the leading pedestrian interval. See Section 7.3.6.5.6, “Motorist RTOR Restrictions” for additional information.
7.3.6.5.7 Supportive Signs
Crosswalk Restrictions
Intersections should be designed to enable pedestrians to cross all legs. There may be limited circumstances where pedestrian access across a leg of an intersection may be prohibited, however this should rarely be done unless there is a compelling reason to limit this movement. Pedestrians should not be directed to cross multiple legs of an intersection to access a corner that could otherwise be accessed by crossing a single leg. Crossing additional legs creates more exposure to vehicular traffic for pedestrians and forces pedestrians to travel longer distances. If pedestrian crossings at unmarked crosswalks must be restricted, sign types R9-2, R9-3, or other appropriate regulatory signs must be installed to face pedestrian approaches of restricted crosswalks. Also note that prohibited crossing locations must be blocked by landscaping or other physical means to prevent unintended use by pedestrians who are blind or have low vision.
Figure 7-36. Restricted Pedestrian Crossing Sign.
Motorist RTOR Restrictions
Right Turn on Red (RTOR) introduces pedestrian safety concerns because drivers scanning for gaps in traffic on their left may not look for pedestrians on their right. Allowing drivers to turn right or left during a pedestrian WALK signal is a frequent cause of crashes between pedestrians and drivers and can impede a pedestrian’s ability to complete their crossing by delaying their entry into the roadway. At locations which allow RTOR, motorists are likely to encroach into the crosswalk while watching oncoming vehicles, further eroding pedestrian safety and comfort. These conflicts can be reduced by restricting RTOR movements. The FHWA Pedestrian Safety Guide and Countermeasure Selection System suggests that “prohibiting RTOR should be considered where exclusive pedestrian phases or high pedestrian volumes are present.”
Right turn-on red can be restricted when activated by a pedestrian push button by using NO RIGHT ON RED blank-out signs to limit the restriction to times when pedestrians are present.
Turning Traffic Stop and Yield
Left and right turning motorists at signals can account for a high percentage of conflicts and crashes with pedestrians at locations with permissive phasing. Where conflicts between turning motorists and crossing pedestrians are likely, a TURNING TRAFFIC STOP FOR PEDESTRIANS (R10-15a) sign should be considered. This sign may be used for both left and right turning traffic.
7.3.6.6 Mid-block Pedestrian Crossing Safety Countermeasures
Midblock pedestrian crossings may be appropriate in a variety of contexts based on pedestrian desire lines, transit stop locations, land use context, and intersection spacing. Motorists are more likely to expect pedestrians at intersection locations and often are driving at higher speeds in midblock locations. Because of this, the use and design of midblock crossings should be deliberate to address pedestrian safety and improve motorist compliance.
Given the differences between intersection and midblock crossings, there are several key considerations designers must keep in mind:
- Anchor: #KGUMDECH
- The crossing location should be convenient for pedestrians; Anchor: #RDSIAFPB
- Motorists should be alerted of the crossing as they approach it; Anchor: #XJXWDLEJ
- Pedestrians must be able to assess opportunities to cross; and Anchor: #EJEHYOOS
- All users must be made aware of their responsibilities and obligations at the crossing and designers must provide opportunities to meet those responsibilities and obligations.
Designers should consider pedestrian volumes, motorist volumes, types of vehicles, traffic speeds, roadway characteristics (e.g. number of travel lanes), and adjacent land use context when determining if a midblock crosswalk should be provided. Additionally, pedestrians have a strong desire to stay on their path of travel and do not want to go unnecessarily out of their way to utilize a crossing, so crossing locations should be placed at or near the pedestrians’ desired path of travel.
7.3.6.6.1 Location Considerations
To promote and achieve high compliance, midblock crossings should be located where intersection spacing is excessive and there is a natural desire line for the pedestrians’ path of travel. These conditions may include some of the following:
- Anchor: #YKCKMWUM
- Signalized intersection spacing exceeds 600-ft; Anchor: #EXUQENUJ
- A shared use path intersects a street midblock; Anchor: #EFCACYWO
- Transit stops are located midblock; Anchor: #CYCJODCF
- Existing pedestrian demand demonstrates a need (e.g. parking lot and office building on opposite sides of the roadway); and Anchor: #FORJLINJ
- New or existing development generates heavy pedestrian traffic (e.g. shopping center, school, etc.).
7.3.6.6.2 Crossing Treatments
The guidance in Sections 7.3.6.3 through 7.3.6.5 for pedestrian crossing treatments and countermeasures is similarly applicable to midblock crossings. See latest standard PM(4) and the TMUTCD for guidance on additional signing and markings for midblock crossings.
7.3.6.7 Pedestrian Facilities at Alternative Intersections
Pedestrian facilities should be included at alternative intersections using the same design principles that apply for standard intersections and midblock crossings. For alternative intersection treatments, adequate sight distance is particularly important as vehicles and pedestrians are often approaching one another at non-right angles. Refer to Appendix E for further guidance on these intersections.
7.3.6.8 Pedestrian Treatments at Railroad Crossings
Texas has a network of railroad systems, which are operated and controlled by federal, local, and state laws and regulations. Where the rail networks cross pedestrian facilities, it is important to follow specified guidance that makes the crossing safe and predictable for the pedestrian and rail operator. All pedestrian facilities should be designed to minimize pedestrian crossing time, and devices should be designed to avoid trapping pedestrians between sets of tracks.
- Anchor: #MDNOJTBI
- Traffic Control. The TMUTCD has guidance on signage, gates, flashing beacons and other rail crossing warning devices to communicate with pedestrians at railroad crossings. Traffic studies may be needed to determine the level and type of traffic control that should be used. See TMUTCD for more guidance. Anchor: #CEKMLWLX
- Passive and Active Devices. May be used
to supplement highway-related active control devices to improve
non-motorist safety at highway-rail crossings. These devices should
be considered at crossings with high pedestrian traffic volumes,
high train speeds or frequency, extremely wide crossings, complex
highway-rail crossing geometry with complex ROW assignment, school
zones, inadequate sight distance; and/or multiple tracks. Passive
or Active Devices should always be used if no highway-related active
control devices are present.
- Anchor: #EEOGESGK
- Passive devices include fencing, swing gates, pedestrian barriers, detectable warning surfaces, pavement markings, texturing, refuge areas, and fixed message signs. Anchor: #HWAFDUFB
- Active devices include flashers, audible active control devices, automated pedestrian gates, pedestrian signals, variable message signs, and blank-out signs. Railroad operating practices may not support installation of pedestrian only devices.
Anchor: #KLSRQXHM - See Federal Rail Administration’s Highway-Rail Crossing Handbook and Engineering Design for Pedestrian Safety at Highway-Rail Grade Crossings report for further detail on these treatments. Anchor: #LAPBRYHC
- Visibility. Clear sightlines should be established so that pedestrians can clearly see oncoming trains and assess whether there is adequate time to cross. Anchor: #ASNMRXSL
- Approach Angle. Perpendicular crossings are preferred in order to provide adequate sight lines and decrease the risk of mobility device wheels getting stuck in flangeway gaps. Where the roadway crossing is skewed, consider widening or providing a bend out in the sidewalk at the rail crossing that allows for a crossing angle closer to perpendicular, preferably between 60 and 90 degrees. Anchor: #SAFGNHIE
- Flangeway Gaps. PROWAG recommends flangeway gaps should not exceed 3-in for freight tracks or 2.5-in for non-freight tracks Anchor: #NOUFQNYN
- Detectable Warning Surfaces. Detectable
warning surfaces (DWS) such as truncated domes, should be placed
on either side of the crossing and outside of the train’s “dynamic
envelope,” the space the train takes up on either side of the track.
The distance between the rail and end of the dynamic envelope is
6 feet unless otherwise stated by the operating railroad. PROWAG and
AASHTO recommend the following design guidance for DWS placement:
-
Anchor: #RBYEETFM
- The nearest edge of the DWS to the rail should be a minimum of 6 feet and a maximum of 15 feet. Anchor: #EVLVFQXC
- The detectable warning should be, at minimum, 2 feet wide in the direction of pedestrian travel and shall extend the full width of the crossing, including any flared sides or ramps that may be present.
Anchor: #KOEUXBSU - Quiet Zones: Note that specific standards apply to pedestrian crossing treatments and signage for designated quiet zones. See Federal Railroad Administration materials related to quiet zones here: https://railroads.dot.gov/highway-rail-crossing-and-trespasser-programs/train-horn-rulequiet-zones/train-horn-rule-and-quiet
More details on design options and treatments can be found in the Federal Rail Administration’s Highway-Rail Crossing Handbook Chapter 2 and report “Engineering Design for Pedestrian Safety at Highway-Rail Grade Crossings.”
Anchor: #i12206167.3.7 Overcrossings and Underpasses
7.3.7.1 Sidewalks for Bridges and Underpasses
7.3.7.1.1 General
While most bridges and underpasses primarily serve motor vehicle traffic, they may also represent the only nearby option for pedestrians to cross a significant barrier. To serve the needs of pedestrians, grade‐separated crossings should consider accessibility, user comfort, and personal safety, including preserving good sight lines.
Pedestrian facilities should be provided on both sides of vehicular bridges and underpasses in all area types. See below for design parameters specific to bridges and to underpasses. Bridges and underpasses with PAR should consider lighting for personal comfort and safety for users. Further guidance about lighting is available in Section 7.3.10.
7.3.7.1.2 Bridges
A PAR should be provided as part of on-system bridges on both sides of vehicular bridges in urbanized areas, if only as an emergency exit path. In urban and suburban areas, this walking area should consist of a sidewalk and/or shared use path
Wherever possible, sidewalk widths across bridges should be the same or greater than the clear width of the existing connecting sidewalks. A greater width provides increased pedestrian comfort by allowing people to walk further from moving traffic.
7.3.7.1.3 Underpasses
Pedestrian facilities such as sidewalks must be provided at vehicular underpasses. Where underpasses are constructed without pedestrian facilities, design should anticipate and provide space for pedestrian facilities to be constructed in the future.
Wherever possible, sidewalk widths through underpasses should be the same as the clear width of the existing connecting sidewalks. See Ch. 2 for vertical clearance requirements for pedestrian crossover structures.
Underpasses that are below grade should provide clear sight distances to and through the underpass. Drainage must be carefully considered to maintain accessible use of underpasses. Overhead clearance for pedestrians is much less than clearance for vehicles, so it is possible to lessen the grade for sidewalks at below grade underpasses. This will make the sidewalk more useable and can increase safety as well.
Lighting should be considered for pedestrian facilities within underpasses. This lighting can be placed along the sidewalk buffer zone or attached to the overpass structure.
7.3.7.2 Railings and Handrails for Pedestrian Facilities
Railings and handrails can improve safety and comfort for pedestrians on bridges/overpasses and in underpasses, and on pedestrian/bike bridges or in pedestrian/bike underpasses. In cases where railings or handrails are provided on both sides of a sidewalk or shared use path, clear width must be maintained between them as measured from the face of the railing. The minimum clear width between railings is 4-ft and passing spaces of 5-ft are required every 200-ft. However, designers should consider consistent wider clear spaces for pedestrian facilities on all bridges and underpasses as they need to accommodate the potential for two users passing one another; a 5-ft passing space between two adjacent vertical elements is not adequate for two users in mobility devices to navigate past one another.
Additionally, pedestrians’ natural behavior is to shy away from vertical elements, such as railings or walls, adjacent to a pedestrian route, and the area of the sidewalk they tend to avoid is referred to as shy distance. A shy distance of 2-ft is recommended for pedestrian facilities on bridges and underpasses where continuous railings or handrails are used, with a minimum of 1-ft shy distance in constrained locations where lane widths and other widths are also reduced to minimum dimensions. This may result in a wider sidewalk than the facility approaching the bridge or underpass.
7.3.7.2.1 Railings
Railings may be used on the outside edge of a pedestrian facility on a bridge, between the pedestrian facility and adjacent travelway on a bridge or in an underpass, or on the edges of a pedestrian/bike bridge. Railing height and placement requirements differ based on the expected design user, the type of facility, and the adjacent slope. The warranting conditions where railings should be considered adjacent to steep slopes are discussed below under section 7.3.12. See Chapter 3 Section 2 of the Bridge Railing Manual and Chapter 3 Section 1 of the Bridge Design Manual for further guidance on the use of railings on bridges.
Figure 7-37. A Railing as a Barrier Against a Steep Drop-Off for a Sidewalk Facility at an Overpass.
7.3.7.2.2 Handrails
To maintain minimum ADA requirements on sloped approaches to a grade-separated facility (bridge or overpass), handrails must be provided at a continuous height between 34- and 38-in. TxDOT’s Pedestrian Handrail standard is for handrail height of 36-in above the walk surface. A second set of handrails at a maximum height of 28-in may be considered if children are expected to be regular users of the facility. If two levels of handrails are provided, the minimum vertical clearance between the two should be 9-in to reduce the likelihood of entrapment. See TAS Section 505 for additional design criteria related to handrails.
7.3.7.3 Pedestrian/Bike Bridges and Underpasses
Where a designer is not able to provide appropriate treatments for the at-grade pedestrian crossing of a roadway, or where the nature of the barrier being crossed does not allow an at-grade crossing (e.g., freeway, water body, depressed rail line, etc.), a grade-separated crossing should be considered. It is not practical to develop warrants governing the construction of pedestrian grade separation facilities. Each situation must be considered on its own merits.
The need for a grade-separated crossing must include an engineering analysis of all alternatives, including safety improvements to nearby at-grade crossings. When the construction of a pedestrian grade separation is considered, an investigation should be made including studies of pedestrian crossing volumes, type of highway to be crossed, proximity of adjacent crossing facilities, the predominant type and age of persons who will use the facility, and the cost of constructing the pedestrian grade separation.
The effectiveness of grade-separated crossings depends on their perceived ease of accessibility by pedestrians. An overpass or underpass will not be used simply because it improves safety. Pedestrians tend to weigh the perceived safety of using the facility against the extra effort and time needed. The degree of use of overpasses and underpasses by pedestrians depends on walking distances and the convenience of the facility.
The primary location for pedestrian overpasses/underpasses is often an urbanized area but may be appropriate in other contexts. Such a pedestrian crossing may be considered when the following conditions exist:
- Anchor: #TITXQNMY
- Pedestrian demand to cross a freeway or expressway is moderate to high; Anchor: #EVJEKESU
- A large number of children need to regularly cross a high-speed, high-volume roadway (particularly near schools); Anchor: #SCOKTPKE
- Conflicts that would be encountered by pedestrians are considered unacceptable (e.g., on wide streets with high pedestrian crossing volumes combined with high-speed traffic); or Anchor: #AQCFNSGM
- One or more of the conditions stated above exists in conjunction with a well-defined pedestrian origin and destination (e.g., a residential neighborhood across a busy street from a school; a parking structure affiliated with a university or other campus; a high-volume, multi-use trail; a major entertainment destination; or an apartment complex near a shopping mall). Anchor: #VFLAFDOP
- Grades on either side of the proposed bridge or underpass are conducive to building the structure
Figure 7-38. Underpasses For Pedestrians And Bicyclists Should Provide Clear Sightlines At The Approach And Through The Underpass.
A pedestrian grade separation should only be constructed when the need for the safe movement of pedestrians cannot be provided in a more efficient manner. Additional guidance concerning pedestrian grade separations can be found in an AASHTO publication Guide Specifications for Design of Pedestrian Bridges.
7.3.7.3.1 Pedestrian/Bike Bridges
Design Parameters
Grade: Bridges must comply with ADA guidelines: not exceeding a 5 percent running slope or 2 percent cross slope. Where space constraints result in necessary steeper grades, bridges must be designed to a maximum slope of 8.3 percent, and landings are required for every 30-in of ramp rise. Landings must be a minimum of 5-ft in length and can have a maximum 2 percent slope in any direction. Assuming a full 30-in rise at 8.3 percent and a 5-ft landing at 2 percent slope results in an “effective grade” of 7.4 percent. It is recommended that this be used for short, constrained segments only if needed rather than a basis of design for long, sustained segments.
Width: The minimum inside clear width of pedestrian bridges, exclusive of railings and handrails, is 8-ft. If the adjacent sidewalk widths are greater than 8-ft, then the minimum inside clear width must match the adjacent sidewalk widths. A minimum width of 14-ft is recommended if the pedestrian bridge will be shared with bicycle traffic. Where width of a bridge is sufficient to permit vehicle passage, designs should include some type of deterrent with the preferred choice being a forgiving bollard since more robust bollards may present safety issues for pedestrians and bicyclists. Greater deterrents are recommended where the structure would not support the weight of a vehicle.
Vertical Clearance: See Ch. 2 for vertical clearance requirements for pedestrian crossover structures.
Lighting: Adequate lighting should be provided for pedestrian and bike bridges that allows users to see one another in nighttime conditions to avoid collisions and improve the perception of personal security.
7.3.7.3.2 Pedestrian/Bike Underpasses
Design Parameters
Grade: Underpasses must comply with ADA guidelines: not exceeding a 5 percent running slope or 2 percent cross slope. Where space constraints result in necessary steeper grades, underpasses must still comply with ADA requirements. Underpasses’ grades and lengths should allow for clear sightlines at the approach and through the underpass.
Width: Width recommendations are 14- to16-ft, but underpasses longer in length and expecting high use in urban areas should be wider. Where width of an underpass is sufficient to permit vehicle passage, designs should include some type of deterrent with the preferred choice being a forgiving bollard since more robust bollards may present safety issues for pedestrians and bicyclists.
Vertical Clearance: A minimum vertical clearance of 10-ft is required. Designers should consider additional height when it would provide clear sight lines through the underpass,
Lighting: Adequate lighting should be provided for pedestrian and bike underpasses that allows users to see one another in nighttime conditions to avoid collisions and improve the perception of personal security.
Anchor: #i12209667.3.8 Work Zone and Temporary Traffic Control Pedestrian Accommodations
Texas Administrative Code Title 43 §22.12 states that traffic control plans shall address pedestrian traffic during individual phases of construction and operation. Part 6 of the TMUTCD provides guidance on the planning and design of temporary traffic control (TTC) which states, “The needs and control of all road users (motorists, bicyclists, and pedestrians within the highway, or on private roads open to public travel … including persons with disabilities in accordance with the Americans with Disabilities Act of 1990 (ADA), Title II, Paragraph 35.130) through a TTC zone shall be an essential part of highway construction, utility work, maintenance operations, and the management of traffic incidents.” Refer to the TMUTCD and the WZ (BTS-2) standard for more information on specific traffic control measures for pedestrians in work zones.
Figure 7-39. Sidewalk Detour Details.
Construction activities that affect pedestrian facilities or connectivity to those facilities must provide and maintain an accessible detour. In some cases, this route may continue to be along the roadway in question, e.g., creating a temporary walking path by placing appropriate barricades, reflectorized drums, and signage to reallocate roadway space during closure of a sidewalk. Walkways must be clearly identified, accessible, and free from hazards. Barricades separating the pedestrian route from motor vehicle traffic must be of sufficient strength to withstand intrusion by an impacting vehicle. On higher-speed roadways, continuous, temporary pre-cast concrete barriers are recommended.
It is preferred to maintain the pedestrian route on the same side of the street when a sidewalk is closed. Completely closing a sidewalk for construction and rerouting pedestrians to the other side of the street is another, less desirable option. In the event pedestrians are rerouted to the other side of the street, the street crossing should be located at an intersection, existing crosswalk, or other suitable and safe location. Access to pedestrian pushbuttons should be maintained during sidewalk closures.
Other cases may completely close a roadway that provides pedestrian access to destinations in areas of high pedestrian activity, e.g., the closure of a bridge or underpass across a freeway.
See TMUTCD Section 2D.50 for additional guidance on the placement of pedestrian oriented wayfinding signage.
Anchor: #i12210187.3.9 Lighting
Illuminating sidewalks and crossings makes it easier for people to see when walking at night and also increases their visibility to drivers. There are many considerations when selecting, designing, and implementing lighting to enhance the pedestrian environment. The presence of pedestrian-generating land uses and existing or anticipated pedestrian crossing activity should be considered when determining the appropriate level of illumination. In general, areas with greater anticipated pedestrian volumes, such as commercial districts, near parks and schools, and along transit routes, are most in need of lighting.
All locations where pedestrian crossing is expected and planned for, including signalized intersections, uncontrolled intersections, and mid-block locations, should have adequate lighting at the crosswalk. At controlled and uncontrolled intersections, luminaires should be located no more than10-ft from the crosswalk and positioned to light the side of the pedestrian facing the approaching vehicle.
TxDOT follows FHWA standards for illumination levels and uniformity for lighting for roadways, walkways, bicycle facilities, crosswalks, and pedestrian underpasses. Illumination levels vary depending on luminaire type, pole height, roadway type, and level of pedestrian activity or conflict. Preferred pedestrian lighting layouts will vary based on the functional classification and cross-section being illuminated. Designers should refer to Chapter 6 Section 2 of the Highway Illumination Manual for illuminance values for pedestrian facilities and intersections.
Lighting should be designed to avoid unnecessary light spillover, energy usage, and environmental impacts. Quality and color temperature of light can impact the character and visitor perception of a street or neighborhood. However, special caution should be used when selecting a color temperature for lighting in and adjacent to residential areas. Higher color temperatures produce a bluer light that can disrupt human sleep cycles.
Although various light sources are approved, Light Emitting Diode (LED) lighting is encouraged, as it is more energy efficient. Lighting is typically located in the buffer zone. Lighting should be oriented towards both the roadway and the sidewalk, ensuring that both are illuminated. All street lighting should include no uplight fixtures (BUG rating with U=0) which direct light downward and reduce the potential for glare and light trespass on adjacent properties.
Pedestrian lighting can be used alone or in combination with roadway scale lighting in high activity areas to accommodate pedestrian activity at night. Pedestrian lighting can be located on the same pole as roadway lighting to reduce the number of poles within the Street buffer zone lighting. Lighting on rural roadways is generally not required, but should be considered for intersections, roundabouts, and areas where pedestrians and bicyclists may be present.
Lighting should be placed at least 24-in behind the face of the curb. Poles should be placed in accordance with guidance regarding obstructions in Section 7.3.2.2.1.
Design of lighting systems should be coordinated with local utilities.
Anchor: #i12210717.3.10 On-Street Parking
Where on-street parking is provided, it should be provided in accordance with PROWAG’s guidance on accessible parking spaces including the minimum number of accessible parking spaces required. All accessible parking spaces shall be marked with the International Symbol of Accessibility that contrasts with the pavement surface. Parking spaces and access aisles shall be designed so that vehicles, when parked, cannot obstruct the required clear width of adjacent pedestrian access routes.
Additional guidance for on-street parking is best taken from the PROWAG Sections R214 (the number of accessible spaces), and R309 (dimension requirements).
Additional guidance for facilities such as safety rest areas, buildings, and parking facilities is found in TAS Section 208 Parking Spaces.
7.3.10.1 Parallel Accessible Parking
Parallel accessible spaces adjacent to a sidewalk greater than 14-ft wide require an access aisle. Access aisle must be minimum 5-ft wide, run the length of the parking space, and be connected to the pedestrian access route by a curb ramp between the roadway and sidewalk. Additional pavement markings are not required for the access aisle at parallel parking spaces, but access aisles shall not encroach on the vehicular travel lane. Parallel accessible spaces adjacent to sidewalks less than or equal to 14-ft do not require an access aisle if the space is located at the end of the block. Sidewalks 8-ft wide or wider adjacent to parallel parking spaces should be kept clear of obstructions to allow for wheelchair deployment. Signs shall be located at the head or the foot of the parking space. The sidewalk adjacent to accessible parallel parking spaces should be free of signs, street furniture, and other obstructions to permit deployment of a van side-lift or ramp or the vehicle occupant to transfer to a wheelchair or scooter.
Figure 7-40. Accessible Parallel Parking
7.3.10.2 Perpendicular Accessible Parking
Perpendicular/Angled accessible spaces require a van accessible aisle with a minimum width of 8-ft. Two adjacent perpendicular or angled accessible spaces may share a common access aisle. The upcoming Traffic Standard PM(AP) provides specific guidance for pavement markings and signing for accessible parking.
7.3.10.3 Access Aisles
Access aisles shall be at street level, extend the full length of the parking space they serve, follow ADA Surface requirements (PROWAG R309.2), and be connected to the adjacent pedestrian access route with a curb ramp. Curb ramps shall not be located within the access aisle. Detectable warnings are not required on curb ramps that connect to access aisles unless they also serve pedestrian street crossings.
Figure 7-41. Perpendicular Parking Access Aisles, Showing A Curb Ramp With Flares (Top) And A Parallel Curb Ramp (Bottom).
Anchor: #i12211827.3.11 Transit Access
Transit riders are also pedestrians for the portion of their trip to and from the transit stop. As with other pedestrian facilities, transit stops must be accessible to all members of the traveling public. Transit stops must comply with Section R308 of PROWAG. Transit-stop design, including amenities and location, should be determined in consultation with the transit operators.
Boarding and alighting areas for transit stops require a minimum 5-ft width (parallel to the street) and minimum 8-ft length (perpendicular to the street) that is hardscaped and free of obstructions. Consider providing wider areas to allow for pedestrian passage around boarding, alighting, and waiting transit passengers. The slope of the boarding area perpendicular to the roadway must be no more than 2 percent, but cross slope may follow the general grade of the roadway. Stops must be located such that the front door of the bus aligns with this landing area.
Boarding areas must be connected to streets, sidewalks, or pedestrian circulation paths by an accessible route.
Bus shelters, if provided, must also connect to the boarding area by an accessible route. Transit shelters must be connected by a PAR to boarding areas. Transit shelters must provide a minimum clear space of at least 2.5-ft x 4-ft entirely within the shelter; this clear space must comply with other provisions of Section R404 of PROWAG. Where seating is provided within transit shelters, the clear space must be located either at one end of a seat or must not overlap the area within 1.5-ft from the front edge of the seat. Protruding objects within transit shelters must comply with Section R402 of PROWAG.
Transit stops should be well lit and highly visible to improve the sense of safety and comfort at all times of day. Consider seating at or near transit stops. Seating need not be a unique and dedicated element, but may include leaning rails, planters, ledges, or other street elements. Street furniture associated with transit stops is typically provided by the transit agency and/or local jurisdiction.
Anchor: #i12212167.3.12 Railings Adjacent to Steep Slopes
In some instances, there may be steep slopes adjacent to the walkway if the roadway is elevated relative to the adjacent roadside, next to an open drainage ditch, or on an approach to a highway bridge. In these situations, engineering judgment should be used to assess the need for a physical barrier such as a railing or fence to separate pedestrians from the adjacent drop-off. Depending upon the height of the embankment, the slope of the adjacent roadside, and the conditions at the bottom of the slope, barriers or rails are recommended if any of the following situations occur within 2-ft of the edge of the sidewalk:
- Anchor: #XUBAAJXK
- Slopes between 1V:3H and 1V:2H, with a drop of 6-ft or greater (Figure 7-42) Anchor: #MWFGHVMK
- Slopes of between 1V:3H and 1V:2H, adjacent to a parallel body of water of 2-ft or greater depth, or other substantial obstacle (Figure 7-43) Anchor: #GGRJBHLK
- Slopes of between 1V:2H and 1V:1H, with a drop of 4-ft or greater (Figure 7-44),or Anchor: #TJPTPRAX
- Slopes of 1V:1H or steeper, with a drop of 1-ft or greater (Figure 7-45)
Railings used for drop-off protection should be 42-in minimum height. Rail construction should be consistent with AASHTO’s LRFD Bridge Design Specifications per the Bridge Railing Manual.
Figure 7-42. Slopes Between 1V: 3H and 1V:2H With a Drop of 6-ft or Greater.
Figure 7-43. Slopes of Between 1V:3H and 1V:2H, Adjacent to a Parallel Body of Water or Other Substantial Obstacle.
Figure 7-44. Slopes of Between 1V:2H and 1V:1H, with a Drop of 4-ft or Greater.
Figure 7-45. Slopes of 1V:1H or Steeper, with a Drop of 1-ft or Greater.
Anchor: #i12213357.3.13 Additional Considerations
7.3.13.1 Personal Security
People may not choose to walk for their trip if they do not feel personally secure along the entirety of the route. While not all aspects of personal security can be impacted by roadway design, there are some elements that can be made more secure through design. For example, ensuring the pedestrian access route is well lit will have a positive impact on personal security (see section above). Simply providing an attractive pedestrian experience thereby encouraging more pedestrian activity improves personal security by bringing more “eyes on the street.”
Where a diversity of active land uses is not present or regular volumes of pedestrians are not expected, open sight lines can promote a sense of security. It is important to reduce or eliminate barriers or blind spots where pedestrians cannot be seen by others, or by motorists traveling along the road. Vegetation in the public right-of-way should be regularly maintained to promote open sight lines., Landscaping can be used in the buffer zones for pedestrian comfort and safety and can also be used to help direct them to established street crossings. Landscape plantings should preserve sightlines between the sidewalk and roadway through appropriate choice of the height and type of plantings.
7.3.13.2 Aesthetics
Attractively designed pedestrian facilities can lead to higher usage by making pedestrians feel integrated and welcomed in the transportation system. Pedestrians’ slower travel speeds mean that they appreciate and expect a greater diversity of roadside elements. Landscaping, whether with vegetation or varying construction materials (e.g., colored concrete, pavers) in and adjacent to the sidewalk corridor, can enhance the pedestrian experience. Maintenance of vegetation and materials should be considered in the project development process since unmaintained landscaping can eventually become detrimental to the pedestrian experience. See the Landscape and Aesthetics Design Manual for further guidance.
7.3.13.3 Exposure to the Elements
Adverse weather conditions present a barrier to pedestrian travel. Protection from heat, sun, and rain should be considered in the project design process as this protection enables more consistent use of pedestrian facilities. Shelters and trees can provide protection from the elements. Additionally, properly designed drainage and regular maintenance will keep pedestrian facilities usable without pooling water in the event of precipitation.
Plantings should be selected according to guidance in TxDOT’s Landscape and Aesthetics Design Manual.
Anchor: #i12214047.3.14 Micromobility Vehicles
Micromobility vehicles include small, fully or partially human-powered vehicles such as bicycles, e-bikes, e-scooters, and others. They are mostly provided in urban areas in Texas but may also be found in some suburban areas. These vehicles may either be privately owned or part of fleets that are publicly available for short-term rentals. Fleet vehicles are most often parked in the right-of-way for pick-up and drop-off either at stations (docked systems) or within a service area (dockless).
In urban and suburban areas serviced by dockless micromobility vehicles, it is recommended to identify adequate width outside of the PAR for parking of the micromobility vehicles. This device parking area may be located in the buffer zone of the sidewalk corridor or within the street adjacent to the curb. The area may flex over time to be used for standard bike parking or other uses if future needs change. Coordination with the local government and micromobility companies should be done to best determine the sizes and locations of the device parking areas. The boundaries of the parking areas should be clearly identified for the use of micromobility vehicles with surface markings or signage. Many micromobility companies are also now including photo verification of appropriate parking within their smart phone applications which encourages users to properly park vehicles outside the PAR.
In areas serviced by docked micromobility vehicles, proposed locations for new docking stations must be coordinated with the local government according to its requirements for micromobility vehicles. The local government must be notified of any projects affecting existing docking stations. Concerns of the local government should be addressed in the project to the extent practical.
An accessible PAR must be provided around and adjacent to micromobility docking stations and parking areas, per accessibility guidelines.
