Section 7: Conduit Systems
Anchor: #i1134713Conduits
The storm drainage conduit system transports the runoff from the surface collection system (inlets) to the outfall. Conduit connections between points in the network such as junctions and inlets are referred to as "runs." Although it is an integral component, the conduit system is analyzed independently of the inlet system. However, the configuration of laterals and trunk lines is controlled by the locations of all inlet and roadway layouts, minimum cover requirements, and utility and foundation locations.
The longitudinal slope of the conduit affects the capacity. The slope of the subject conduit run is tentatively established during the system planning stage of design. Typically, the slope will be approximately parallel to the surface topography. However, the slope may have to be adjusted to adapt to critical elevations (such as outfall elevations or utilities) to increase capacity or to afford adequate cover for the conduit.
The Department minimum diameter for trunk lines and laterals is 18 inches because of difficulties in the construction and maintenance of smaller sizes. Some designers prefer to limit the minimum diameter to 24 inches. The following recommendations on conduit dimensions should be considered:
- Anchor: #ECIPCSWU
- Larger into smaller conduit dimensions -- Avoid discharging the flow of a larger conduit into a smaller conduit. The capacity of the smaller conduit may theoretically be greater due to a steeper slope; however, a reduction in size almost always results in operational problems and expenses for the system. Debris that may pass through a larger dimension may clog as it enters a smaller dimension. Anchor: #KILRTYND
- Soffit and flow line placement in conduits -- At changes in conduit size, the soffit (top inside surface), not the flow line, of the two conduits should be aligned. When flow lines are aligned, the smaller pipe often must discharge against a head. It may not be feasible to follow this guideline in every instance, but it should be the rule whenever practicable. It is acceptable to have the entire downstream conduit offset downward because the flow would still not discharge against a head. Anchor: #RHQWTUFN
- Conduit length -- The approximate length
of conduit should be determined as the inlets and junctions are
located. The length is the distance from the centerline of the upstream
node to the centerline of the downstream node of the subject conduit
run. The length and average flow velocity are used to estimate the
travel time within the run. Establish the length of the run during
the first phase of the storm drain system design in which the inlets
are located.
NOTE: These lengths are hydraulic lengths of conduit, not pay lengths; the Department standard specifications provide that pay lengths include only the actual net length of pipe and not the distance across inlets or access holes where no conduit actually is placed.
Access Holes (Manholes)
Access holes or combination access hole/inlets should be placed at changes in direction, junctions of pipe runs, at intervals in long pipe runs, or wherever necessary for clean-out and inspection purposes. The table below provides maximum spacing criteria for access holes.
|
Pipe Diameter |
Maximum Distance |
|---|---|
|
in. |
ft. |
|
12 - 24 |
300 |
|
27 - 36 |
375 |
|
39 - 54 |
450 |
|
> 60 |
900 |
It is possible to reduce head losses caused by turbulence within an access hole by rounding the flowline (bottom) of the access hole to match the flowlines of the pipes attached to the manhole. See Inlet and Access Hole Energy Loss Equations for more details. For manholes larger than the incoming or outgoing pipes, expansion losses can sometimes be significant. Access holes that include other functions must be detailed to include facilities that will serve all the intended functions.
If the hydraulic grade line could rise above the access hole cover, the cover must be secured by bolting or with a locking mechanism to prevent removal by vandals or by a “blowout.” A “blowout” is caused when the hydraulic grade line rises higher than the access hole cover, which may force the cover to explode off.
Anchor: #CTEECYYFJunction Angles
At junctions, right angle intersections are simpler to construct than acute angle junctions. However, acute angle junctions reduce head losses and also pass debris more easily, and should be used where practical. See Figure 10-18 for the contrast.
")
Figure 10-21. Acute Angle and Right Angle Intersections
Anchor: #UGWLTXXDInverted Siphons
Inverted siphons carry flow under obstructions such as sanitary sewers, water mains, or other structure or utilities that may be in the path of the storm drain line. Siphons should be used only where avoidance or adjustment of the obstruction is not practical. Figure 10-19 shows a profile of an inverted siphon. A minimum flow velocity of 3 fps (1 m/s) is recommended to keep sediment suspended.The conduit size through the inverted siphon used in a storm drain system should be the same size as either the approaching or exiting conduit. In no case should the size be smaller than the smallest of the approaching or exiting conduit.Because inverted siphons include slopes of zero and adverse values, the head losses through the structure must be accounted for. The sources of the losses can be friction, bends, junctions, and transitions. See Chapter 6, Hydraulic Grade Line Analysis. Alternative means of avoiding the obstruction may be necessary if losses are unacceptable. Maintenance access should be provided at either or both ends of the inverted siphon as indicated in Figure 10-19.
")
Figure 10-22. Inverted Siphon
Anchor: #AWPLRBFCConduit Capacity Equations
Refer to Chapter 6 for calculating channel (conduit) capacity and critical depth.
Anchor: #QBDUPXXEConduit Design Procedure
In this procedure, points in the network such as junctions and inlets are referred to as “nodes”. Conduit connections between nodes are referred to as “runs”. A storm drainage system is characterized as a link-node system with runoff entering the system at nodes (inlets) that are linked together (by pipe or conduit runs), all leading to some outfall (outlet node). The procedure entails proceeding progressively downstream from the most remote upstream node to the outlet. The peak discharge at each node is recomputed based on cumulative drainage area, runoff coefficient, and longest time of concentration contributing to the particular node.The following steps are used for the design of conduit systems (a more detailed explanation and example are contained in HEC-22):
- Anchor: #KHIMCMUU
- Determine the design discharge at each extreme node (inlet). Any bypass flow, either from or to the inlet, is ignored when considering the discharge into the conduit. Keep track of the cumulative runoff coefficient multiplied by the area (ΣCA) and the time of concentration. This time of concentration often is referred to as “inlet time,” indicating it is the surface time of concentration in the watershed to the inlet. Anchor: #WXQLNRRR
- Determine the design discharge for the
first run (or any inlet lateral) based on the watershed area to
the upstream node of the run (A), the associated weighted runoff
coefficient (C), and the rainfall intensity based on the time of
concentration (tc) in the watershed. The
rainfall intensity is calculated with Equation 10-33 using the larger
of the actual tc value or a tc of
10 minutes. The discharge is computed using Equation 10-32. It is
very important to record the actual time of concentration as this
value will eventually become significant.
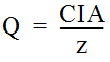
Equation 10-32.
where:
- Anchor: #DFDGOCFW
- Q = peak discharge (cfs or m3/s) Anchor: #OHUDGPKC
- C = runoff coefficient Anchor: #VLJSPIMS
- I = rainfall intensity associated with a specific AEP (in./hr or mm/hr) Anchor: #FYSHDLPM
- A = area of the watershed (ac. or ha) Anchor: #HWBXPRPD
- z = 1.0 for English measurement and 360 for metric.
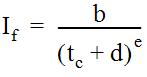
Equation 10-33.
where:
- Anchor: #BPJWIAIV
- If = rainfall intensity for design AEP (in./hr or mm/hr) Anchor: #AGMVMYEE
- tc = time of concentration (min) Anchor: #NAFLSFPD
- e, b, d = empirical factors that are tabulated for each county in Texas for frequencies of 2, 5, 10, 25, 50, and 100 years (50%, 20%, 10%, 4%, 2%, and 1% AEPs) in Hydrology. (See Rainfall Intensity-Duration-Frequency Coefficients.)
NOTE: Chapter 4 references the new rainfall atlas, Atlas of Depth-Duration Frequency (DDF) of Precipitation Annual Maxima for Texas (TxDOT 5-1301-01-1). A table of factors correlating to this atlas, similar to Rainfall Intensity-Duration-Frequency Coefficients, for use with Equation 10-33, will be developed at a later date. The new table will replace this reference to Rainfall Intensity-Duration-Frequency Coefficients at that time.
The intensity is based on the longest time of concentration leading to the upstream end of the run. This means that a recalculation of total discharge is necessary at each conduit run. It also means that the discharge rates from approaching pipe runs are not simply summed; instead, the sum of contributing CA values (
 ) are multiplied by an intensity based on the longest
tc leading to the point in question.
Anchor: #JWXKXKGO
) are multiplied by an intensity based on the longest
tc leading to the point in question.
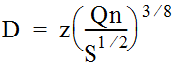
Anchor: #JWXKXKGO - Size the conduit based on Manning's Equation
and the design discharge. The Department recommended method is to
design for non-pressure flow. Conduit size will likely be slightly larger
than necessary to accommodate the design flow under the terms of
Manning's Equation. To size circular pipe, use Equation 10-34:
Equation 10-34.
where:
- Anchor: #BFRVKCII
- D = required diameter (ft. or m) Anchor: #FPBBJJSX
- z = 1.3333 for English measurement or 1.5485 for metric Anchor: #XRSIMDPL
- Q = discharge (cfs or m3/s) Anchor: #TSCXOXEW
- n = Manning’s roughness coefficient Anchor: #YGTAXYLY
- S = slope of conduit run (ft./ft. or m/m).
For sizing other shapes, use trial and error by selecting a trial size and then computing the capacity. Adjust the size until the computed capacity is slightly higher than the design discharge.
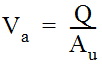
Anchor: #XSGELJKR - Estimate the velocity of flow through
the designed conduit. Determine the cross-section area, Au,
assuming uniform flow as an average depth of flow in the conduit
as discussed in
Section
2 of Chapter 6. This is a straightforward procedure for rectangular
sections but much more complicated for circular and other shapes.
Then calculate the average velocity of flow (Va)
using the continuity relation shown in Equation 10-35.
Equation 10-35.
Anchor: #RRXTFLOP - Calculate the travel time, tt,
for flow in the conduit from the upstream node to the downstream node
by dividing the length of the conduit by the average velocity of
flow. Add this travel time to the tt at the
upstream end of the subject run to represent the tt at
the downstream end of the run.
NOTE: For this purpose, base the tt on the actual calculated times, not the minimum of 10 minutes used to compute intensity.
Anchor: #CSEYYUGI - Proceeding downstream through the system, determine the cumulative runoff coefficient multiplied by the area (ΣCA) and respective time of concentration at each node. Make sure to include all conduits and inlets coming to a particular node before sizing the conduit run out of that node. It may help to draw a stick diagram showing the cumulative CA and tc/tt values. Anchor: #OIJOWPSO
- Compute the peak discharge for the next
run downstream based on the ΣCA to the node and the intensity based
on the longest value of tc of all incoming
conduits, and, if applicable, tc of any inlet
directly at the node. The discharge, so determined, is not the same
as if all approaching discharges have been added.
In some instances, an increase in tt (which decreases I) with little or no additional CA can cause the calculated discharge to decrease as the analysis is carried downstream. In such cases, use the previous intensity to avoid designing for a reduced discharge, or consider using a hydrograph routing method.
Anchor: #ABODQMPU - Develop the hydraulic grade line (HGL) in the system as outlined in Chapter 6. Calculate minor losses according to Conduit Systems Energy Losses. If the system was designed for full flow, calculate other losses such as junction, manhole and exit losses according to Conduit Systems Energy Losses.
Conduit Analysis
The analysis of a conduit requires the same consideration of hydrology as does design. The difference is that geometry, roughness characteristics, and conduit slopes are already established.The analysis and accumulation of discharge must proceed from upstream toward downstream in the system. Develop the discharges in this way so that appropriate discharge values are available for the development of the hydraulic grade line analysis.