Section 4: Hydraulics of Bridge Openings
Anchor: #i1007580Bridge Modeling Philosophy
Numerous methods exist for estimating the hydraulic impact of bridge openings on water surface profiles. TxDOT recommends that computer programs be employed to perform such estimates. Generally, the documentation of the specific computer program should be referred to for the theory employed.
Note. Previously, TxDOT employed a single
energy loss equation, (h =  v2/2g),
to estimate the backwater effect of bridge openings. It is no longer
used as the basis for design of TxDOT bridges.
v2/2g),
to estimate the backwater effect of bridge openings. It is no longer
used as the basis for design of TxDOT bridges.
Bridge Alignment
The discussions of bridge design assume normal lengths and alignments perpendicular to the flow at flood stage even though the low flow streambed may be at a skew to the bridge. In actuality, many bridges are skewed to some degree which causes the hydraulic length of the bridge to be longer than the plan width. For example, a 60-foot wide bridge perpendicular to the stream has a hydraulic length of 60 feet. The same bridge at a 30º skew to the stream has a hydraulic length of 69.3 feet.
Hydraulic programs do not automatically account for the skew. The program operator is required to specifically account for the skew by putting in the correct hydraulic length.
Anchor: #i1007597Flow Zones and Energy Losses
Figure 9-10 shows a plan of typical cross section locations that establish three flow zones that should be considered when estimating the effects of bridge openings.
NOTE: These cross sections are related to the explanation of flow zones and energy losses and must not be confused with the cross sections required for analysis. The analysis cross sections may be further upstream and downstream.
")
Figure 9-10. Flow Zones at Bridge
Zone 1 – Downstream. Zone 1 represents the area between the downstream face of the bridge and a cross section downstream of the bridge within which expansion of flow from the bridge is expected to occur. The distance over which this expansion occurs can vary depending on the flow rate and the floodplain characteristics. No detailed guidance is available, but a distance equal to about four times the length of the average embankment constriction is reasonable for most situations. Section 1 represents the effective channel flow geometry at the end of the expansion zone, which is also called the “exit” section. Cross sections 2 and 3 are at the toe of roadway embankment and represent the portion of unconstricted channel geometry that approximates the effective flow areas near the bridge opening as shown in Figure 9-11.
 (click in image to see full-size image)")
Figure 9-11. Effective Geometry for Bridge (Section 2 shown, Section 3 similar)
Zone 2 - Under Bridge Opening. Zone 2 represents the area under the bridge opening through which friction, turbulence, and drag losses are considered. Generally, consider the bridge opening by superimposing the bridge geometry on cross sections 2 and 3.
Zone 3 – Upstream. Zone 3 represents an area from the upstream face of the bridge to a distance upstream where contraction of flow must occur. A distance upstream of the bridge equal to the length of the average embankment constriction is a reasonable approximation of the location at which contraction begins. Cross section 4 represents the effective channel flow geometry where contraction begins. This is sometimes referred to as the “approach” cross section.
Anchor: #i1007641Extent of Impact Determination
The maximum effect of the bridge should occur at cross section 4. However, in order to determine the extent of the impact, continue water surface profile computations upstream until the water surface does not differ significantly from the estimated pre-construction conditions.
Anchor: #i1007653Water Surface Profile Calculations
Calculate the water surface profile through Zones 1 and 3 using the Standard Step Backwater Method (see Chapter 7) with consideration of expansion and contraction losses. The table 9-1 below provides recommended loss coefficients.
|
Transition Type |
Contraction (Kc) |
Expansion (Ke) |
|---|---|---|
|
No losses computed |
0.0 |
0.0 |
|
Gradual transition |
0.1 |
0.3 |
|
Typical bridge |
0.3 |
0.5 |
|
Severe transition |
0.6 |
0.8 |
Anchor: #i1007664
Bridge Flow Class
The losses associated with flow through bridges depend on the hydraulic conditions of low or high flow.
Low flow describes hydraulic conditions in which the water surface between Zones 1, 2, and 3 is open to atmospheric pressure. That means the water surface does not impinge upon the superstructure. (This condition should exist for the design frequency of all new on-system bridges.) Low flow is divided into categories as described in Table 9-2 “Low Flow Classes”. Type I is the most common in Texas, although severe constrictions compared to the flow conditions could result in Types IIA and IIB. Type III is likely to be limited to steep hills and mountainous regions.
|
Type Designation |
Description |
|---|---|
|
I |
Subcritical flow through Zones |
|
IIA |
Subcritical flow Zones 1 and 3, flow through critical depth Zone 2 |
|
IIB |
Subcritical Zone 3, flow through critical Zone 2, hydraulic jump Zone 1 |
|
III |
Supercritical flow through Zones 1, 2 and 3 |
High flow refers to conditions in which the water surface impinges on the bridge superstructure:
- Anchor: #RQBSHTYJ
- When the tailwater does not submerge the lowchord of the bridge, the flow condition is comparable to a pressure flow sluice gate. Anchor: #RAISGSWU
- At the tailwater, which submerges the lowchord but does not exceed the elevation of critical depth over the road, the flow condition is comparable to orifice flow. Anchor: #GEQCBXVL
- If the tailwater overtops the roadway, neither sluice gate flow nor orifice flow is reasonable, and the flow is either weir flow or open flow.
Zone 2 Loss Methods
Generally determine the losses in Zone 2 by one of the following methods depending on the flow characteristics and the engineer's judgment:
- Anchor: #BWNVMEAN
- Standard Step Backwater Method (based on balance of energy principle) Anchor: #KXWFLFHG
- Momentum Balance Method Anchor: #UMTHHILS
- WSPRO Contraction Loss Method [This is a method, not limited to the WSPRO program.] Anchor: #EGIPKEXK
- Pressure Flow Method Anchor: #AYGHSFWV
- Empirical Energy Loss Method (HDS 1).
Standard Step Backwater Method (used for Energy Balance Method computations)
Refer to Chapter 7 for the Standard Step Backwater Method. Figure 9-12 shows the relative location of section geometry for profile computations. Bd and Bu refer to the bridge geometry at the downstream and upstream inside faces, respectively.
")
Figure 9-12. Relative Location of Section Geometry
- Anchor: #FYWCQOCQ
- Solve the energy equation (step backwater) between cross section 2 and the downstream bridge face (Bd). Use the water surface at cross section 2 determined from the previous backwater profile computations. Anchor: #CIAKASXP
- Proceed with the standard step backwater calculations from the downstream bridge face to the upstream face. Use the bridge geometry superimposed on cross sections 2 and 3 respectively. Anchor: #FDWDVSEE
- Approximate the effects of piers and impingement of flow on the lowchord by reducing the section area and increasing the wetted perimeter accordingly. Anchor: #OHRPBLWM
- Similarly, consider roadway overflow as open channel flow. Proceed with calculations from the upstream bridge face (Bu) to cross section 3. Anchor: #JFFMFJCM
- As indicated in the previous Flow Zones and Energy Losses subsection, proceed with calculating the remainder of the bridge impact from cross section 3 upstream using step backwater calculations.
Under the right circumstances, you can consider the energy balance method for low flow and high flow.
Anchor: #LNFJJNIJMomentum Balance Method
This method computes the backwater through Zone 2 by balancing forces at three locations:
- Anchor: #JUJCJDAO
- between the inside, downstream face of the bridge (Bd) and cross section 2 Anchor: #BREVIOAJ
- between the downstream and upstream ends of the bridge (Bd to Bu) Anchor: #SJDDVFFW
- between the inside, upstream face of the bridge (Bu) and cross section 3.
Refer to Figure 9-10 and Figure 9-12 for zone and cross section locations. Assuming hydrostatic pressure conditions, the forces acting on a control volume between two cross sections (1 and 2) must be in balance and are generalized in Equation 9-2.

Equation 9-2.
where:
- Anchor: #JTKKDRNA
- FP1, FP2 =
force due to hydrostatic pressure at cross section =
 Ay
Anchor: #DNUDRIIP
Ay
Anchor: #DNUDRIIP - Fm =
force causing change in momentum between cross sections =
 Q
Q v
Anchor: #RWBFCPFP
v
Anchor: #RWBFCPFP - Ff =
force due to friction =
 (A1+A2)LSf/2
Anchor: #QNBAIEPL
(A1+A2)LSf/2
Anchor: #QNBAIEPL - Fd =
total drag force due to obstructions (e.g., for piers =
 CdAov/2)
Anchor: #KFXATUMP
CdAov/2)
Anchor: #KFXATUMP - Fw =
component of weight in direction of flow =
 (A1+A2)LSo/2.
- Anchor: #THXKWOKM
- For subcritical flow, determine the water surface elevation and average velocity at section 2 from step backwater computations. Anchor: #MCAYAPJJ
- Determine the water surface elevation and average velocity at Section Bd by applying successive assumed water surface elevations to Equation 9-3 until equality is achieved within a reasonable tolerance. Anchor: #HPEAFDVQ
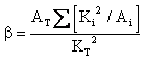
- Determine the momentum correction factor
(B), which accommodates natural velocity distributions similar to
the energy correction factor,
 , using Equation 9-4.
Anchor: #WLNEPRSE
, using Equation 9-4.
Anchor: #WLNEPRSE - Using the resulting water surface elevation at Bd, determine the water surface elevation and average velocity at Section Bu by applying successive assumed water surface elevations at Section Bu to Equation 9-5 until achieving equality within a reasonable tolerance. Bu refers to the upstream face of the bridge. Anchor: #EMSXVDYW
- Determine the final momentum balance between the upstream face of the bridge and cross section 3 using Equation 9-6. Table 9-3 “ Suggested Drag Coefficients for Bridge Piers” presents suggested drag coefficients for different pier types. Anchor: #UFMACGEB
- As discussed in the above Flow Zones and Energy Losses section, proceed with the remainder of the bridge impact computations from cross section 3 upstream using step backwater calculations.

Equation 9-3.
where:
- Anchor: #YAOGIXJW
- Subscripts 2 and Bd refer to section 2 and the downstream bridge face, respectively. Anchor: #ONQAFFOA
- A = effective flow area at cross sections (sq.ft. or m2) Anchor: #MRWAXJUU
 = height
from water surface to centroid of effective flow area (ft. or m)
Anchor: #RTYJOISI
= height
from water surface to centroid of effective flow area (ft. or m)
Anchor: #RTYJOISI- g = acceleration due to gravity (ft./s2 or m/s2) Anchor: #GWTXYMVC
- Q = discharge (cfs or m3/s) Anchor: #AQQDEUQO
- Apd = obstructed area of pier at downstream side (sq. ft. or m2) Anchor: #LSNOFWIT
- L = distance between cross sections (ft. or m) Anchor: #AJRYCEFX
- Sf = friction slope (ft./ft. or m/m) (see Chapter 6) Anchor: #IUXNDSPG
- So = channel bed slope (ft./ft. or m/m) Anchor: #RHFXVMXY
- β = momentum correction factor. Anchor: #XANPSRMV
-
Equation 9-4.
where:
- Anchor: #OBQLYGPY
- Ki = conveyance in subsection (cfs or m3/s) Anchor: #VPOEESBS
- Ai= area of subsection (sq. ft. or m2) Anchor: #MXMNVPXA
- KT = total conveyance of effective area section (cfs or m3/s) Anchor: #JCFNMKFJ
- AT = total effective area (sq.ft. or m2).

Equation 9-5.

Equation 9-6.
where:
- Anchor: #DSRXXPWQ
- Subscript 3 refers to cross section 3 Anchor: #ALFUWOJR
- Apu = Obstructed area of piers at upstream side (sq.ft. or m2) Anchor: #MRTTLXCK
- Cd = drag coefficient
|
Pier Type |
Drag Coefficient, Cd |
|---|---|
|
Circular |
1.20 |
|
Elongated with semi-circular ends |
1.33 |
|
Elliptical (2:1 aspect ratio) |
0.60 |
|
Elliptical (4:1 aspect ratio) |
0.32 |
|
Elliptical (8:1 aspect ratio) |
0.29 |
|
Square nose |
2.00 |
|
Triangular nose (30o apex) |
1.00 |
|
Triangular nose (60o apex) |
1.39 |
|
Triangular nose (90o apex) |
1.60 |
|
Triangular nose (120o apex) |
1.72 |
WSPRO Contraction Loss Method
The Water Surface Profile (WSPRO) method is a contraction model that uses step backwater calculations and empirical loss coefficients. This method is not limited to the WSPRO program.
- Anchor: #IUSISWJO
- Base the model on providing approach and exit cross sections (cross sections 1 and 4) at distances from the downstream and upstream faces approximately equal to the bridge opening length. Anchor: #TGXMNWBR
- Compute the flow in Zones 1 and 3 using step backwater computations with a weighted flow length based on 20 equal conveyance tubes. Refer to Bridge Waterways Analysis Model (Shearman et al., 1986) for details on this method. (See Reference for details on obtaining this document.)
Pressure Flow Method
By definition, pressure flow methods represent high flow conditions. Figure 9-13 shows a high flow condition in which the water surface at the upstream face of the bridge has impinged the lowchord but the downstream face is not submerged. You may approximate this condition as a sluice gate using Equation 9-7. You need to assume successive elevations at cross section 3 (y3) until the calculated discharge in Equation 9-7 is equal to the design discharge within a reasonable tolerance.
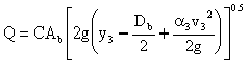
Equation 9-7.
where:
- Anchor: #WTHGCCIO
- Q = calculated discharge (cfs or m3/s) Anchor: #NYQSLPKO
- C = discharge coefficient (0.5 suggested) Anchor: #UMUJOYFW
- Ab = net area under bridge (sq. ft. or m2) Anchor: #TBYJAAJC
- y3 = depth of flow at cross section 3 (ft. or m) Anchor: #QQGTULWG
- Db = height of lowchord from mean stream bed elevation (ft. or m).
")
Figure 9-13. Sluice Gate Type Pressure Flow
Figure 9-14 shows a submerged bridge opening with a tailwater lower than the overtopping elevation Equation 9-8 represents orifice flow. You need to assume successive elevations at cross section 3 (y3) until the calculated discharge in Equation 9-8 is equal to the design discharge within a reasonable tolerance.
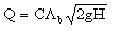
Equation 9-8.
where:
- Anchor: #DMRMRJPA
- C = discharge coefficient (0.8 typical) Anchor: #YYCSINHS
- H = difference between energy grade at cross section 3 and water surface at cross section 2 (ft. or m), Equation 9-9.
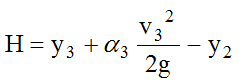
Equation 9-9.
where:
- Anchor: #DTFQKNET
- α3 = kinetic energy correction coefficient Anchor: #BHLOFDIQ
- Cd = coefficient of discharge, Equation 9-12.
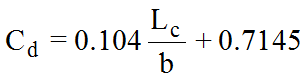
Equation 9-10.
where:
- Anchor: #JBEVRVLV
- b = width of top of embankment at bridge abutment (ft. or m) (see Figure 9-15) Anchor: #NSIRMQBH
- Lc = length of bridge opening between abutment faces (ft. or m).
")
Figure 9-14. Orifice Type Pressure Flow
")
Figure 9-15. Bridge Dimensions for Pressure Flow Analysis
Empirical Energy Loss Method (HDS 1)
Although hand computations are used rarely, the FHWA publication Hydraulics of Bridge Waterways ( HDS 1) presents methods for estimating bridge backwater effects. The HDS-1 Empirical Loss Method presents a summary of the method that is appropriate for low flow Type I. (This flow type should predominate for the design of bridges over Texas streams.)
Anchor: #i1008257Two-dimensional Techniques
Two-dimensional (2-D) horizontal flow, depth-averaged techniques are highly specialized. Contact the Design Division’s Hydraulics Branch for consultation.
Anchor: #i1008267Roadway/Bridge Overflow Calculations
Consider flow over the bridge or roadway in one of two ways:
- Anchor: #JVSDLQLQ
- Weir flow if the tailwater does not drown out critical depth of flow in the overtopping section -- the approach is similar to that in the Roadway Overtopping subsection of Chapter 8, except that the design engineer must use the bridge loss methods above instead of culvert head loss computations. That is, apportion flow between the bridge and the weir such that the head at cross section 3 results in a flow apportionment that sums to equal the design flow within a reasonable tolerance. Anchor: #SNJUDNUH
- Open channel flow if the tailwater is too high -- As the depth of flow over the road increases and the tailwater submerges the road, the design engineer considers the flow over the road as open channel flow and use step backwater computations across the road.
Backwater Calculations for Parallel Bridges
The backwater calculation for parallel bridges (depicted in Figure 9-16) requires the application of a coefficient. The chart in Figure 9-17 relates the value of the backwater adjustment coefficient (μ) to the ratio of the out-to-out dimension of the parallel bridges to the width of a single embankment (see Figure 9-18). Determine the backwater head calculation for a parallel bridge with Equation 9-11.

Equation 9-11.
where:
- Anchor: #BPPDHELV
- h = total backwater head (ft. or m) Anchor: #BRGLRGCD
- μ = backwater adjustment coefficient (see Figure 9-17) Anchor: #OCIKQWQN
- h1 = backwater head for one bridge as discussed in the Bridge Flow Class subsection above.
")
Figure 9-16. Parallel Bridges
")
Figure 9-17. Parallel Bridges Backwater Adjustment
")
Figure 9-18. Definition of Parameters