Section 4: Adding Non-Contiguous Segments
Anchor: #i1020699Non-Contiguous Route Defined
A Non-Contiguous Route segment is a designated highway section which, when added, does not adjoin a route segment already existing in TRM, but is located on the proposed alignment of the completed route. Add this new section due to new construction or route realignment. The new non-contiguous segment may join an existing route:
- Before the beginning of the route
- After the ending of the route
- Within a roadway gap within the route.
Input—Before Beginning of Route
Input only the ‘From’ Reference Marker Number, which resides on the new segment; add it to the route without going through the Add Reference Markers process.
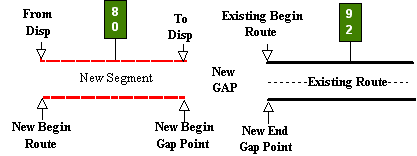
Determining the length of the new segment requires both the ‘From’ and ‘To’ Displacement fields (see Figure 5‑6 below):
- The ‘From’ Displacement is the distance from the given marker to the beginning of the new segment. This becomes the new beginning of route. This marker should not be at the exact beginning of the new segment
- The ‘To’ Displacement is the distance from the given marker to the ending of the new segment. This becomes the location of the beginning of a new roadway gap
The calculated length of the new segment is the difference between the ‘From’ Displacement and the ‘To’ Displacement.
Figure 5-6. Adding a new segment before an existing route begins, creating a new gap.
Follow these input instructions to add before beginning of route:
|
Step |
Input |
Action |
|---|---|---|
|
1 |
(For instructions to log onto the system, click this link) From the TPP Database Maintenance Menu, select Update-Code 12C and press <E>; the Job Location screen appears |
- |
|
2 |
Input Location Key fields |
Do not input the ‘To’ Reference Marker Number; it is automatically the same as the ‘From’ Reference Marker Number
|
|
3 |
Input remaining fields and press <F2>; the system updates TRM with the new route information and displays the message “Transaction completed successfully” |
|
|
4 |
To input another Update-Code, press <F3> to exit back to the TPP Database Maintenance Menu To exit back to the TRM Main Menu, press <F10> (For instructions to log off the system, click this link) |
- |
System Response. While adding this new non-contiguous segment, the TRM system automatically
- Creates a record with placeholder marker 0000
- Adjusts:
-
- DFO for all existing markers as needed
- Distance between markers for all existing markers as needed
- Copies the value of District-Id into the Maintenance District field.
Input—After End of Route
Input only the ‘From’ Reference Marker Number, which resides on the new segment; add it to the route without going through the Add Reference Markers process.
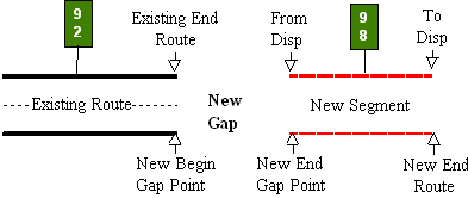
Determining the length of the new segment requires both the ‘From’ and ‘To’ Displacement fields (see Figure 5‑7 below):
- The ‘From’ Displacement is the distance from the given marker to the beginning of the new segment. This becomes the location of the ending of a roadway gap
- The ‘To’ Displacement is the distance from the given marker to the ending of the new segment. This becomes the new ending of route
The calculated length of the new segment is the difference between the ‘From’ Displacement and the ‘To’ Displacement.
Figure 5-7. Adding a new segment after an existing route ends, creating a new gap.
Follow these input instructions to adding after end of route
|
Step |
Action |
Input |
|---|---|---|
|
1 |
(For instructions to log onto the system, click this link) From the TPP Database Maintenance Menu, select Update-Code 12C and press <E>; the Job Location screen appears |
- |
|
2 |
Input Location Key fields |
Do not input the ‘To’ Reference Marker Number; it is automatically the same as the ‘From’ Reference Marker Number
|
|
3 |
Input remaining fields and press <F2>; the system updates TRM with the new route information and displays the message “Transaction completed successfully” |
|
|
4 |
To input another Update-Code, press <F3> to exit back to the TPP Database Maintenance Menu To exit back to the TRM Main Menu, press <F10> (For instructions to log off the system, click this link) |
- |
System Response. While adding this new non-contiguous segment, the TRM system automatically:
- Creates a record with placeholder marker 9999
- Adjusts:
-
- DFO for all existing markers as needed
- Distance between markers for all existing markers as needed
- Copies the value of District-Id into the Maintenance District field
Input—Within Roadway Gap
This procedure leaves the existing route with a roadway gap on either side of the new segment. Input only the ‘From’ Reference Marker Number, which resides on the new segment; add it to the route without going through the Add Reference Markers process.
Determining the length of the new segment requires both the ‘From’ and ‘To’ Displacement fields (see Figure 5‑8 below):
- The ‘From’ Displacement is the distance from the given marker to the beginning of the new segment. This becomes the location of the ending of a roadway gap.
- The ‘To’ Displacement is the distance from the given marker to the ending of the new segment. This becomes the location of the beginning of another roadway gap
The calculated length of the new segment is the difference between the ‘From’ Displacement and the ‘To’ Displacement.
Figure 5-8. Adding a new segment inside an existing gap, decreasing the existing gap and creating a new gap.
Follow these input instructions to add within roadway gap:
|
Action |
Step |
Input |
|---|---|---|
|
1 |
(For instructions to log onto the system, click this link) From the TPP Database Maintenance Menu, select Update-Code 12C and press <E>; the Job Location screen appears |
- |
|
2 |
Input Location Key fields |
Do not input the ‘To’ Reference Marker Number; it is automatically the same as the ‘From’ Reference Marker Number
|
|
3 |
Input remaining fields and press <F2>; the system updates TRM with the new route information and displays the message “Transaction completed successfully” |
|
|
4 |
To input another Update-Code, press <F3> to exit back to the TPP Database Maintenance Menu To exit back to the TRM Main Menu, press <F10> (For instructions to log off the system, click this link) |
- |
System Response. While adding this new non-contiguous segment, the TRM system automatically:
- Creates an additional roadway gap record in the TRM-FEATURE file at the ending of the new segment. The original gap record remains as it was
- Adjusts:
-
- DFO for all existing reference markers past the new segment as needed
- Distance between markers for all markers past the new segment as needed
- Copies the value of District-Id into the Maintenance District field.


