Section 3: Report Processing
Anchor: #i1017203Printing a Report
Printing a report involves steps in different systems: TRM, the ROSCOE Mainframe, and ODVS. Follow the input instructions to process a report.
Anchor: #i1017213TRM Report Processing
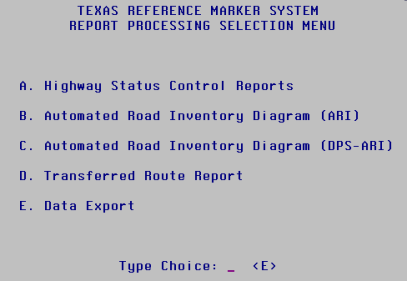
Log on to TRM; the Texas Reference Marker System Main Menu appears. From the TRM Main Menu, input an ‘F’ in Type Choice and press <E>; the Report Processing Selection Menu appears:
Figure 4-40. Report Processing Selection Menu
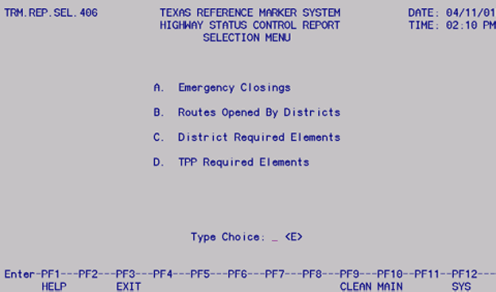
Input the report selection’s letter in Type Choice and press <E>; for Highway Status Control Reports, another selection menu appears:
Figure 4-41. Status Control Report Selection Menu
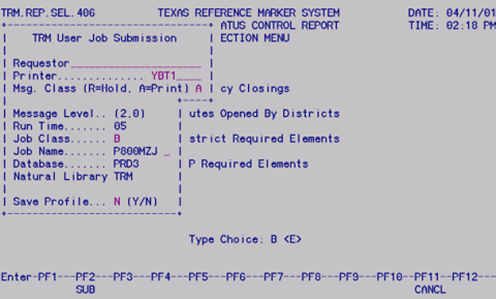
Input the letter corresponding to the specific Highway Status Control report to process in Type Choice and press <E>; the TRM User Job Submission dialog box appears:
Figure 4-42. TRM User Job Submission dialog box.
This table lists the five input fields on the TRM User Job Submission dialog box, their formats and default and valid values:
|
Field |
Description |
Format |
Default Value |
Valid Values |
|---|---|---|---|---|
|
Requestor |
Name of report requestor |
19 alpha |
None |
All characters |
|
Printer |
VPS Printer Id assigned to the target mainframe printer |
4 alpha |
Default printer Id |
Any valid printer Id |
|
Msg Class |
Value determines whether the system holds the output for review or prints automatically |
1 alpha |
None |
(R)eview or (A)utomatic print |
|
Job Name |
Name given to the job for access in ROSCOE; the last character must be entered to differentiate one report from another |
1 alpha |
None |
A-Z, 0-9 |
|
Save Profile |
Value determines whether the system saves Requestor, Printer, and Msg Class fields |
1 alpha |
(N)o |
(Y)es or (N)o |
NOTE: After saving the profile, the values in the first three fields always appear the same. If any of the fields change, save the profile.
Make modifications to the TRM User Job Submission pop-up window and press <F2>.
Important: Remember the Job Name! You need it to identify your job in ROSCOE output.
The Report Limits dialog box appears:
Figure 4-43. Report Limits dialog box
This table lists each of the Required/Optional input fields on the Report Processing Selection Menu:
|
Field |
Required/Optional |
|---|---|
|
Signed Highway |
|
|
From Reference Marker |
|
|
To Reference Marker |
|
|
Roadbed-Id |
Required |
Input all required plus any applicable optional fields and press <E>. The system searches for information within the specific Signed Highway, Reference Marker, and Roadbed-Id range. A message indicates that the job submitted successfully. Press <F12> to exit TRM and access the submitted job through ROSCOE.
Figure 4-44. Success message
Anchor: #i1017323ROSCOE Report Processing
Follow these input instructions to continue processing your report thru ROSCOE.
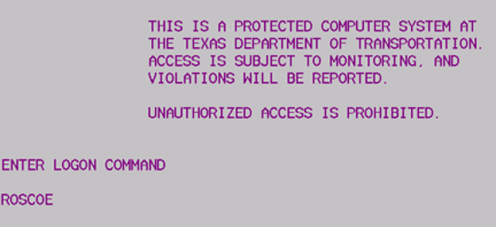
From the mainframe session, input the name of your regional central ROSCOE site and press <E>:
Figure 4-45. Start-up page for mainframe sessions.
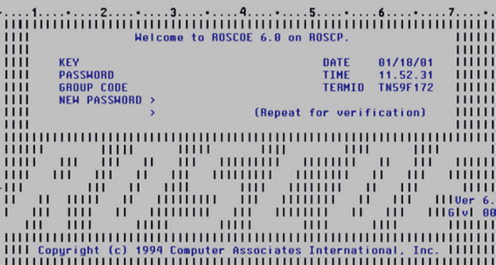
The ROSCOE signon screen appears:
Figure 4-46. Security screen.
Input your Key (User Id) Number and top secret Password and press <E>; continue pressing <E> through all message screens; a blank screen appears:
Figure 4-47. Blank screen after message screens.
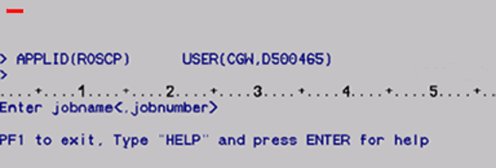
Input ‘DOUT’ at the cursor and press <E>; the PC.DOUT screen appears:
Figure 4-48. PC.DOUT screen.
At the cursor, input the Jobname from the first step and press <E>; all jobs with your jobname appear along with the status of the jobs:
Figure 4-49. List of processed jobs
This table describes the Jobname Screen:
|
Column |
Description |
|---|---|
|
JOBNO |
System-assigned job number |
|
JOBNAME |
Name of the job entered in the TRM User Job Submission pop-up window |
|
STATUS |
Status of the job:
|
|
C |
Message Class--A, R, or blank |
|
ORIGIN |
Destination of output—this is the printer Id entered in the TRM User Job Submission pop-up window |
|
Step |
If STATUS of the job is EXECUTING, the queue position of the job is listed here [example: POS(2) means “queue position number 2”] |
|
NOTE: If the submitted job is message class = A (automatic print), the output goes to the printer named in the Job Submittal pop-up window. Do not continue with the next step |
|
Select the job to review under the JOBNO column:
- If more than one job is listed, input the number of the job to review and press <F2>
- If only one job is listed, press <F2>.
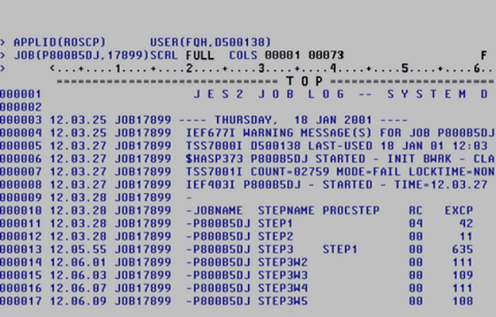
The first page of the job appears:
Figure 4-50. First job page.
To view the output, input ‘NEXT FILE’ to scroll forward through the job or ‘PREV FILE’ to scroll backward.
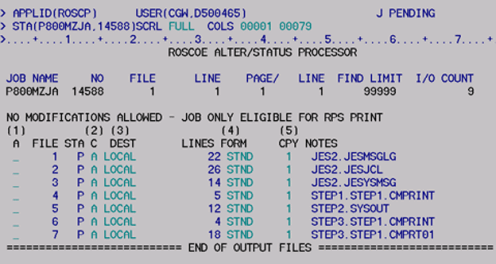
Input ‘STATUS’ at the cursor and press <E>; the ROSCOE ALTER/STATUS PROCESSOR Print screen appears:
Figure 4-51. ROSCOE ALTER/STATUS PROCESSOR print screen.
This table describes the ROSCOE ALTER/STATUS PROCESSOR/Print screen:
|
Column |
Description |
|---|---|
|
A |
|
|
FILE |
The sequential number of the file |
|
STA |
Status of the job:
|
|
C |
Class for print status: A = Automatic, R = Review |
|
DEST |
Destination of output. This is the printer Id entered in the Job Submission pop-up window |
Select the reports to print:
- To print only specific files from the job, tab to the underscores in Column A. Input ‘P’ on the underscore adjacent to each file to print and press <E>; the values under the STA column change to P for the selected print files
- To print all files, input ‘ALTER JOB ALL PRINT’ on the Command Line and press <E>; the values under the STA column change to P for all files.
To exit the ROSCOE ALTER/STATUS PROCESSOR screen without printing any files and return to the output job, press <F1>.
Input ‘DETACH JOB’ at the cursor and press <E> to send the selected files to the printer; the system deletes the job and exits the DOUT function.
Input ‘OFF’ at the cursor to exit ROSCOE; the system returns to the mainframe logon screen.
Anchor: #i1017519ODVS Report Processing
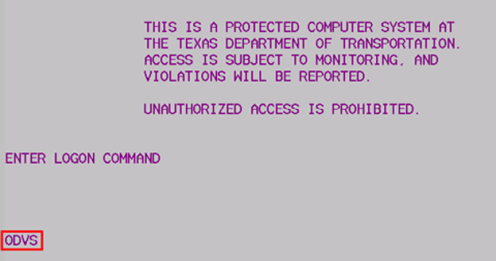
To access the Online Document Viewing System from the mainframe session, input ‘ODVS’ and press <E>:
Figure 4-52. ODVS is the acronym for Online Document Viewing System.
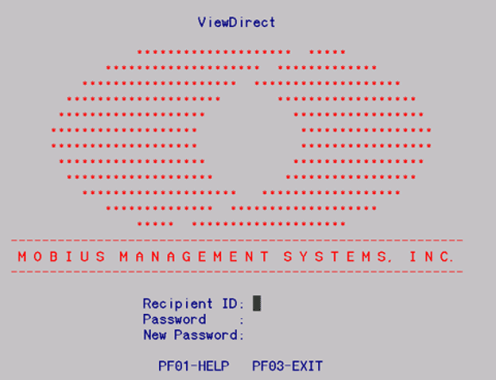
The ODVS ViewDirect Screen appears. Input your Recipient (User) Id and top secret Password and press <E>:
Figure 4-53. Security screen.
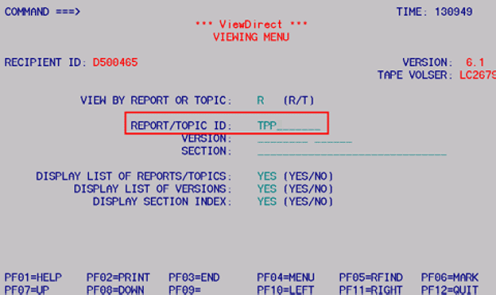
The Viewing Menu appears:
Figure 4-54. Viewing menu.
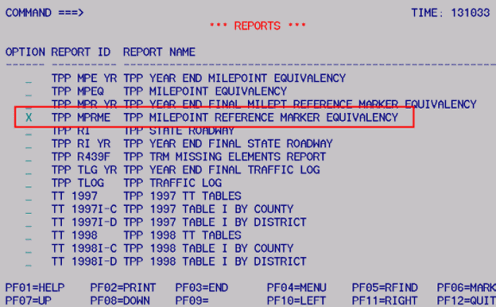
Input ‘TPP’ in the Report/Topic ID field and press <E>; the Reports list appears:
Figure 4-55. Be sure to select MPRME and not one of the others beginning with “MPR”!
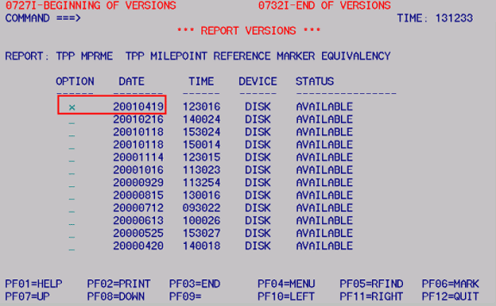
Input ‘X’ in the TPP MILEPOINT REFERENCE MARKER EQUIVALENCY field and press <E>; the Report Versions Menu appears:
Figure 4-56. The most current date here is April 19, 2001.
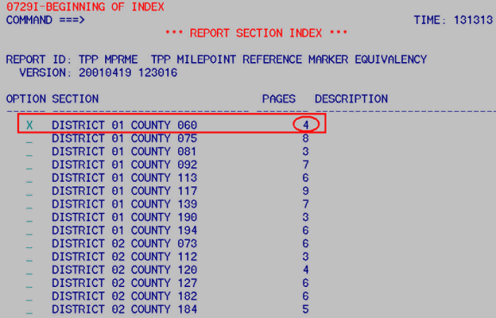
Input ‘X’ next to the most current date and press <E>; the Report Section Index appears:
Figure 4-57. Selected above is Paris District, Delta County; its MPRME report contains 4 pages.
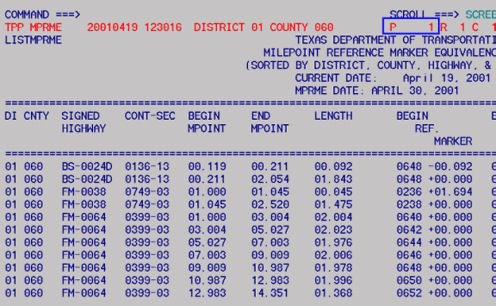
Find the county you are looking for by district and County numbers. Press <F8> to scroll forward or <F7> to scroll backward. Make a note of the number of pages in the report! Input ‘X’ by your selection and press <E>; the first page of the MPRME for your county appears:
Figure 4-58. Page 1, far left side of the MPRME report for Delta County.
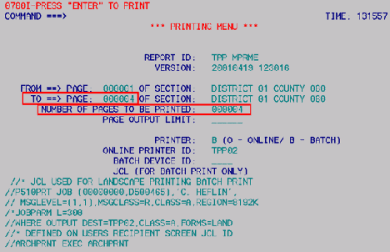
To view the complete page, press <F11> to move the view to the right and <F10> to move the view to the left. To print the MPRME, press <F2>; the Printing Menu appears:
Figure 4-59. Check the Online Printer ID so you can find your printout!
In the TO PAGE and NUMBER OF PAGES TO BE PRINTED fields, input the number of MPRME pages indicated on the Report Section Index. Press <E> twice to print the report.
To select another county, press <F4>.
To exit to mainframe session, press <F12>.
Anchor: #i1017672TRM Data Export Processing
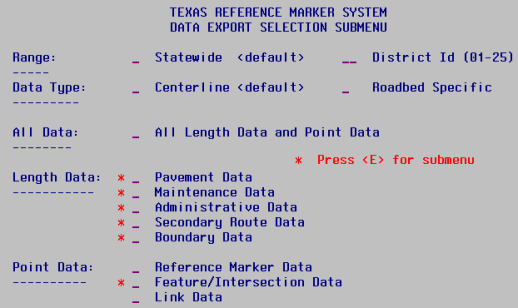
Log on to TRM; the Texas Reference Marker System Main Menu appears. From the TRM Main Menu, input an ‘F’ in Type Choice and press <E>; the Report Processing Selection Menu appears. Select ‘E’ and press <E>; the Data Export Selection Submenu appears:
Figure 4-60. Select the data you want in your text file.
Input Range:
|
Range |
TRM selects… |
|---|---|
|
Statewide |
All districts—TRM users only |
|
District |
District’s ID—any authorized user |
Select the Data Type:
|
Roadbed Type |
Length data pulled from… |
|---|---|
|
Centerline |
TRM Monthly file |
|
Roadbed Specific |
TRM Monthly Roadbed file |
Select the Data elements:
|
Data Type |
TRM provides data for… |
|---|---|
|
Length Data |
|
|
Point Data |
|
Press <E> to go to the submenus (if available) or PF2 to submit. If you select a submenu, select one or more submenu elements and press PF2 to submit.
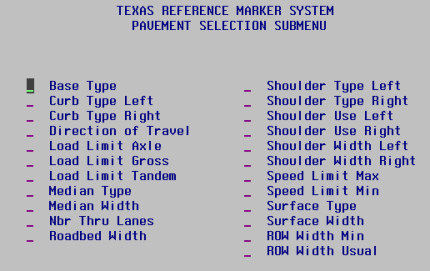
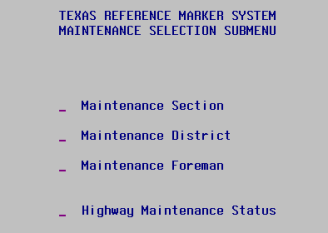
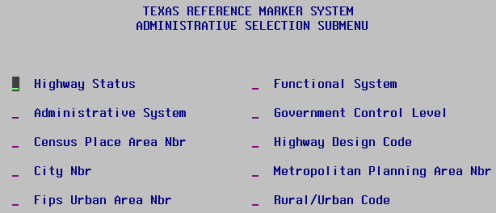
The following graphics show the various submenu selections:
- Pavement Data Submenu
-
Figure 4-61. Select pavement data.
- Maintenance Data Submenu
-
Figure 4-62. Select maintenance data.
- Administrative Data Submenu
-
Figure 4-63. Select administrative data choices.
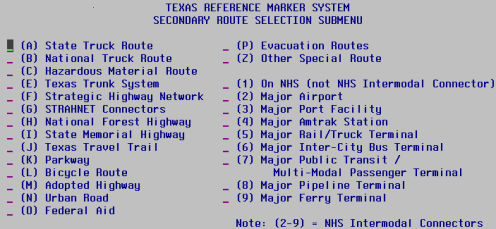
- Secondary Route Submenu
-
Figure 4-64. Select secondary route data.
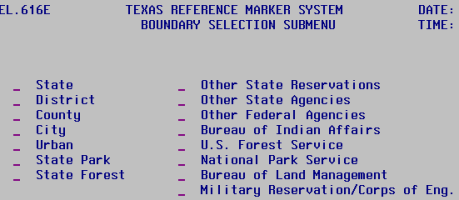
- Boundary Data Submenu
-
Figure 4-65. Select boundary data.
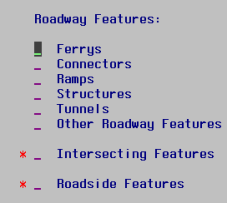
- Feature Data Submenu
-
Figure 4-66. Select roadway features.
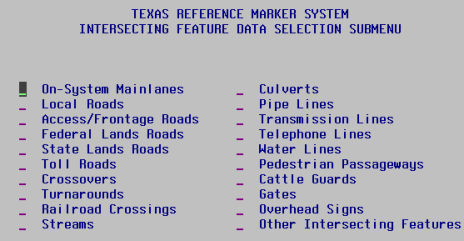
- Intersecting Features Submenu
-
Figure 4-67. Select intersecting features.
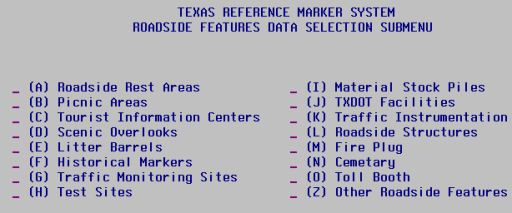
- Roadside Feature Data Submenu
-
Figure 4-68. Select roadside features.
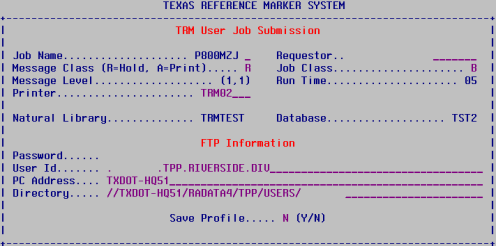
After you make all selections, press PF2 to submit the batch job; the Job Submission window appears:
Figure 4-69. Complete the Job Name and your top secret password.
This table lists the five input fields on the TRM User Job Submission dialog box, their formats and default and valid values:
|
Field |
Description |
Format |
Default Value |
Valid Values |
|---|---|---|---|---|
|
Requestor |
Name of report requestor |
19 alpha |
None |
All characters |
|
Printer |
VPS Printer Id assigned to the target mainframe printer |
4 alpha |
Default printer Id |
Any valid printer Id |
|
Msg Class |
Value determines whether the system holds the output for review or prints automatically |
1 alpha |
None |
(R)eview or (A)utomatic print |
|
Job Name |
Name given to the job for access in ROSCOE; the last character must be entered to differentiate one report from another |
1 alpha |
None |
A-Z, 0-9 |
|
Save Profile |
Value determines whether the system saves Requestor, Printer, and Msg Class fields |
1 alpha |
(N)o |
(Y)es or (N)o |
NOTE: After saving the profile, the values in the first three fields always appear the same. If any of the fields change, save the profile.
Make modifications to the TRM User Job Submission pop-up window and press <F2>.
Important: Remember the Job Name! You need it to identify your job in ROSCOE output.
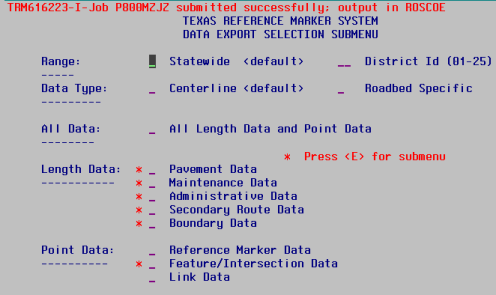
Press PF2 to submit:
Figure 4-70. Display message tells you that the output is in ROSCOE.
…or PF11 to cancel and return to the last displayed screen.
You may then review the ROSCOE job output to ensure that the system downloaded to the FTP successfully (click here for instructions).
