Section 5: District Feature Input Instructions
Anchor: #i1086260About This Section
The features listed in this section include definitions, descriptions, and input instructions of features for which the district is solely responsible.
Anchor: #i1086270Cattle Guards
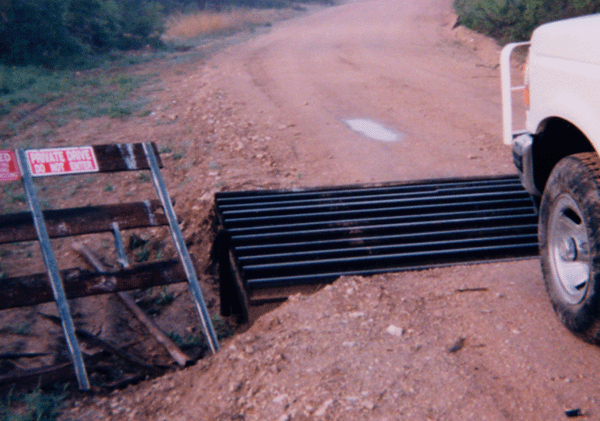
Structures placed in roadways to permit vehicle, but not animal, passage over roadways (Intersecting Feature Type 91):
Figure 11-16. Cattle Guards also warn drivers to watch for livestock on the roadway.
Figure 11-17. Cattle guard on off-system roadway.
Follow these input instructions to add cattle guards:
|
Step |
Action |
Input |
|---|---|---|
|
1 |
(For instructions to log onto the system, click this link) From the TPP or District Database Maintenance screen, select Update-Code 22H and press <E>. Result: The Point Data screen appears |
- |
|
2 |
Input Location Key fields |
|
|
3 |
Input Feature Data fields and press <F2>. Result: The system updates TRM with the new cattle guard data and displays the message “Transaction completed successfully” |
|
|
4 |
(For instructions to log off the system, click this link) |
- |
Follow these input instructions to delete cattle guards:
|
Step |
Action |
Input |
|---|---|---|
|
1 |
(For instructions to log onto the system, click this link) From the TPP or District Database Maintenance screen, selectUpdate-Code 21H and press <E>. Result: The Point Data screen appears |
- |
|
2 |
Input Location Key fields |
|
|
3 |
Input Feature Data fields and press <F2>. Result: The system retrieves record data from TRM. A prompting message “Press PF2 to confirm or PF 11 to cancel” appears |
|
|
4 |
Repress <F2> to confirm deletion. Result: The system displays the verification message “Transaction completed successfully” and deletes all data records associated with the deleted cattle guards |
OR Press <F11> to cancel deletion. Result: The system takes no action |
|
5 |
(For instructions to log off the system, click this link) |
- |
Follow these input instructions to update cattle guard location:
|
Step |
Action |
Input |
|---|---|---|
|
1 |
(For instructions to log onto the system, click this link) From the TPP or District Database Maintenance screen, select Update-Code 23H and press <E>. Result: The Update Selection Menu appears |
- |
|
2 |
Input an X by Update Attribute Location and press <E>. Result: A prompt message requests the updated feature’s location plus any other required fields the system needs to locate the feature record |
- |
|
3 |
Input Location Key fields and press <E>. Result: The system retrieves record data from TRM. A prompting message “Enter new Reference-Marker location” appears |
|
|
4 |
Input update fields and press <F2>. Result: The system updates the location and the verification message “Transaction completed successfully” appears. The original request for the current location to update displays for another update transaction |
|
|
5 |
(For instructions to log off the system, click this link) |
- |
Follow these input instructions to update cattle guard attributes:
|
Step |
Action |
Input |
|---|---|---|
|
1 |
(For instructions to log onto the system, click this link) From the TPP or District Database Maintenance screen, select Update-Code 23H and press <E>. Result: The Update Selection Menu appears |
- |
|
2 |
Input an X by Update Attribute Elements and press <E>. Result: A prompt message requests the updated attribute’s location plus any other required fields the system needs to locate the feature record |
- |
|
3 |
Input Location Key fields |
|
|
4 |
Input Feature Data fields and press <E>. Result: The system retrieves record data from TRM. A prompting message “Enter Updated Attribute Data” appears |
|
|
5 |
Input update fields and press <F2>. Result: The system updates the feature’s data attributes and the verification message “Transaction completed successfully” appears. The original request for the current attributes to update displays for another update transaction |
Notation (optional) |
|
6 |
(For instructions to log off the system, click this link) |
- |
Anchor: #i1086318
Connectors
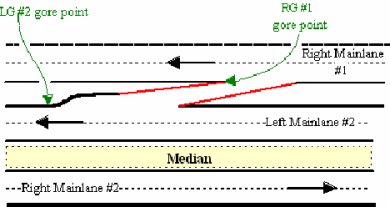
Connectors are roadway segments which join the mainlane roadbed of one route to a mainlane roadbed of another route; measured from the gore point, which is the area immediately beyond the divergence of two roadbeds, bounded by the edges of those roadbeds:
Figure 11-18. Right mainlane #1 connected to left mainlane #2.
Figure 11-19. Measure connectors at gore points for each highway connected.
Follow these input instructions to add connectors:
|
Step |
Action |
Input |
|---|---|---|
|
1 |
(For instructions to log onto the system, click this link) From the TPP or District Database Maintenance screen, select Update-Code 22H and press <E>. Result: The Point Data screen appears |
- |
|
2 |
Input Location Key fields |
|
|
3 |
Input Feature Data fields and press <F2>. Result: The system updates TRM with the new connector data and displays the message "Transaction completed successfully” |
|
|
4 |
(For instructions to log off the system, click this link) |
- |
Follow these input instructions to delete connectors:
|
Step |
Input |
Action |
|---|---|---|
|
1 |
(For instructions to log onto the system, click this link) From the TPP or District Database Maintenance screen, selectUpdate-Code 21H and press <E>. Result: The Point Data screen appears |
- |
|
2 |
Input Location Key fields |
|
|
3 |
Input Feature Data fields and press <F2>. Result: The system retrieves record data from TRM. A prompting message “Press PF2 to confirm or PF 11 to cancel” appears |
|
|
4 |
Repress <F2> to confirm deletion. Result: The system displays the verification message “Transaction completed successfully” and deletes all data records associated with the deleted connectors |
OR Press <F11> to cancel deletion. Result: The system takes no action |
|
5 |
(For instructions to log off the system, click this link) |
- |
Follow these input instructions to update connectors location:
|
Step |
Action |
Input |
|---|---|---|
|
1 |
(For instructions to log onto the system, click this link) From the TPP or District Database Maintenance screens, select Update-Code 23H and press <E>. Result: The Update Selection Menu appears |
- |
|
2 |
Input an X by Update Attribute Location and press <E>. Result: The Point Data screen appears and a prompt message requests the updated feature’s location plus any other required fields the system needs to locate the feature record |
- |
|
3 |
Input Location Key fields and press <E>. Result: The system retrieves record data from TRM. A prompting message “Enter new Reference-Marker location” appears |
|
|
4 |
Input update fields and press <F2>. Result: The system updates the location and the verification message “Transaction completed successfully” appears. The original request for the current location to update displays for another update transaction |
|
|
5 |
(For instructions to log off the system, click this link) |
- |
Follow these input instructions to update connectors attributes:
|
Step |
Action |
Input |
|---|---|---|
|
1 |
(For instructions to log onto the system, click this link) From the TPP or District Database Maintenance screen, select Update-Code 23H and press <E>. Result: The Update Selection Menu appears |
- |
|
2 |
Input an X by Update Attribute Elements and press <E>. Result: A prompt message requests the updated attribute’s location plus any other required fields the system needs to locate the feature record |
- |
|
3 |
Input Location Key fields |
|
|
4 |
Input Feature Data fields and press <E>. Result: The system retrieves record data from TRM. A prompting message “Enter Updated Attribute Data” appears |
|
|
5 |
Input update fields and press <F2>. Result: The system updates the feature’s data attributes and the verification message “Transaction completed successfully” appears. The original request for the current attributes to update displays for another update transaction |
|
|
6 |
(For instructions to log off the system, click this link) |
- |
Anchor: #i1086364
Crossovers
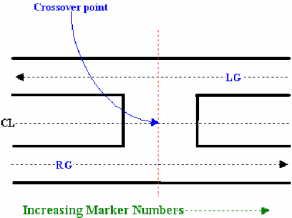
Crossovers are roadways between two roadbeds that allow a change in direction at grade on non-controlled access highways, also known as median openings; the simplest form of an intersection:
Figure 11-20. Measure crossover at NG centerline.
Follow these input instructions to add crossovers:
|
Step |
Action |
Input |
|---|---|---|
|
1 |
(For instructions to log onto the system, click this link) From the TPP or District Database Maintenance screen, selectUpdate-Code 22H and press <E>. Result: The Point Data screen appears |
- |
|
2 |
Input Location Key fields |
|
|
3 |
Input Feature Data fields and press <F2>. Result: The system updates TRM with the new crossover data and displays the message “Transaction completed successfully” |
|
|
4 |
(For instructions to log off the system, click this link) |
- |
Follow these input instructions to delete crossovers:
|
Step |
Action |
Input |
|---|---|---|
|
1 |
(For instructions to log onto the system, click this link) From the TPP or District Database Maintenance screen, select Update-Code 21H and press <E>. Result: The Point Data screen appears |
- |
|
2 |
Input Location Key fields |
|
|
3 |
Input Feature Data fields and press <F2>. Result: The system retrieves record data from TRM. A prompting message “Press PF2 to confirm or PF 11 to cancel” appears |
|
|
4 |
Repress <F2> to confirm deletion. Result: The system displays the verification message “Transaction completed successfully” and deletes all data records associated with the deleted crossovers |
OR Press <F11> to cancel deletion. Result: The system takes no action |
|
5 |
(For instructions to log off the system, click this link) |
- |
Follow these input instructions to update crossover location:
|
Step |
Action |
Input |
|---|---|---|
|
1 |
(For instructions to log onto the system, click this link) From the TPP or District Database Maintenance screen, select Update-Code 23H and press <E>. Result: The Update Selection Menu appears |
- |
|
2 |
Input an X by Update Attribute Location and press <E>. Result: A prompt message requests the updated feature’s location plus any other required fields the system needs to locate the feature record |
- |
|
3 |
Input Location Key fields and press <E>. Result: The system retrieves record data from TRM. A prompting message “Enter new Reference-Marker location” appears |
|
|
4 |
Input update fields and press <F2>. Result: The system updates the location and the verification message “Transaction completed successfully” appears. The original request for the current location to update displays for another update transaction |
|
|
5 |
(For instructions to log off the system, click this link) |
- |
Follow these input instructions to update crossover attributes:
|
Step |
Action |
Input |
|---|---|---|
|
1 |
(For instructions to log onto the system, click this link) From the TPP or District Database Maintenance screen, select Update-Code 23H and press <E>. Result: The Update Selection Menu appears |
- |
|
2 |
Input an X by Update Attribute Elements and press <E>. Result: A prompt message requests the updated attribute’s location plus any other required fields the system needs to locate the feature record |
- |
|
3 |
Input Location Key fields |
|
|
4 |
Input Feature Data fields and press <E>. Result: The system retrieves record data from TRM. A prompting message “Enter Updated Attribute Data” appears |
|
|
5 |
Input update fields and press <F2>. Result: The system updates the feature’s data attributes and the verification message “Transaction completed successfully” appears. The original request for the current attributes to update displays for another update transaction |
Notation (optional) |
|
6 |
(For instructions to log off the system, click this link) |
- |
Anchor: #i1086400
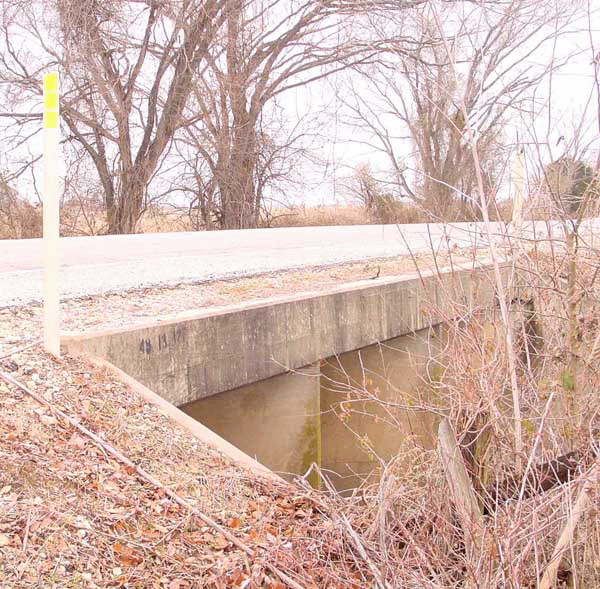
Culverts
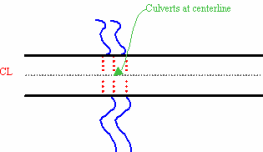
Culverts are any structure under a roadway (less than 20 feet wide), usually for drainage (see Figure 11-22), with a clear opening, measured along the center of the roadway between inside of the end walls:
Figure 11-21. Measure at center of culverts at centerline.
Figure 11-22. Multiple box culvert.
Culvert Fill Depth is the depth of embankment, fill, earth, or base over the top most part of the culvert, measured to the nearest foot.
Follow these input instructions to add culverts:
|
Step |
Action |
Input |
|---|---|---|
|
1 |
(For instructions to log onto the system, click this link) From the TPP or District Database Maintenance screen, selectUpdate-Code 22H and press <E>. Result: The Point Data screen appears |
- |
|
2 |
Input Location Key fields |
|
|
3 |
Input Feature Data fields and press <F2>. Result: The system updates TRM with the new culvert data and displays the message “Transaction completed successfully” |
|
|
4 |
(For instructions to log off the system, click this link) |
- |
Follow these input instructions to delete culverts:
|
Step |
Action |
Input |
|---|---|---|
|
1 |
(For instructions to log onto the system, click this link) From the TPP or District Database Maintenance screen, selectUpdate-Code 21H and press <E>. Result: The Point Data screen appears |
- |
|
2 |
Input Location Key fields |
|
|
3 |
Input Feature Data fields and press <F2>. Result: The system retrieves record data from TRM. A prompting message “Press PF2 to confirm or PF 11 to cancel” appears |
|
|
4 |
Repress <F2> to confirm deletion. Result: The system displays the verification message “Transaction completed successfully” and deletes all data records associated with the deleted culverts |
OR Press <F11> to cancel deletion Result: The system takes no action |
|
5 |
(For instructions to log off the system, click this link) |
- |
Follow these input instructions to update culvert location:
|
Step |
Action |
Input |
|---|---|---|
|
1 |
(For instructions to log onto the system, click this link) From the TPP or District Database Maintenance screen, select Update-Code 23H and press <E>. Result: The Update Selection Menu appears |
- |
|
2 |
Input an X by Update Attribute Location and press <E>. Result: A prompt message requests the updated feature’s location plus any other required fields the system needs to locate the feature record |
- |
|
3 |
Input Location Key fields and press <E>. Result: The system retrieves record data from TRM. A prompting message “Enter new Reference-Marker location” appears |
|
|
4 |
Input Feature Data fields and press <F2>. Result: The system updates the location and the verification message “Transaction completed successfully” appears. The original request for the current location to update displays for another update transaction |
Reference Marker Number and Suffix and/or Reference Marker Sign (+) or (–) and Displacement |
|
5 |
(For instructions to log off the system, click this link) |
- |
Follow these input instructions to update culvert attributes:
|
Step |
Action |
Input |
|---|---|---|
|
1 |
(For instructions to log onto the system, click this link) From the TPP or District Database Maintenance screen, select Update-Code 23H and press <E>. Result: The Update Selection Menu appears |
- |
|
2 |
Input an X by Update Attribute Elements and press <E>. Result: A prompt message requests the updated attribute’s location plus any other required fields the system needs to locate the feature record |
- |
|
3 |
Input Location Key fields |
|
|
4 |
Input Feature Data fields and press <E>. Result: The system retrieves record data from TRM. A prompting message “Enter Updated Attribute Data” appears |
|
|
5 |
Input update fields and press <F2>. Result: The system updates the feature’s data attributes and the verification message “Transaction completed successfully” appears. The original request for the current attributes to update displays for another update transaction |
|
|
6 |
(For instructions to log off the system, click this link) |
- |
Anchor: #i1086453
Gates
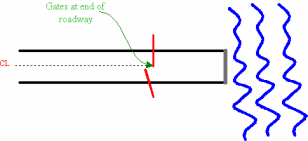
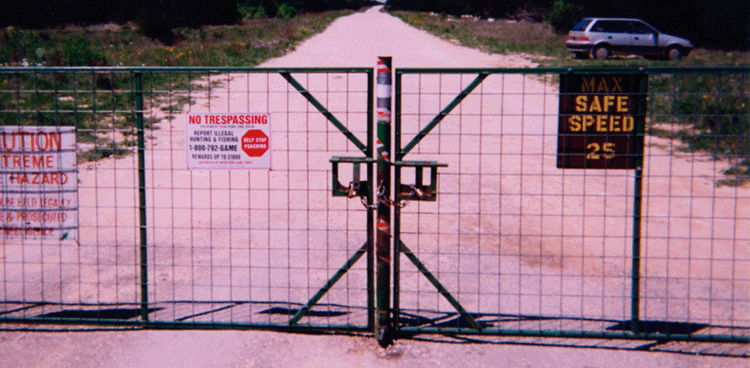
Gates are swinging structures which prevent traffic from entering or exiting the given roadway:
Figure 11-23. Measure where gates cross centerline.
Figure 11-24. Gates across an off-system roadway.
Follow these input instructions to add gates:
|
Step |
Action |
Input |
|---|---|---|
|
1 |
(For instructions to log onto the system, click this link) From the TPP or District Database Maintenance screen, selectUpdate-Code 22H and press <E>. Result: The Point Data screen appears |
- |
|
2 |
Input Location Key fields |
|
|
3 |
Input Feature Data and press <F2>. Result: The system updates TRM with the new gate data and displays the message “Transaction completed successfully” |
|
|
4 |
(For instructions to log off the system, click this link) |
- |
Follow these input instructions to delete gates:
|
Step |
Action |
Input |
|---|---|---|
|
1 |
(For instructions to log onto the system, click this link) From the TPP or District Database Maintenance screen, selectUpdate-Code 21H and press <E>. Result: The Point Data screen appears |
- |
|
2 |
Input Location Key fields |
|
|
3 |
Input Feature Data and press <F2>. Result: The system retrieves record data from TRM. A prompting message “Press PF2 to confirm or PF 11 to cancel” appears |
|
|
4 |
Repress <F2> to confirm deletion. Result: The system appears the verification message “Transaction completed successfully” and deletes all data records associated with the deleted gates |
OR Press <F11> to cancel deletion. Result: The system takes no action |
|
5 |
(For instructions to log off the system, click this link) |
- |
Follow these input instructions to update gate location:
|
Step |
Action |
Input |
|---|---|---|
|
1 |
(For instructions to log onto the system, click this link) From the TPP or District Database Maintenance screen, select Update-Code 23H and press <E>. Result: The Update Selection Menu appears |
- |
|
2 |
Input an X by Update Attribute Location and press <E>. Result: A prompt message requests the updated feature’s location plus any other required fields the system needs to locate the feature record |
- |
|
3 |
Input Location Key fields and press <E>. Result: The system retrieves record data from TRM. A prompting message “Enter new Reference-Marker location” appears |
|
|
4 |
Input update fields and press <F2>. Result: The system updates the location and the verification message “Transaction completed successfully” appears. The original request for the current location to update displays for another update transaction |
|
|
5 |
(For instructions to log off the system, click this link) |
- |
Follow these input instructions to update gate attributes:
|
Step |
Action |
Input |
|---|---|---|
|
1 |
(For instructions to log onto the system, click this link) From the TPP or District Database Maintenance screen, select Update-Code 23H and press <E>. Result: The Update Selection Menu appears |
- |
|
2 |
Input an X by Update Attribute Elements and press <E>. Result: A prompt message requests the updated attribute’s location plus any other required fields the system needs to locate the feature record |
- |
|
3 |
Input Location Key fields |
|
|
4 |
Input Feature Data fields and press <E>. Result: The system retrieves record data from TRM. A prompting message “Enter Updated Attribute Data” appears |
|
|
5 |
Input the update fields and press <F2>. Result: The system updates the feature’s data attributes and the verification message “Transaction completed successfully” appears. The original request for the current attributes to update displays for another update transaction |
Notation (optional) |
|
6 |
(For instructions to log off the system, click this link) |
- |
Anchor: #i1086501
Overhead Signs
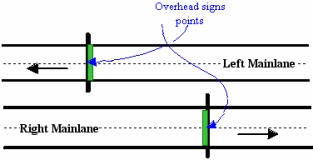
Overhead Signs are highway signs mounted over one or more roadway lanes:
Figure 11-25. Measure overhead signs at centerline.
Figure 11-26. Overhead signs provide information and direction.
Follow these input instructions to add overhead signs:
|
Step |
Action |
Input |
|---|---|---|
|
1 |
(For instructions to log onto the system, click this link) From the TPP or District Database Maintenance screen, select Update-Code 22H and press <E>. Result: The Point Data screen appears |
- |
|
2 |
Input Location Key fields |
|
|
3 |
Input Feature Data fields and press <F2>. Result: The system updates TRM with the new overhead sign data and displays the message “Transaction completed successfully” |
|
|
4 |
(For instructions to log off the system, click this link) |
- |
Follow these input instructions to delete overhead signs:
|
Step |
Action |
Input |
|---|---|---|
|
1 |
(For instructions to log onto the system, click this link) From the TPP or District Database Maintenance screen, select Update-Code 21H and press <E> Results: The Point Data screen appears |
- |
|
2 |
Input Location Key fields |
|
|
3 |
Input Feature Data fields and press <F2>. Result: The system retrieves record data from TRM. A prompting message “Press PF2 to confirm or PF 11 to cancel” appears |
|
|
4 |
Repress <F2> to confirm deletion. Result: The system displays the verification message “Transaction completed successfully” and deletes all data records associated with the deleted overhead signs |
OR Press <F11> to cancel deletion. Result: The system takes no action |
|
5 |
(For instructions to log off the system, click this link) |
- |
Follow these input instructions to update overhead sign location:
|
Step |
Action |
Input |
|---|---|---|
|
1 |
(For instructions to log onto the system, click this link) From the TPP or District Database Maintenance screen, select Update-Code 23H and press <E>. Result: The Update Selection Menu appears |
- |
|
2 |
Input an X by Update Attribute Location and press <E>. Result: A prompt message requests the updated feature’s location plus any other required fields the system needs to locate the feature record |
- |
|
3 |
Input Location Key fields and press <E>. Result: The system retrieves record data from TRM. A prompting message “Enter new Reference-Marker location” appears |
|
|
4 |
Input update fields and press <F2>. Result: The system updates the location and the verification message “Transaction completed successfully” appears. The original request for the current location to update displays for another update transaction |
Reference Marker Number and Suffix and/or Reference Marker Sign (+) or (–) and Displacement |
|
5 |
(For instructions to log off the system, click this link) |
- |
Follow these input instructions to update overhead sign attributes:
|
Step |
Action |
Input |
|---|---|---|
|
1 |
(For instructions to log onto the system, click this link) From the TPP or District Database Maintenance screen, select Update-Code 23H and press <E>. Result: The Update Selection Menu appears |
- |
|
2 |
Input an X by Update Attribute Elements and press <E>. Result: A prompt message requests the updated attribute’s location plus any other required fields the system needs to locate the feature record |
- |
|
3 |
Input Location Key fields |
|
|
4 |
Input Feature Data fields and press <E>. Result: The system retrieves record data from TRM. A prompting message “Enter Updated Attribute Data” appears |
|
|
5 |
Input update fields and press <F2>. Result: The system updates the feature’s data attributes and the verification message “Transaction completed successfully” appears. The original request for the current attributes to update displays for another update transaction |
Notation (optional) |
|
6 |
(For instructions to log off the system, click this link) |
- |
Anchor: #i1086547
Pedestrian Passageways
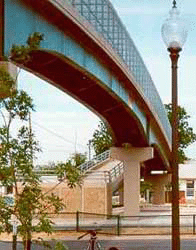
Pedestrian Passageways are walkways which cross either above the roadway (i.e., pedestrian bridges) or below the roadway (i.e., pedestrian tunnels):
Figure 11-27. Measure Pedestrian Passageway at centerline.
Figure 11-28. Pedestrian Bridge in San Angelo District.
Follow these input instructions to add pedestrian passageways:
|
Step |
Action |
Input |
|---|---|---|
|
1 |
(For instructions to log onto the system, click this link) From the TPP or District Database Maintenance screen, select Update-Code 22H and press <E>. Result: The Point Data screen appears |
- |
|
2 |
Enter Location Key fields |
|
|
3 |
Enter Feature Data fields and press <F2>. Result: The system updates TRM with the new pedestrian passageway data and displays the message “Transaction completed successfully” |
|
|
4 |
(For instructions to log off the system, click this link) |
- |
Follow these input instructions to delete pedestrian passageways:
|
Step |
Action |
Input |
|---|---|---|
|
1 |
(For instructions to log onto the system, click this link) From the TPP or District Database Maintenance screen, select Update-Code 21H and press <E>. Result: The Point Data screen appears |
- |
|
2 |
Input Location Key fields |
|
|
3 |
Input Feature Data fields and press <F2>. Result: The system retrieves record data from TRM. A prompting message “Press PF2 to confirm or PF 11 to cancel” appears |
|
|
4 |
Repress <F2> to confirm deletion. Result: The system displays the verification message “Transaction completed successfully” and deletes all data records associated with the deleted pedestrian passageway |
OR Press <F11> to cancel deletion. Result: The system takes no action |
|
5 |
(For instructions to log off the system, click this link) |
- |
Follow these input instructions to update pedestrian passageway location:
|
Step |
Action |
Input |
|---|---|---|
|
1 |
(For instructions to log onto the system, click this link) From the TPP or District Database Maintenance screen, select Update-Code 23H and press <E>. Result: The Update Selection Menu appears |
- |
|
2 |
Input an X by Update Attribute Location and press <E>. Result: A prompt message requests the updated feature’s location plus any other required fields the system needs to locate the feature record |
- |
|
3 |
Input Location Key fields and press <E>. Result: The system retrieves record data from TRM. A prompting message “Enter new Reference-Marker location” appears |
|
|
4 |
Input update fields and press <F2>. Result: The system updates the location and the verification message “Transaction completed successfully” appears. The original request for the current location to update displays for another update transaction |
Reference Marker Number and Suffix and/or Reference Marker Sign (+) or (–) and Displacement |
|
5 |
(For instructions to log off the system, click this link) |
- |
Follow these input instructions to update pedestrian passageway attributes:
|
Step |
Action |
Input |
|---|---|---|
|
1 |
(For instructions to log onto the system, click this link) From the TPP or District Database Maintenance screen, select Update-Code 23H and press <E>. Result: The Update Selection Menu appears |
- |
|
2 |
Input an X by Update Attribute Elements and press <E>. Result: A prompt message requests the updated attribute’s location plus any other required fields the system needs to locate the feature record |
- |
|
3 |
Input Location Key fields |
|
|
4 |
Input Feature Data fields and press <E>. Result: The system retrieves record data from TRM. A prompting message “Enter Updated Attribute Data” appears |
|
|
5 |
Input update fields and press <F2>. Result: The system updates the feature’s data attributes and the verification message “Transaction completed successfully” appears. The original request for the current attributes to update displays for another update transaction |
|
|
6 |
(For instructions to log off the system, click this link) |
- |
Anchor: #i1086593
Pipelines
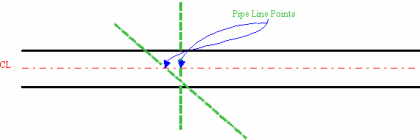
Pipelines are lines of pipe under a roadway, with pumps, valves, and control devices for conveying liquids, gases, or finely divided solids:
Figure 11-29. Estimate where underground pipeline meets centerline of roadway.
Figure 11-30. Pipeline warning sign.
Follow these input instructions to add pipelines:
|
Step |
Action |
Input |
|---|---|---|
|
1 |
(For instructions to log onto the system, click this link) From the TPP or District Database Maintenance screen, select Update-Code 22H and press <E>. Result: The Point Data screen appears |
- |
|
2 |
Input Location Key fields |
|
|
3 |
Input Feature Data fields and press <F2>. Result: The system updates TRM with the new pipeline data and displays the message “Transaction completed successfully” |
|
|
4 |
(For instructions to log off the system, click this link) |
- |
Follow these input instructions to delete pipelines:
|
Step |
Action |
Input |
|---|---|---|
|
1 |
(For instructions to log onto the system, click this link) From the TPP or District Database Maintenance screen, select Update-Code 21H and press <E>. Result: The Point Data screen appears |
- |
|
2 |
Input Location Key fields |
|
|
3 |
Input Feature Data fields and press <F2>. Result: The system retrieves record data from TRM. A prompting message “Press PF2 to confirm or PF 11 to cancel” appears |
|
|
4 |
Repress <F2> to confirm deletion. Result: The system displays the verification message “Transaction completed successfully” and deletes all data records associated with the deleted pipelines |
OR Press <F11> to cancel deletion. Result: The system takes no action |
|
5 |
(For instructions to log off the system, click this link) |
- |
Follow these input instructions to update pipelines location:
|
Step |
Action |
Input |
|---|---|---|
|
1 |
(For instructions to log onto the system, click this link) From the TPP or District Database Maintenance screen, select Update-Code 23H and press <E>. Result: The Update Selection Menu appears |
- |
|
2 |
Input an X by Update Attribute Location and press <E>. Result: A prompt message requests the updated feature’s location plus any other required fields the system needs to locate the feature record |
- |
|
3 |
Input Location Key fields and press <E>. Result: The system retrieves record data from TRM. A prompting message “Enter new Reference-Marker location” appears |
|
|
4 |
Input update fields and press <F2>. Result: The system updates the location and the verification message “Transaction completed successfully” appears. The original request for the current location to update displays for another update transaction |
Reference Marker Number and Suffix and/or Reference Marker Sign (+) or (–) and Displacement |
|
5 |
(For instructions to log off the system, click this link) |
- |
Follow these input instructions to update pipelines attributes:
|
Step |
Action |
Input |
|---|---|---|
|
1 |
(For instructions to log onto the system, click this link) From the TPP or District Database Maintenance screen, select Update-Code 23H and press <E>. Result: The Update Selection Menu appears |
- |
|
2 |
Input an X by Update Attribute Elements and press <E>. Result: A prompt message requests the updated attribute’s location plus any other required fields the system needs to locate the feature record |
- |
|
3 |
Input Location Key fields |
|
|
4 |
Input Feature Data fields and press <E>. Result: The system retrieves record data from TRM. A prompting message “Enter Updated Attribute Data” appears |
|
|
5 |
Input update fields and press <F2>. Result: The system updates the feature’s data attributes and the verification message “Transaction completed successfully” appears. The original request for the current attributes to update displays for another update transaction |
|
|
6 |
(For instructions to log off the system, click this link) |
- |
Anchor: #i1086639
Ramps
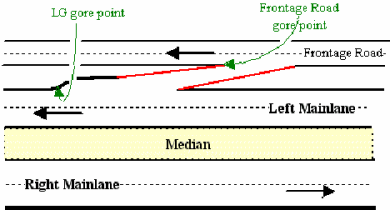
Ramps are interconnecting roadways or traffic interchanges on which vehicles may enter or leave a designated highway, joining mainlane to frontage road or frontage road to mainlane of the same designated highway:
Figure 11-31. Measure gore point for frontage road and mainlane.
Follow these input instructions to add ramps:
|
Action |
Step |
Input |
|---|---|---|
|
1 |
(For instructions to log onto the system, click this link) From the TPP or District Database Maintenance screen, select Update-Code 22H and press <E>. Result: The Point Data screen displays |
- |
|
2 |
Input Location Key fields |
|
|
3 |
Input Feature Data and press <F2>. Result: The system updates TRM with the new ramp data and displays the message “Transaction completed successfully” |
|
|
4 |
(For instructions to log off the system, click this link) |
- |
Follow these input instructions to delete ramps:
|
Step |
Action |
Input |
|---|---|---|
|
1 |
(For instructions to log onto the system, click this link) From the TPP or District Database Maintenance screen, select Update-Code 21H and press <E>. Result: The Point Data screen appears |
- |
|
2 |
Input Location Key fields |
|
|
3 |
Input Feature Data fields and press <F2>. Result: The system retrieves record data from TRM. A prompting message “Press PF2 to confirm or PF 11 to cancel” appears |
|
|
4 |
Repress <F2> to confirm deletion. Result: The system displays the verification message “Transaction completed successfully” and deletes all data records associated with the deleted ramps |
OR Press <F11> to cancel deletion. Result: The system takes no action |
|
5 |
(For instructions to log off the system, click this link) |
- |
Follow these input instructions to update ramp location:
|
Step |
Action |
Input |
|---|---|---|
|
(For instructions to log onto the system, click this link) From the TPP or District Database Maintenance screen, select Update-Code 23H and press <E>. Result: The Update Selection Menu appears |
- |
|
|
Input an X by Update Attribute Location and press <E>. Result: A prompt message requests the updated feature’s location plus any other required fields the system needs to locate the feature record |
- |
|
|
Input Location Key fields and press <E>. Result: The system retrieves record data from TRM. A prompting message “Enter new Reference-Marker location” appears |
|
|
|
Input update fields and press <F2>. Result: The system updates the location and the verification message “Transaction completed successfully” appears. The original request for the current location to update displays for another update transaction |
Reference Marker Number and Suffix and/or Reference Marker Sign (+) or (–) and Displacement |
|
(For instructions to log off the system, click this link) |
- |
Follow these input instructions to update ramp attributes:
|
Step |
Action |
Input |
|---|---|---|
|
1 |
(For instructions to log onto the system, click this link) From the TPP or District Database Maintenance screen, select Update-Code 23H and press <E>. Result: The Update Selection Menu appears |
- |
|
2 |
Input an X by Update Attribute Elements and press <E>. Result: A prompt message requests the updated attribute’s location plus any other required fields the system needs to locate the feature record |
- |
|
3 |
Input Location Key fields |
|
|
4 |
Input Feature Data fields and press <E>. Result: The system retrieves record data from TRM. A prompting message “Enter Updated Attribute Data” appears |
|
|
5 |
Input update fields and press <F2>. Result: The system updates the feature’s data attributes and the verification message “Transaction completed successfully” appears. The original request for the current attributes to update displays for another update transaction |
|
|
6 |
(For instructions to log off the system, click this link) |
- |
Anchor: #i1086675
Streams
Streams are water flows ranging from creeks and rivers to aqueducts. Determine the type by travelling the roadway in ascending reference marker direction:
Figure 11-32. Estimate where the stream crosses the centerline under the roadway.
Follow these input instructions to add streams:
|
Step |
Action |
Input |
|---|---|---|
|
1 |
(For instructions to log onto the system, click this link) From the TPP or District Database Maintenance screen, select Update-Code 22H and press <E>. Result: The Point Data screen appears |
- |
|
2 |
Input Location Key fields |
|
|
3 |
Input Feature Data fields press <F2>. Result: The system updates TRM with the new stream data and displays the message “Transaction completed successfully” |
|
|
4 |
(For instructions to log off the system, click this link) |
- |
Follow these input instructions to delete streams:
|
Step |
Action |
Input |
|---|---|---|
|
1 |
(For instructions to log onto the system, click this link) From the TPP or District Database Maintenance screen, select Update-Code 21H and press <E>. Result: The Point Data screen appears |
- |
|
2 |
Input Location Key fields |
|
|
3 |
Input Feature Data fields and press <F2>. Result: The system retrieves record data from TRM. A prompting message “Press PF2 to confirm or PF 11 to cancel” appears |
|
|
4 |
Repress <F2> to confirm deletion. Result: The system displays the verification message “Transaction completed successfully” and deletes all data records associated with the deleted streams |
OR Press <F11> to cancel deletion. Result: The system takes no action |
|
5 |
(For instructions to log off the system, click this link) |
- |
Follow these input instructions to update streams location:
|
Step |
Action |
Input |
|---|---|---|
|
1 |
(For instructions to log onto the system, click this link) From the TPP or District Database Maintenance screen, select Update-Code 23H and press <E>. Result: The Update Selection Menu appears |
- |
|
2 |
Input an X by Update Attribute Location and press <E>. Result: A prompt message requests the location of the feature(s) being updated plus any other required fields the system needs to locate the feature record |
- |
|
3 |
Input Location Key fields and press <E>. Result: The system retrieves record data from TRM. A prompting message “Enter new Reference-Marker location” appears |
|
|
4 |
Input update fields and press <F2>. Result: The system updates the location and the verification message “Transaction completed successfully” appears. The original request for the current location to update displays for another update transaction |
Reference Marker Number and Suffix and/or Reference Marker Sign (+) or (–) and Displacement |
|
5 |
(For instructions to log off the system, click this link) |
- |
Follow these input instructions to update streams attributes:
|
Step |
Action |
Input |
|---|---|---|
|
1 |
(For instructions to log onto the system, click this link) From the TPP or District Database Maintenance screen, select Update-Code 23H and press <E>. Result: The Update Selection Menu appears |
- |
|
2 |
Input an X by Update Attribute Elements and press <E>. Result: A prompt message requests the location of the attribute(s) being updated plus any other required fields the system needs to locate the feature record |
- |
|
3 |
Input Location Key fields |
|
|
4 |
Input Feature Data fields and press <E>. Result: The system retrieves record data from TRM. A prompting message “Enter Updated Attribute Data” appears |
|
|
5 |
Input update fields and press <F2>. Result: The system updates the feature’s data attributes and the verification message “Transaction completed successfully” appears. The original request for the current attributes to update displays for another update transaction |
|
|
6 |
(For instructions to log off the system, click this link) |
- |
Anchor: #i1086711
Telephone Lines
Telephone Lines are overhead and underground communication lines:
Figure 11-33. Measure telephone lines at centerline.
Follow these input instructions to add telephone lines:
|
Step |
Action |
Input |
|---|---|---|
|
1 |
(For instructions to log onto the system, click this link) From the TPP Database Maintenance Menu, select Update-Code 22H. Result: The Point Data Screen appears |
- |
|
2 |
Input Location Key fields |
|
|
3 |
Input Feature Data fields and press <F2>. Result: The system updates TRM with the new telephone line data and displays the message “Transaction completed successfully” |
|
|
4 |
(For instructions to log off the system, click this link) |
- |
Follow these input instructions to delete telephone lines:
|
Step |
Action |
Input |
|---|---|---|
|
(For instructions to log onto the system, click this link) From the TPP Database Maintenance Menu, select Update-Code 21H. Result: The Point Data screen appears |
- |
|
|
Input Location Key fields |
|
|
|
1 |
Input Feature Data fields and press <F2>. Result: The system retrieves record data from TRM. A prompting message “Press PF2 to confirm or PF 11 to cancel” appears |
|
|
2 |
Repress <F2> to confirm deletion. Result: The system displays the verification message “Transaction completed successfully” and deletes all data records associated with the deleted telephone lines |
OR Press <F11> to cancel deletion. Result: The system takes no action |
|
3 |
(For instructions to log off the system, click this link) |
- |
Follow these input instructions to update telephone lines location:
|
Step |
Action |
Input |
|---|---|---|
|
1 |
(For instructions to log onto the system, click this link) From the TPP Database Maintenance Menu, select Update-Code 23H. Result: The Selection Menu appears |
- |
|
2 |
Input an X by Update Attribute Location and press <E>. Result: The Point Data screen appears and a prompt message requests the updated feature’s location plus any other required fields the system needs to locate the feature record |
- |
|
3 |
Input Location Key fields and press <E>. Result: The system retrieves record data from TRM. A prompting message “Enter new Reference-Marker location” appears |
|
|
4 |
Input update fields and press <F2>. Result: The system updates the location and the verification message “Transaction completed successfully” appears. The original request for the current location to update displays for another update transaction |
|
|
5 |
(For instructions to log off the system, click this link) |
- |
Follow these input instructions to update telephone lines attributes:
|
Step |
Action |
Input |
|---|---|---|
|
1 |
(For instructions to log onto the system, click this link) From the TPP Database Maintenance Menu, select Update-Code 23H. Result: The Update Selection Menu appears |
- |
|
2 |
Input an X by Update Attribute Elements and press <E>. Result: A prompt message requests the updated attribute’s location plus any other required fields the system needs to locate the feature record |
- |
|
3 |
Input Location Key fields |
|
|
4 |
Input Feature Data fields and press <E>. Result: The system retrieves record data from TRM. A prompting message “Enter Updated Attribute Data” appears |
|
|
5 |
Input update fields and press <F2>. Result: The system updates the feature’s data attributes and the verification message “Transaction completed successfully” appears. The original request for the current attributes to update displays for another update transaction |
|
|
6 |
(For instructions to log off the system, click this link) |
- |
Anchor: #i1086747
Transmission Lines
Transmission Lines are overhead and underground power and communication lines:
Figure 11-34. Measure Transmission Lines at centerline.
Figure 11-35. Electrical transmission lines.
Follow these input instructions to add transmission lines:
|
Step |
Action |
Input |
|---|---|---|
|
1 |
(For instructions to log onto the system, click this link) From the TPP or District Database Maintenance screen, select Update-Code 22H and press <E>. Result: The Point Data screen appears |
- - |
|
2 |
Input Location Key fields |
|
|
3 |
Input Feature Data fields and press <F2>. Result: The system updates TRM with the new transmission line data and displays message “Transaction completed successfully” |
|
|
4 |
(For instructions to log off the system, click this link) |
- |
Follow these input instructions to delete transmission lines:
|
Step |
Action |
Input |
|---|---|---|
|
1 |
(For instructions to log onto the system, click this link) From the TPP or District Database Maintenance screen, select Update-Code 21H and press <E>. Result: The Point Data screen appears |
- |
|
2 |
Input Location Key fields |
|
|
3 |
Input Feature Data fields and press <F2>. Result: The system retrieves record data from TRM. A prompting message “Press PF2 to confirm or PF 11 to cancel” appears |
|
|
4 |
Repress <F2> to confirm deletion. Result: The system displays the verification message “Transaction completed successfully” and deletes all data records associated with the deleted transmission lines |
OR Press <F11> to cancel deletion Result: The system takes no action |
|
5 |
(For instructions to log off the system, click this link) |
- |
Follow these input instructions to update transmission lines location:
|
Step |
Action |
Input |
|---|---|---|
|
1 |
(For instructions to log onto the system, click this link) From the TPP or District Database Maintenance screen, select Update-Code 23H and press <E>. Result: The Update Selection Menu displays |
- |
|
2 |
Input an X by Update Attribute Location and press <E>. Result: A prompt message requests the location of the feature(s) being updated plus any other required fields the system needs to locate the feature record |
- |
|
3 |
Input Location Key fields and press <E>. Result: The system retrieves record data from TRM. A prompting message “Enter new Reference-Marker location” appears |
|
|
4 |
Input update fields and press <F2>. Result: The system updates the location and the verification message “Transaction completed successfully” appears. The original request for the current location to update displays for another update transaction |
Reference Marker Number and Suffix and/or Reference Marker Sign (+) or (–) and Displacement |
|
5 |
(For instructions to log off the system, click this link) |
- |
Follow these input instructions to update transmission lines attributes:
|
Step |
Input |
Action |
|---|---|---|
|
1 |
(For instructions to log onto the system, click this link) From the TPP or District Database Maintenance screen, select Update-Code 23H and press <E>. Result: The Update Selection Menu appears |
- |
|
2 |
Input an X by Update Attribute Elements and press <E>. Result: A prompt message requests the location of the attribute(s) being updated plus any other required fields the system needs to locate the feature record |
- |
|
3 |
Input Location Key fields |
|
|
4 |
Input Feature Data fields and press <E>. Result: The system retrieves record data from TRM. A prompting message “Enter Updated Attribute Data” appears |
|
|
5 |
Input update fields and press <F2>. Result: The system updates the feature’s data attributes and the verification message “Transaction completed successfully” appears. The original request for the current attributes to update displays for another update transaction |
|
|
6 |
(For instructions to log off the system, click this link) |
- |
Anchor: #i1086793
Turnarounds
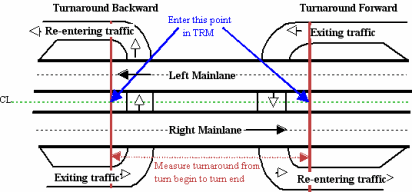
Turnaround Back connects a roadbed, under a structure, whose direction of travel is the increasing reference marker order with a roadbed whose direction of travel is decreasing reference marker order.
Turnaround Forward connects a roadbed, under a structure, whose direction of travel is the decreasing reference marker order with a roadbed whose direction of travel is increasing reference marker order:
Figure 11-36. Measure from beginning turnaround curve to ending turnaround curve at centerline..
Follow these input instructions to add turnarounds:
|
Action |
Step |
Input |
|---|---|---|
|
1 |
(For instructions to log onto the system, click this link) From the TPP or District Database Maintenance screen, selectUpdate-Code 22H and press <E>. Result: The Point Data screen appears |
- |
|
2 |
Input Location Key fields |
|
|
3 |
Input Feature Data fields and press <F2>. Result: The system updates TRM with the new turnaround data and displays the message “Transaction completed successfully” |
|
|
4 |
(For instructions to log off the system, click this link) |
- |
Follow these input instructions to delete turnarounds:
|
Step |
Action |
Input |
|---|---|---|
|
1 |
(For instructions to log onto the system, click this link) From the TPP or District Database Maintenance screen, select Update-Code 21H and press <E>. Result: The Point Data screen appears |
- |
|
2 |
Input Location Key fields |
|
|
3 |
Input Feature Data fields and press <F2>. Result: The system retrieves record data from TRM. A prompting message “Press PF2 to confirm or PF 11 to cancel” appears |
|
|
4 |
Repress <F2> to confirm deletion. Result: The system displays the verification message “Transaction completed successfully” and deletes all data records associated with the deleted turnaround |
OR Press <F11> to cancel deletion. Result: The system takes no action |
|
5 |
(For instructions to log off the system, click this link) |
- |
Follow these input instructions to update turnarounds location:
|
Step |
Action |
Input |
|---|---|---|
|
(For instructions to log onto the system, click this link) From the TPP or District Database Maintenance screen, select Update-Code 23H and press <E> Result: The Update Selection Menu appears |
- |
|
|
1 |
Input an X by Update Attribute Location and press <E>. Result: The Point Data screen appears and a prompt message requests the updated feature’s location plus any other required fields the system needs to locate the feature record |
- |
|
2 |
Input Location Key fields and press <E>. Result: The system retrieves record data from TRM. A prompting message “Enter new Reference-Marker location” appears |
|
|
3 |
Input update fields and press <F2>. Result: The system updates the location and the verification message “Transaction completed successfully” appears. The original request for the current location to update displays for another update transaction |
Reference Marker Number and Suffix of either the begin or end point and/or Reference Marker Sign (+) or (–) and Displacement to either the begin or end point |
|
4 |
(For instructions to log off the system, click this link) |
- |
Follow these input instructions to update turnarounds attributes:
|
Step |
Action |
Input |
|---|---|---|
|
1 |
(For instructions to log onto the system, click this link) From the TPP or District Database Maintenance screen, select Update-Code 23H and press <E>. Result: The Update Selection Menu appears |
- |
|
2 |
Input an X by Update Attribute Elements and press <E>. Result: A prompt message requests the location of the attribute(s) being updated plus any other required fields the system needs to locate the feature record |
- |
|
3 |
Input Location Key fields |
|
|
3 |
Input Feature Data fields and press <E>. Result: The system retrieves record data from TRM. A prompting message “Enter Updated Attribute Data” appears |
|
|
4 |
Input update fields and press <F2>. Result: The system updates the feature’s data attributes and the verification message “Transaction completed successfully” appears. The original request for the current attributes to update displays for another update transaction |
|
|
5 |
(For instructions to log off the system, click this link) |
- |
Anchor: #i1086840
Water Lines
Water Lines are structures carrying water under a roadway:
Figure 11-37. Estimate where water lines cross under roadway centerline.
Follow these input instructions to add water lines:
|
Step |
Action |
Input |
|---|---|---|
|
(For instructions to log onto the system, click this link) From the TPP or District Database Maintenance screen, select Update-Code 22H and press <E>. Result: The Point Data screen appears |
- |
|
|
Input Location Key fields |
|
|
|
Input Feature Data fields and press <F2>. Result: The system updates TRM with the new water line data and displays the message “Transaction completed successfully” |
||
(For instructions to log off the system, click this link) |
- |
Follow these input instructions to delete water lines:
|
Step |
Action |
Input |
|---|---|---|
|
1 |
(For instructions to log onto the system, click this link) From the TPP or District Database Maintenance screen, select Update-Code 21H and press <E> Result: The Point Data screen appears |
- |
|
2 |
Input Location Key fields |
|
|
3 |
Input Feature Data fields and press <F2>. Result: The system retrieves record data from TRM. A prompting message “Press PF2 to confirm or PF 11 to cancel” appears |
|
|
4 |
Repress <F2> to confirm deletion. Result: The system displays the verification message “Transaction completed successfully” and deletes all data records associated with the deleted water lines |
OR Press <F11> to cancel deletion. Result: The system takes no action |
|
5 |
(For instructions to log off the system, click this link) |
- |
Follow these input instructions to update water lines location:
|
Step |
Action |
Input |
|---|---|---|
|
1 |
(For instructions to log onto the system, click this link) From the TPP or District Database Maintenance screen, select Update-Code 23H and press <E>. Result: The Update Selection Menu appears |
- |
|
2 |
Input an X by Update Attribute Location and press <E>. Result: A prompt message requests the updated feature’s location plus any other required fields the system needs to locate the feature record |
- |
|
3 |
Input Location Key fields and press <E>. Result: The system retrieves record data from TRM. A prompting message “Enter new Reference-Marker location” appears |
|
|
4 |
Input update fields and press <F2>. Result: The system updates the location and the verification message “Transaction completed successfully” appears. The original request for the current location to update displays for another update transaction |
|
|
5 |
(For instructions to log off the system, click this link) |
- |
Follow these input instructions to update water lines attributes:
|
Step |
Action |
Input |
|---|---|---|
|
1 |
(For instructions to log onto the system, click this link) From the TPP or District Database Maintenance screen, select Update-Code 23H and press <E>. Result: The Update Selection Menu appears |
- |
|
2 |
Input an X by Update Attribute Elements and press <E>. Result: A prompt message requests the updated attribute’s location plus any other required fields the system needs to locate the feature record |
- |
|
3 |
Input Location Key fields |
|
|
4 |
Input Feature Data fields and press <E>. Result: The system retrieves record data from TRM. A prompting message “Enter Updated Attribute Data” appears |
|
|
5 |
Input update fields and press <F2>. Result: The system updates the feature’s data attributes and the verification message “Transaction completed successfully” appears. The original request for the current attributes to update displays for another update transaction |
|
|
6 |
(For instructions to log off the system, click this link) |
- |

