Section 2: Entry Screen Features
Anchor: #i1018389TRM Data Entry Screens
Using TRM data entry screens, process transactions involving several data exchanges of all attribute values necessary to:
- add data to
- update data
- delete data from
- access data on, or
- report data stored in TRM.
Description of Screen Components
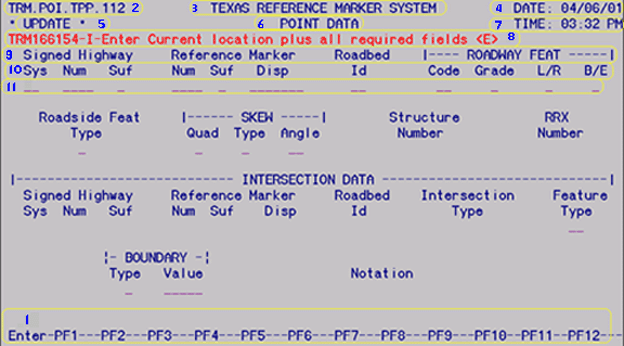
All TRM data entry screens are similar in appearance and system response. Figure 3‑11 shows a data screen with the different parts numbered…
Figure 3-11. Data entry screen 1.
…to correspond with the descriptions in this table:
|
Part |
Description |
|---|---|
|
1 |
Function Key Selections--<Function> Keys plus <E> available on each entry screen. Each key (except for <E>) has a one-word descriptor. The function key does not appear on a screen if it is not available. |
|
2 |
Screen Identifier--a unique identification label for the screen composed of four parts, each separated by a period |
|
3 |
System Title--name given to the system |
|
4 |
Date--in the form MM/DD/YYYY |
|
5 |
Update Function--Delete, Add, or Update |
|
6 |
Screen Label--name given to a specific screen |
|
7 |
Time--in the form HH:MM AP |
|
8 |
Secondary Message Line--for either Information or Prompting messages. |
|
9 |
Column Headers--labels for blocks of Data Element Headers |
|
10 |
Data Element Headers--labels for individual Data Entry Fields |
|
11 |
Data Entry Fields--point of entry for TRM data element values |
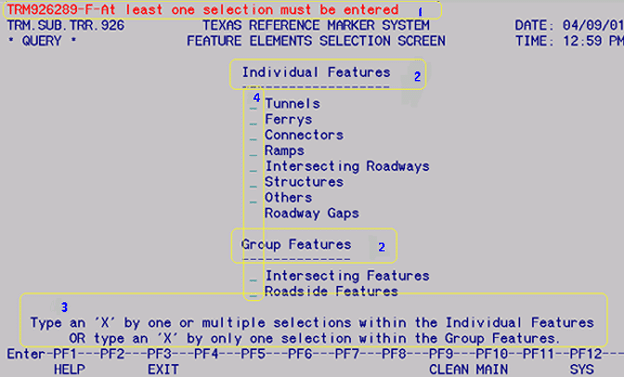
Figure 3-12 shows another data screen with the different parts numbered…
Figure 3-12. Data entry screen 2.
…to correspond with the descriptions in this table:
|
Part |
Description |
|---|---|
|
1 |
Primary Message Line--Used for (F)atal, (W)arning, or (I)nformational messages. |
|
2 |
Choice Descriptions--selections for screens, reports, etc. These have either an alphabet letter or an underscore preceding the description. |
|
3 |
Prompting Message Line--further instructions for entering selections or for pressing <E> or a PF key |
|
4 |
Prompt Entry Field--point of entry for either the letter corresponding to a Choice Descriptor or for an X, depending on the request of the Prompting Message. |
This table lists common screen characteristics:
|
Description |
|---|
|
Cursor automatically tabs to each Data or Prompt Entry field when the previous field is full. |
|
Control key takes the cursor down one row |
|
Numeric elements need not be “zero-padded”. Example: Input ‘02.000’ as ‘2’. |
|
TRM assumes a positive-signed Reference Marker Displacement if you do not input a sign. |
|
Required, optional, and non-applicable entry fields:
Example: Reference Marker Suffix is optional until you assign a suffix value; then it is required.
|
|
Select all Update Functions, Add, Update, or Delete, from a submenu. To change the update mode, you must exit to the appropriate Maintenance Menu. |
Anchor: #i1018471
Function Keys
Use Function Keys to perform a variety of operations, including exiting the system and updating TRM. The keys are a separate row located across the top of the keyboard, called PF, F, or Function keys. Across the bottom of each entry screen appears a list of all function keys available on that screen. If the description for the Function Key appears, the Function Key is available:
Figure 3-13. Function keys at bottom of screen.
All instructions in this manual use the abbreviation <F1> thru <F12> for the function keys:
|
Function Key |
Descriptor |
Description |
|---|---|---|
|
F1 |
HELP |
Screen or field-level help |
|
F2 |
UPD |
Update TRM with new/updated/deleted data |
|
F3 |
EXIT |
Return to previous menu |
|
F7 |
PREV |
Scroll back to the previous screen of data (Query processing only) |
|
F8 |
NEXT |
Scroll forward to the next screen of data (Query processing only) |
|
F9 |
CLEAN |
Clean the screen of all data and error messages |
|
F10 |
MAIN |
Exit to TRM Main Menu |
|
F11 |
CANCL |
Cancel current action |
|
F12 |
SYS |
Exit the TRM system |
Anchor: #i1018495
Negative Conversion Window
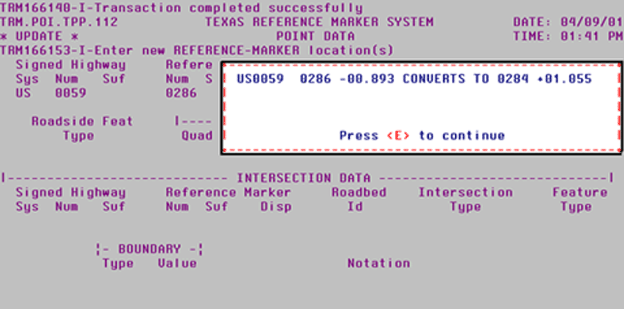
You may input the marker limit using positive or negative displacements. If entering a negative displacement, the negative conversion window appears after you press <F2>. This window shows the location with the equivalent marker number and a positive displacement, by which the data actually stores in TRM. Press <E> to clear the window and continue processing data transactions:
Figure 3-14. The negative conversion window displays the equivalent Reference Marker location with a positive displacement.
Anchor: #i1018519Numeric Entry Fields
Some numeric attributes in TRM have two characteristics: floating decimal and signed entry fields.
The floating decimal feature allows you to input the decimal point of a number anywhere in the entry field. As long as the numeric value entered falls within the range of the format specified for that field, the screen editor accepts the entry. An invalid entry yields an error message.
EXAMPLE: The format of the attribute Off-System Length is 3.3. This means that seven character positions are available for entry into the field:
- Three maximum digits before the decimal
- One position for the decimal point
- Three maximum digits after the decimal.
This table identifies some valid and invalid values entered in the Off-System Length field:
|
Format of Off-System Length Field |
Examples of Valid Entries |
Examples of Invalid Entries |
Reason Entry is Invalid |
|---|---|---|---|
|
123.123 |
101.166 |
1301.16 |
Too many digits before the decimal |
|
- |
2.837 |
2.8337 |
Too many digits after the decimal |
|
- |
.244 |
.2.244 |
Too many decimals |
Input either a positive (+) or negative (–) sign in the signed entry field. If entered, the sign always goes in the first Reference Marker Displacement entry field character position, which is the only signed entry field in TRM. The numeric value then begins in the second character position.
EXAMPLE: The format of Reference Marker Displacement is (±)3.3. Eight character positions are available for entry into this field:
- One for the (+) or (–) sign
- Three maximum digits before the decimal
- One position for the decimal point
- Three maximum digits after the decimal.
This table identifies some valid and invalid uses of the sign entered in the Reference Marker Displacement field:
|
Reference Marker Displacement Format |
Examples of Valid Entries |
Examples of Invalid Entries |
Reason Entry is Invalid |
|---|---|---|---|
|
±123.123 |
–33.166 |
33–.166 |
Sign not in the first character position |
|
- |
+35 |
+ 35 |
Space is within the value |
|
- |
1.833 |
$11.833 |
Symbol is not (+) or (–) |
Anchor: #i1018601
Online Help Facilities
TRM offers online help facilities on all system screens.
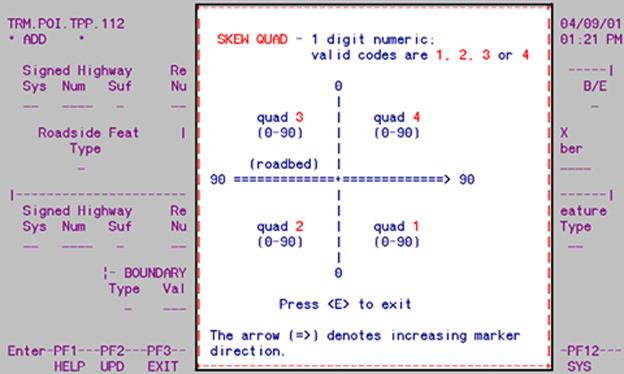
Field Level Help provides assistance for a specific entry field. Place the cursor in the entry field and press <F1>. A pop-up window appears (see Figure 3‑15) with the format of the field plus valid values; most indicate the Offices of Primary Responsibility:
Figure 3-15. Cursor located the in SKEW Quad field.
Press <E> to return to the entry screen.
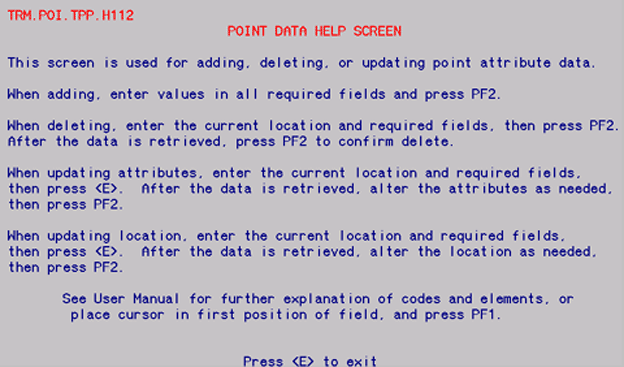
Screen Level Help provides assistance for all entry fields on the screen. Move the cursor off an entry field and press <F1>. A help screen appears (see Figure 3‑16) for all entry fields on that screen. Press <E> to return to the entry screen:
Figure 3-16. The Point Data screen level Help.
