Section 4: TPP/District Feature Input Instructions
Anchor: #i1086083About This Section
The features listed in this section include definitions, descriptions, and input instructions of features for which TPP and the district are responsible.
Anchor: #i1086093Ferries
Ferries are boats that carry persons and things across a channel:
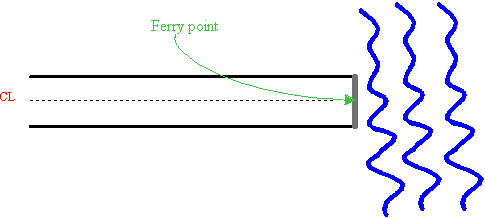
Figure 11-12. Measure ferry where roadway’s centerline meets the dock.
Figure 11-13. Ferry at Bolivar Peninsula.
Follow these input instructions to add ferries:
|
Step |
Action |
Input |
|---|---|---|
|
1 |
(For instructions to log onto the system, click this link) From the TPP or District Database Maintenance screen, select Update-Code 22H and press <E>; the Point Data screen appears |
- |
|
2 |
Input Location Key fields |
|
|
3 |
Input Feature Data fields and press <F2>; the system updates TRM with the new ferry data and displays the message “Transaction completed successfully” |
|
|
4 |
To input other add feature transactions, press <F9> to clean the screen (optional) and repeat the first step To input another Update-Code, press <F3> to exit back to the TPP/District Database Maintenance Menu To exit back to the TRM Main Menu, press <F10> (For instructions to log off the system, click this link) |
- |
Follow these input instructions to delete ferries:
|
Step |
Action |
Input |
|---|---|---|
|
1 |
(For instructions to log onto the system, click this link) From the TPP or District Database Maintenance screen, select Update-Code 21H and press <E>; the Point Data screen appears |
- |
|
2 |
Input Location Key fields |
|
|
3 |
Input Feature Data fields and press <F2>; the system retrieves record data from TRM. A prompting message “Press PF2 to confirm or PF 11 to cancel” appears |
Roadway Feature Value |
|
4 |
Repress <F2> to confirm deletion; the system displays the verification message “Transaction completed successfully” and deletes all data records associated with the deleted ferries |
OR Press <F11> to cancel deletion; the system takes no action |
|
5 |
To input another Update-Code, press <F3> to exit back to the TPP/District Database Maintenance Menu To exit back to the TRM Main Menu, press <F10> (For instructions to log off the system, click this link) |
- |
Follow these input instructions to update ferry location:
|
Step |
Action |
Input |
|---|---|---|
|
1 |
(For instructions to log onto the system, click this link) From the TPP or District Database Maintenance screen, select Update-Code 23H and press <E>; the Update Selection Menu appears |
- |
|
2 |
Input an X by Update Attribute Location and press <E>; the Point Data screen appears and a prompt message requests the updated feature’s location plus any other required fields the system needs to locate the feature record |
- |
|
3 |
Input Location Key fields and press <E>; the system retrieves record data from TRM. A prompting message “Enter new Reference-Marker location” appears |
|
|
4 |
Input update fields and press <F2>; the system updates the location and the verification message “Transaction completed successfully” appears. The original request for the current location to update displays for another update transaction |
|
|
5 |
To select Update Attribute Elements, press <F3> to exit back to the Update Selection menu To input another Update-Code, press <F3> twice to exit back to the TPP/District Database Maintenance Menu To exit back to the TRM Main Menu, press <F10> (For instructions to log off the system, click this link) |
- |
Follow these input instructions to update ferry attributes:
|
Step |
Action |
Input |
|---|---|---|
|
1 |
(For instructions to log onto the system, click this link) From the TPP or District Database Maintenance screen, select Update-Code 23H and press <E>; the Update Selection Menu appears |
- |
|
2 |
Input an X by Update Attribute Elements and press <E>; the Point Data screen appears and a prompt message requests the updated attribute’s location plus any other required fields the system needs to locate the feature record |
- |
|
3 |
Input Location Key fields |
|
|
4 |
Input Feature Data fields and press <E>; the system retrieves record data from TRM. A prompting message “Enter Updated Attribute Data” appears |
Roadway Feature Value |
|
5 |
Input update fields and press <F2>; the system updates the feature’s data attributes and the verification message “Transaction completed successfully” appears. The original request for the current attributes to update displays for another update transaction |
Notation (optional) |
|
6 |
To select Update Attribute Location, press <F3> to exit back to the Update Selection menu To input another Update-Code, press <F3> twice to exit back to the TPP/District Database Maintenance Menu To exit back to the TRM Main Menu, press <F10> (For instructions to log off the system, click this link) |
- |
Anchor: #i1086139
Roadside Features
Roadside Features are physical objects residing on the left or right side of the roadway.
Roadside Feature Type Values indicate the type of feature located off the roadway:
|
Value |
Feature |
Responsibility |
|---|---|---|
|
G |
Traffic monitoring site |
TPP only |
|
A |
Rest area |
TPP/District |
|
B |
Picnic area |
TPP/District |
|
C |
Tourist information |
TPP/District |
|
D |
Scenic overlook |
TPP/District |
|
E |
Litter barrel |
TPP/District |
|
F |
Historical marker |
TPP/District |
|
H |
Test site |
TPP/District |
|
I |
Material stock pile |
TPP/District |
|
J |
TxDOT facility |
TPP/District |
|
K |
Traffic Management Instrumentation |
TPP/District |
|
L |
Structure (structure number required) |
TPP/District |
|
M |
Fire Plugs |
TPP/District |
|
N |
Cemetery |
TPP/District |
|
O |
Toll Booth |
TPP/District |
|
Z |
Other |
TPP/District |
Feature Begin/End indicates the beginning or ending of a roadway feature. Valid values: B (beginning of feature) or E (ending of feature).
Features Left/Right indicates whether a feature is on left or right of a particular roadbed noted in ascending reference marker order. Valid values: L (left of roadbed) or R (right of roadbed). Determine Roadway Feature Left/Right by traveling the roadway in ascending reference marker direction:
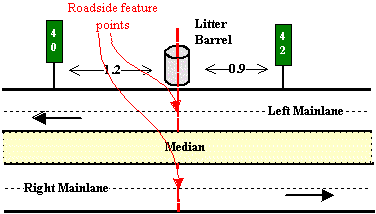
Example: In Figure 11-14, input the litter barrel as either reference marker location 40 + 1.200 or 42 – 0.900. Input Roadway Feature Left/Right as left:
Figure 11-14. Roadside Feature E.
The estimated midpoint of the roadside feature determines the location of the feature.
Example: Input location of littler barrel from estimated midpoint of barrel (see Figure 11‑14)
Follow these input instructions to add roadside features:
|
Step |
Action |
Input |
|---|---|---|
|
1 |
(For instructions to log onto the system, click this link) From the TPP or District Database Maintenance screen, select Update-Code 22H and press <E>; the Point Data screen appears |
- |
|
2 |
Input Location Key fields |
|
|
3 |
Input Feature Data fields and press <F2>; the system updates TRM with the new roadside feature data and displays the message “Transaction completed successfully” |
|
|
4 |
To input other add feature transactions, press <F9> to clean the screen (optional) and repeat the first step To input another Update-Code, press <F3> to exit back to the TPP/District Database Maintenance Menu To exit back to the TRM Main Menu, press <F10> (For instructions to log off the system, click this link) |
- |
Follow these input instructions to delete roadside features:
|
Step |
Action |
Input |
|---|---|---|
|
1 |
(For instructions to log onto the system, click this link) From the TPP or District Database Maintenance screen, select Update-Code 21H and press <E>; the Point Data screen appears |
- |
|
2 |
Input Location Key fields |
|
|
3 |
Input Feature Data fields and press <F2>; the system retrieves record data from TRM. A prompting message “Press PF2 to confirm or PF 11 to cancel” appears |
|
|
4 |
Repress <F2> to confirm deletion; the system displays the verification message “Transaction completed successfully” and deletes all data records associated with the deleted roadside features |
OR Press <F11> to cancel deletion; the system takes no action |
|
5 |
To input another Update-Code, press <F3> to exit back to the TPP/District Database Maintenance Menu To exit back to the TRM Main Menu, press <F10> (For instructions to log off the system, click this link) |
- |
Follow these input instructions to update roadside feature location:
|
Step |
Action |
Input |
|---|---|---|
|
1 |
(For instructions to log onto the system, click this link) From the TPP or District Database Maintenance screen, select Update-Code 23H and press <E>; the Update Selection Menu appears |
- |
|
2 |
Input an X by Update Attribute Location and press <E> The Point Data screen appears and a prompt message requests the updated feature’s location plus any other required fields the system needs to locate the feature record |
- |
|
3 |
Input Location Key fields and press <E> The system retrieves record data from TRM. A prompting message “Enter new Reference-Marker location” appears |
|
|
4 |
Input update fields and press <F2>. The system updates the location and the verification message “Transaction completed successfully” appears. The original request for the current location to update displays for another update transaction |
|
|
5 |
To select Update Attribute Elements, press <F3> to exit back to the Update Selection menu To input another Update-Code, press <F3> twice to exit back to the TPP/District Database Maintenance Menu To exit back to the TRM Main Menu, press <F10> (For instructions to log off the system, click this link) |
- |
Follow these input instructions to update roadside feature attributes:
|
Step |
Action |
Input |
|---|---|---|
|
1 |
(For instructions to log onto the system, click this link) From the TPP or District Database Maintenance screen, select Update-Code 23H and press <E>; the Update Selection Menu appears |
- |
|
2 |
Input an X by Update Attribute Elements and press <E>; the Point Data Screen appears and a prompt message requests the updated attribute’s location plus any other required fields the system needs to locate the feature record |
- |
|
3 |
Input Location Key fields |
|
|
4 |
Input Feature Value fields and press <E>; the system retrieves record data from TRM. A prompting message “Enter Updated Attribute Data” appears |
|
|
5 |
Input update fields and press <F2>; the system updates the feature’s data attributes and the verification message “Transaction completed successfully” appears. The original request for the current attributes to update displays for another update transaction |
|
|
6 |
To select Update Attribute Location, press <F3> to exit back to the Update Selection menu To input another Update-Code, press <F3> twice to exit back to the TPP/District Database Maintenance Menu To exit back to the TRM Main Menu, press <F10> (For instructions to log off the system, click this link) |
- |
Anchor: #i1086206
Tunnels
Tunnels are covered vehicle passageways. TPP adds, updates, and deletes tunnels; District offices update tunnels.
Apply these constraints when inputting tunnels:
|
If… |
Then… |
|---|---|
|
A tunnel exists in TRM at a given marker location on Roadbed N |
You cannot add a tunnel or move one to that same marker location on any other specific mainlane roadbed |
|
A tunnel exists in TRM at a given marker location on any specific mainlane roadbed |
You cannot add or move a tunnel to that same marker location on Roadbed N |
Apply these constraints when inputting tunnels below grade:
|
If the tunnel is below the roadway (Roadway Feature Grade = D) and |
Then: |
|---|---|
|
The mainlane roadbeds share the same structure number |
|
|
The mainlane roadbeds have different structure numbers |
|
Apply these constraints when adding or deleting tunnels:
|
Remember |
This… |
|---|---|
|
Determine the beginning point for a tunnel… |
by traveling the roadway in ascending reference marker direction |
|
Adding a tunnel requires two transactions. |
|
|
Deleting a tunnel requires only one transaction. |
Input either the begin point or the end point of the tunnel to delete the entire tunnel from TRM |
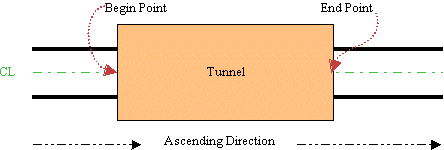
Figure 11-15. Measure tunnel begin and end at centerline.
Follow these input instructions to add tunnels:
|
Step |
Action |
Input |
|---|---|---|
|
1 |
(For instructions to log onto the system, click this link) From the TPP or District Database Maintenance screen, select Update-Code 22H and press <E>; the Point Data screen appears |
- |
|
2 |
Enter Location Key fields |
|
|
3 |
Enter Feature Data and press <F2>; the system updates TRM with the new tunnel data and displays the message “Transaction completed successfully” |
|
|
4 |
To enter other add feature transactions, press <F9> to clean the screen (optional) and repeat the first step To enter another Update-Code, press <F3> to exit back to the TPP/District Database Maintenance Menu To exit back to the TRM Main Menu, press <F10> (For instructions to log off the system, click this link) |
- |
Follow these input instructions to delete tunnels:
|
Step |
Action |
Input |
|---|---|---|
|
1 |
(For instructions to log onto the system, click this link) From the TPP or District Database Maintenance screen, select Update-Code 21H and press <E>; the Point Data screen appears |
- |
|
2 |
Input Location Key fields |
|
|
3 |
Input Feature Data fields and press <F2>; the system retrieves record data from TRM. A prompting message “Press PF2 to confirm or PF 11 to cancel” appears |
Roadway Feature Value |
|
4 |
Repress <F2> to confirm deletion; the system displays the verification message “Transaction completed successfully” and deletes all data records associated with the deleted tunnels |
OR Press <F11> to cancel deletion; the system takes no action |
|
5 |
To input another Update-Code, press <F3> to exit back to the TPP/District Database Maintenance Menu To exit back to the TRM Main Menu, press <F10> (For instructions to log off the system, click this link) |
- |
Follow these input instructions to update tunnel location:
|
Step |
Action |
Input |
|---|---|---|
|
1 |
(For instructions to log onto the system, click this link) From the TPP or District Database Maintenance screen, select Update-Code 23H and press <E>; the Update Selection Menu appears |
- |
|
2 |
Input an X by Update Attribute Location and press <E>; the Point Data screen appears. A prompt message requests the updated feature’s location plus any other required fields the system needs to locate the feature record |
- |
|
3 |
Input Location Key fields and press <E>; the system retrieves record data from TRM. A prompting message “Enter new Reference-Marker location” appears |
|
|
4 |
Input update fields and press <F2>; the system updates the location and the verification message “Transaction completed successfully” appears. The original request for the current location to update displays for another update transaction |
|
|
5 |
To select Update Attribute Elements, press <F3> to exit back to the Update Selection menu To input another Update-Code, press <F3> twice to exit back to the TPP/District Database Maintenance Menu To exit back to the TRM Main Menu, press <F10> (For instructions to log off the system, click this link) |
- |
Follow these input instructions to update tunnel attributes:
|
Step |
Action |
Input |
|---|---|---|
|
1 |
(For instructions to log onto the system, click this link) From the TPP or District Database Maintenance screen, select Update-Code 23H and press <E>; the Update Selection Menu appears |
- |
|
2 |
Input an X by Update Attribute Elements and press <E>; the Point Data screen appears and a prompt message requests the updated attribute’s location plus any other required fields the system needs to locate the feature record |
- |
|
3 |
Input Location Key fields |
|
|
4 |
Input Feature Data fields and press <E>; the system retrieves record data from TRM. A prompting message “Enter Updated Attribute Data” appears |
Roadway Feature Value |
|
5 |
Input update fields and press <F2>; the system updates the feature’s data attributes and the verification message “Transaction completed successfully” appears. The original request for the current attributes to update displays for another update transaction |
Notation (optional) |
|
6 |
To select Update Attribute Location, press <F3> to exit back to the Update Selection menu To input another Update-Code, press <F3> twice to exit back to the TPP/District Database Maintenance Menu To exit back to the TRM Main Menu, press <F10> (For instructions to log off the system, click this link) |
- |


